- Balsamiq Mockups - Home
- Wireframing Basics
- Balsamiq Mockups - Introduction
- Balsamiq Mockups - First Project
- Wireframing in Action
- Balsamiq Mockups - Navigation
- Exporting the Mockups
Balsamiq Mockups - Introduction
Installing Balsamiq
To install Balsamiq, please ensure that you have the following requirements.
For running Balsamiq on your computer, Adobe Air 2.6 needs to run. It works fine on most computers and operating systems. The minimum system requirements for Adobe Air 2.6 are given below −
For Windows
A 2.33GHz or faster x86-compatible processor, or Intel AtomTM 1.6GHz or faster processor for netbook class devices.
Microsoft Windows Server 2008, Windows 7, Windows 8 Classic or Windows 10.
A minimum 512MB of RAM (1GB recommended).
AIR SDK Development Supports Microsoft Windows 7 and above, 64-bit only.
For Mac
- Intel CoreTM Duo 1.83GHz or faster processor.
- Mac OS X v10.7, and above.
- A minimum 512MB of RAM (1GB recommended).
- AIR SDK Development supports Mac OS 10.9 and above, 64bit only.
Reference link - Balsamiq System Requirements
Downloading Balsamiq
We can download Balsamiq from the following link Balsamiq Mockups for Desktop Balsamiq is available on Windows and Mac OS.
User Interface
Once the installation goes through, we should be able to open Balsamiq from our computer. We will see the following screen for the first time when we run Balsamiq.
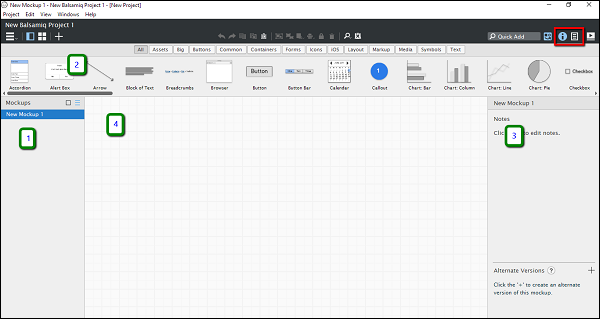
As shown in the above screenshot, the user interface for Balsamiq is divided in the four following parts.
- Navigator
- UI Library
- Inspector
- Wireframe space/Area
In the screenshot, the section highlighted in red is the toggle for the sections Inspector / Project Information. Based on the selection, we should be able to see either the Inspector / the project information section (3).
UI Library
As shown in the following screenshot, the UI Library is categorized as per different screen elements. You can scroll horizontally on All section and get an idea about the screen elements available in Balsamiq.

Let us get acquainted to the different basic screen elements categories available in Balsamiq.
All − This covers all the UI elements present in Balsamiq. You can scroll horizontally to view/use them.
Assets − For the purpose of introduction, these are the custom assets as uploaded by the user.
Big − This category includes the screen elements, which are reasonably high in size/appearance. You can see the elements such as placeholders, browser window, iPad, iPhone in this category.
Buttons − It includes all the button controls used in mobile/web wireframes. A typical example will be action button, checkbox, etc.
Common − These are different shapes/controls used to denote the most common interactions.
Containers − As the name suggests, it is inclusive of the Window, Field Set, Browsers, etc.
Forms − All the UI controls related to a form are present in this category.
Icons − At any given point, you might need to denote a particular operation by an icon. For instance, in the recent past, we have the floppy icon with the Save button. This category of controls will provide you with the icons required for this operation. Balsamiq has a huge collection of icons; feel free to check them!
iOS − The UI controls, specific to Apple iOS mobile operating system, are available under this category.
Layout − When representing a basic page/feature, it becomes important to represent the basic layout. The category layout includes most of them, such as Accordian, Horizontal/Vertical Tabs, etc.
Markup − Suppose you want to add a comment on a particular control in the wireframe. The comment box is available in the markup. In addition, callouts are used to show interconnectivity in many of the scenarios. It is available under the Markup Category.
Media − When it comes to showing an image/sound in our wireframe, related UI controls are available under the Media category.
Symbols − The symbols are reusable components, which can reduce the time to create the most common elements.
Text − As the name goes, all the UI controls related to text or paragraphs, such as Link Bar, Block of Text, Combo Box is available under this category.
In the next chapter, we will make the first project in Balsamiq.