- ASP.NET WP - Home
- ASP.NET WP - Overview
- ASP.NET WP - Environment Setup
- ASP.NET WP - Getting Started
- ASP.NET WP - View Engines
- Project Folder Structure
- ASP.NET WP - Global Pages
- ASP.NET WP - Programming Concepts
- ASP.NET WP - Layouts
- ASP.NET WP - Working with Forms
- ASP.NET WP - Page Object Model
- ASP.NET WP - Database
- ASP.NET WP - Add Data to Database
- ASP.NET WP - Edit Database Data
- ASP.NET WP - Delete Database Data
- ASP.NET WP - WebGrid
- ASP.NET WP - Charts
- ASP.NET WP - Working with Files
- ASP.NET WP - Working with Images
- ASP.NET WP - Working with Videos
- ASP.NET WP - Add Email
- ASP.NET WP - Add Search
- Add Social Networking to the Website
- ASP.NET WP - Caching
- ASP.NET WP - Security
- ASP.NET WP - Publish
ASP.NET WP - Quick Guide
ASP.NET WP - Overview
This tutorial will give you a fair idea of how to get started with ASP.NET Web Pages. Microsoft ASP.NET Web Pages is a free Web development technology that is designed to deliver the world's best experience for Web Developers who are making websites for the Internet. The main goal is that after completing this tutorial, you will have a better understanding of what ASP.NET Web Pages is, why we need them and of course how to add ASP.NET Web Pages to your project.
What is ASP.NET Web Pages?
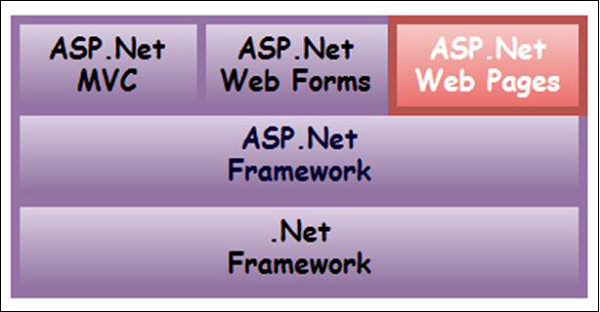
ASP.NET Web Pages is a simplified framework that we can use to build ASP.NET content quickly and easily. It is one of the three programming models for creating ASP.NET web sites and web applications. The other two programming models are Web Forms and MVC.
ASP.NET Web Pages is a framework that you can use to create dynamic web pages.
A simple HTML web page is static and its content is determined by the fixed HTML markup that's in the page, while with dynamic pages you can create the page content on the fly by using code.
It provides an easy way to combine HTML, CSS, JavaScript and server code.
With dynamic pages you can do many things like −
Ask a user for making an input by using a form and then change what the page displays or how it looks.
Take the information from a user, save it in a database, and then list it later.
Send an email from your site.
Interact with other services on the web.
The ASP.NET Web Pages support the ability to run websites side by side. This lets you to continue to run your older ASP.NET Web Pages applications, build new ASP.NET Web Pages applications, and run all of them on the same computer.
What Should You Know?
In this tutorial, we are assuming that you are interested in learning basic programming.
The ASP.NET Web Pages use C# and Visual Basic programming languages. In this tutorial, we will use C# as a programming language.
No prior experience in programming required.
If you have ever written any JavaScript in a web page before then it is more than enough to understand this tutorial.
What Do You Need?
To start the ASP.NET Web Pages development, you will need the following −
A computer/laptop that is running Windows 10, Windows 8, Windows 7, Windows Server 2008, or Windows Server 2012.
A live internet connection.
Administrator privileges which is required just for the installation.
ASP.NET WP - Environment Setup
You can start ASP.NET Web Pages development using any one of the following tools −
- WebMatrix
- Visual Studio
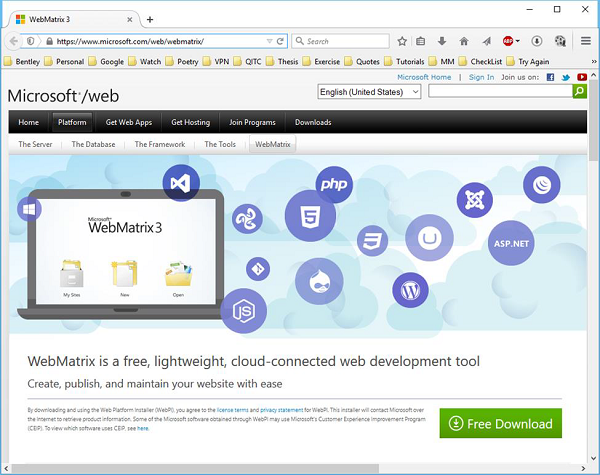
WebMatrix
WebMatrix is a free, lightweight, easy to install and easy to use set of web development tools that provides the easiest way to build websites. It is a tool that integrates a web page editor, a database utility, a web server for testing pages, and features for publishing your website to the Internet.
It includes IIS Express which is a development web server, ASP.NET and SQL Server Compact, which is an embedded database.
The web pages that you create using WebMatrix can be dynamic.
To program dynamic Web pages, you can use ASP.NET with the Razor syntax and with the C# or Visual Basic programming languages.
If you already have programming tools that you like, you can try the WebMatrix tools or you can use your own tools to create websites that use ASP.NET such as Visual Studio.
WebMatrix Installation
You can install the WebMatrix from the following link − https://www.microsoft.com/web/webmatrix/
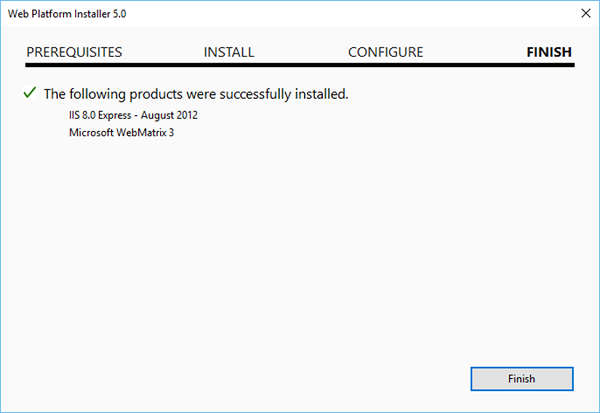
Download the WebMatrix and double click on the WebMatrixWeb.exe and it will start the Microsoft Web Platform Installer.
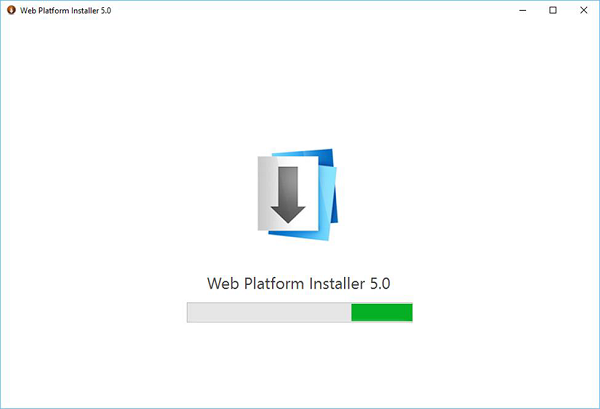
The Web Platform Installer appears, and now it is ready to install WebMatrix.
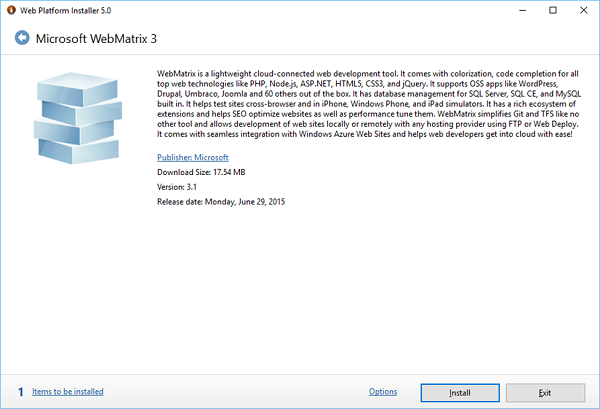
Click Install button to start the WebMatrix installation.
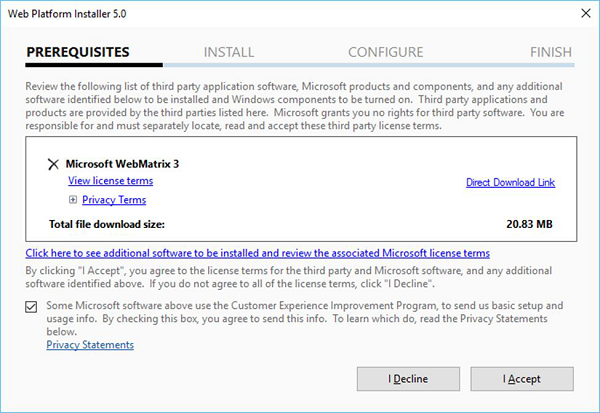
Click I Accept to continue the installation.
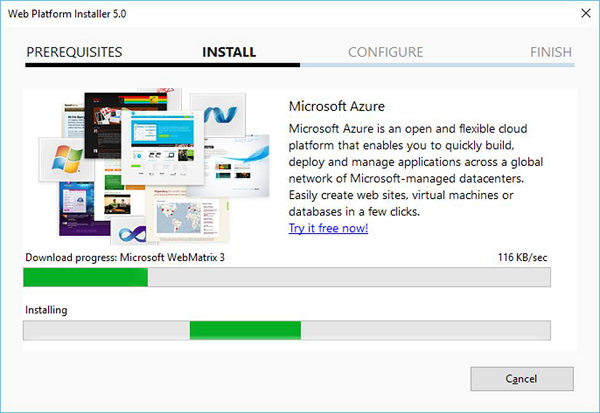
Once the installation is completed, you will see the following message.
Visual Studio Installation
Microsoft provides a free version of Visual Studio that also contains SQL Server and it can be downloaded from https://www.visualstudio.com/en-us/downloads/download-visual-studio-vs.aspx
Step 1 − Once downloading is completed, run the installer. It will display the following dialog.
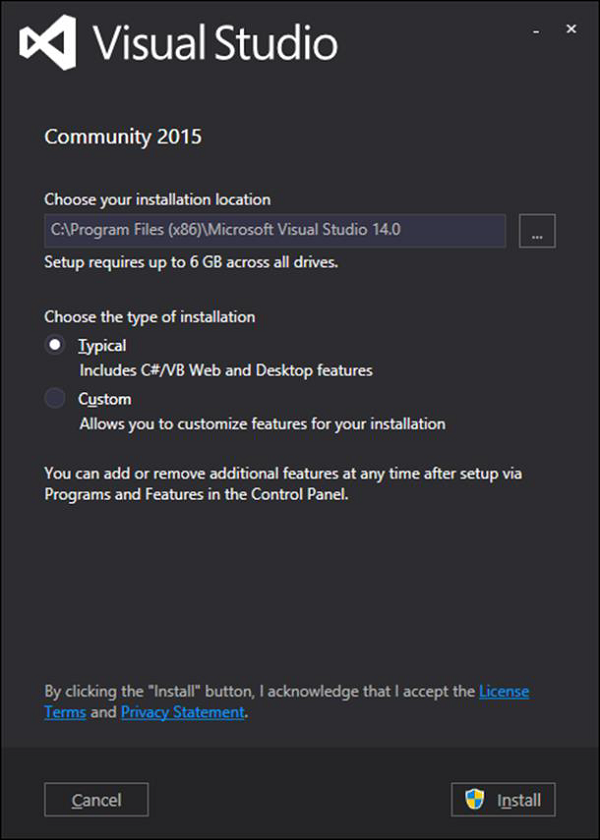
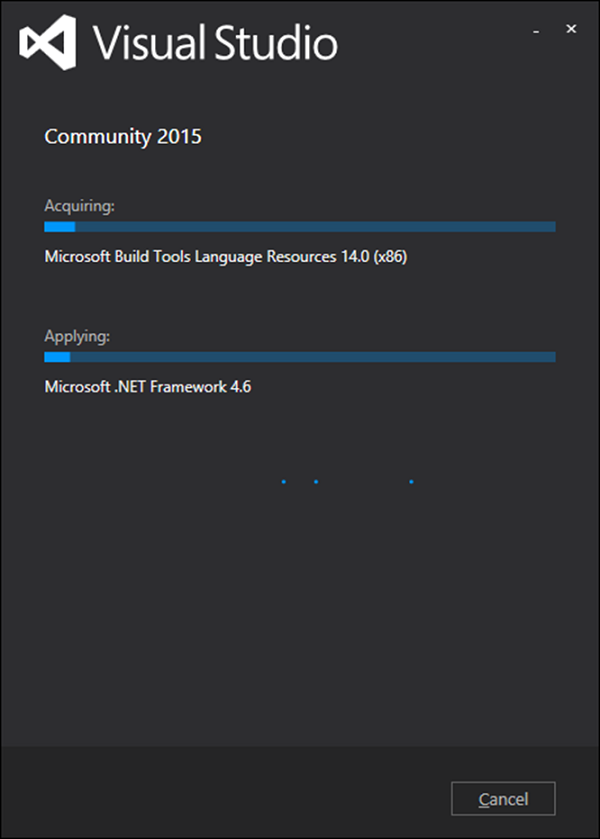
Step 2 − Click Install and it will start installation process.
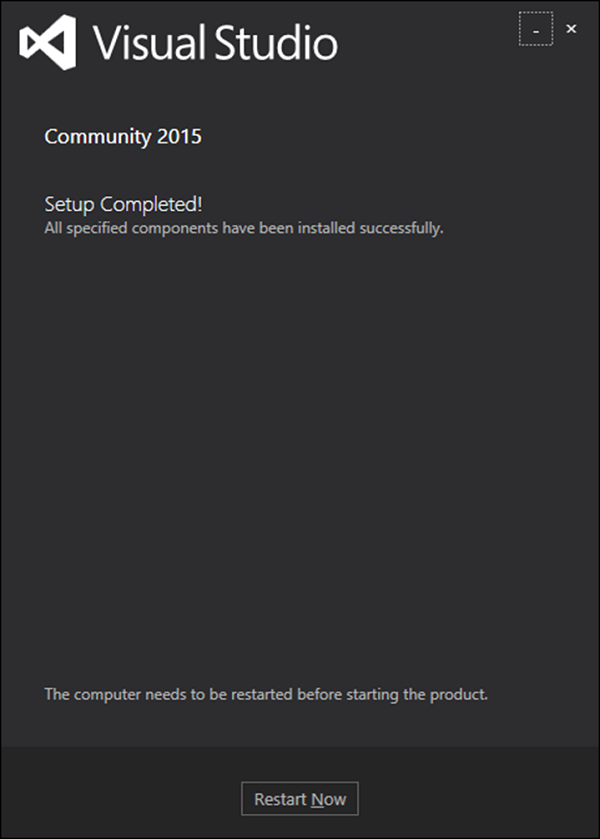
Step 3 − Once the installation process is completed successfully you will see the following dialog.
Step 4 − Close this dialog and restart your computer if required.
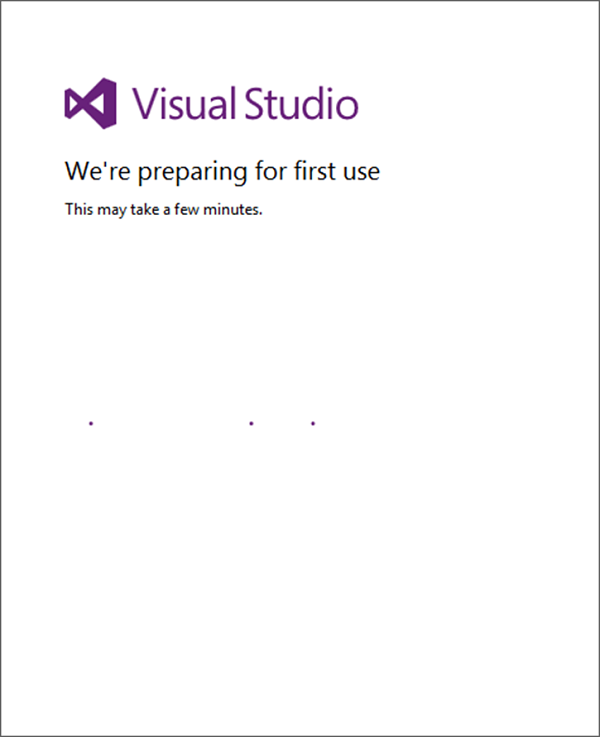
Step 5 − Now open Visual studio from the Start Menu, which will open a below dialog and it will take some time to open for the first time for preparation as shown in the following screenshot.
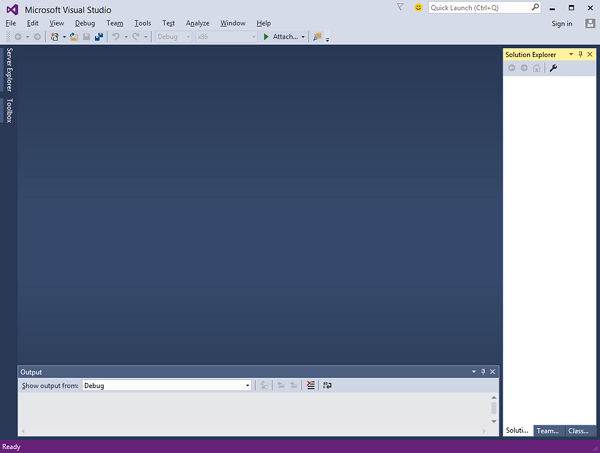
Step 6 − Once all this is done, you will see the main window of Visual studio.
You can now start ASP.NET Web Pages development.
ASP.NET WP - Getting Started
In this chapter, we will look at how to start a simple example using ASP.NET Web Pages. To begin with, we will create a new website and a simple web page.
How to Create a Blank Website?
To start with, launch Microsoft WebMatrix which we have installed in the previous chapter.
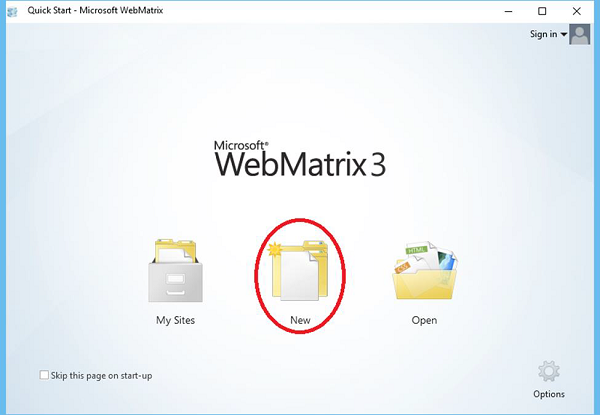
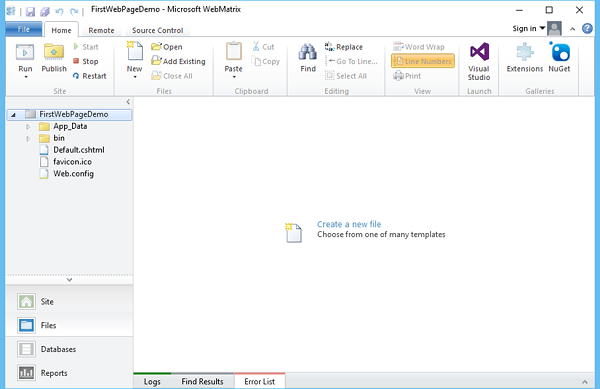
We will create a blank site and then and add a page. To start with, click New and it will display the built-in templates.
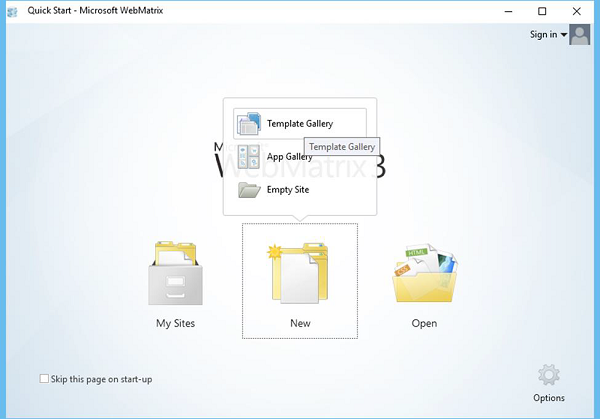
Templates are pre-built files and pages for different types of websites. To see all of the templates that are available by default, select the Template Gallery option.
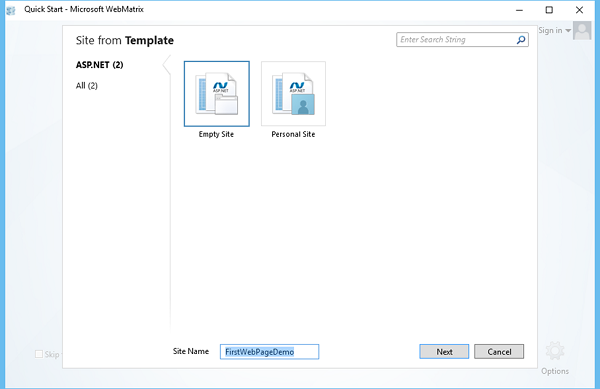
Select the Empty Site template and enter the Site Name. In this case, we have entered FirstWebPageDemo as the Site Name and then we have to click Next.
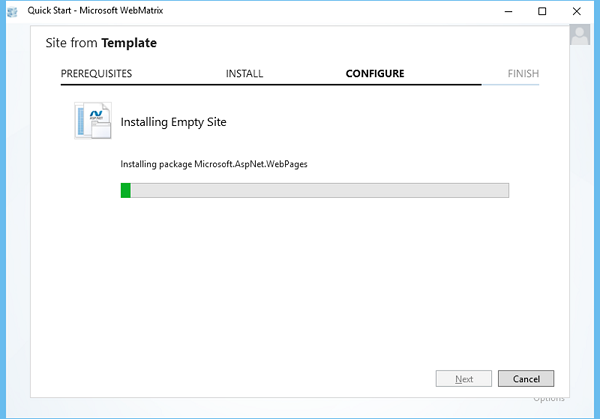
It will install the required packages. Once the installation is finished, WebMatrix creates and opens the site as shown in the following screenshot.
Create an ASP.NET Web Page
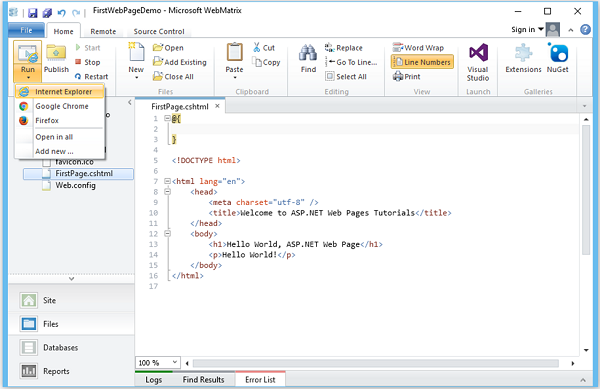
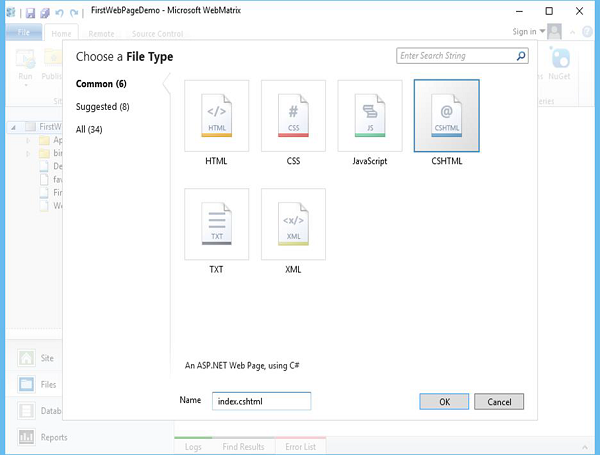
Now to understand and become familiar with WebMatrix and ASP.NET Web Pages, lets create a simple web page by clicking New in the Home tab.
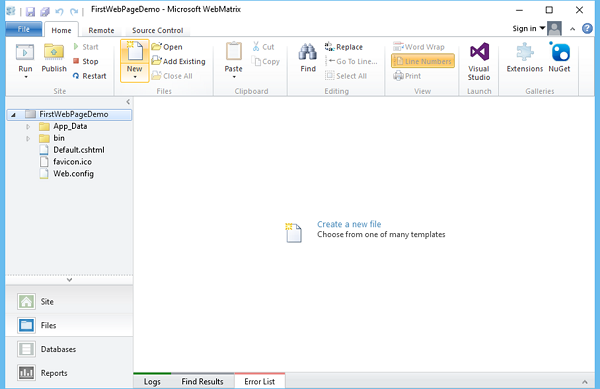
WebMatrix displays a list of file types as shown in the following screenshot.
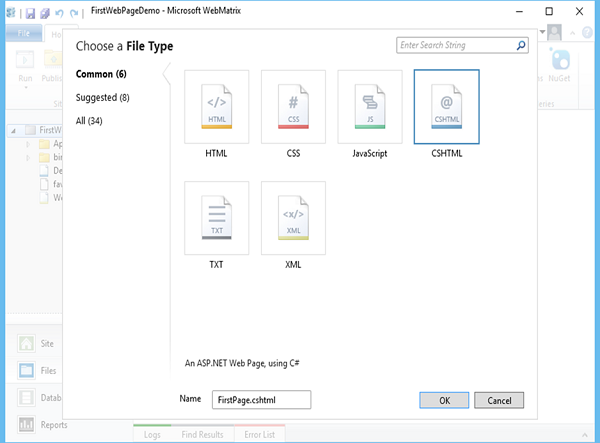
Select CSHTML, and in the Name box, enter FirstPage.cshtml and click Ok.
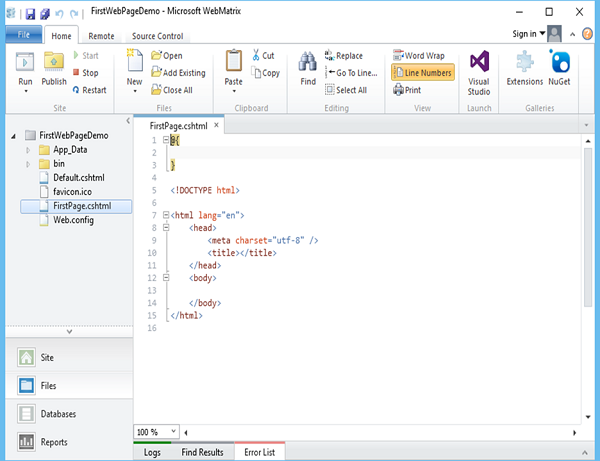
Now you can see that WebMatrix has created the page and opens it in the editor.
Let us first update the FirstPage.cshtml page as shown in the following program.
@{ }
<!DOCTYPE html>
<html lang = "en">

   <head>
      <meta charset = "utf-8" />
      <title>Welcome to ASP.NET Web Pages Tutorials</title>
   </head>

   <body>
      <h1>Hello World, ASP.NET Web Page</h1>
      <p>Hello World!</p>
   </body>

</html>
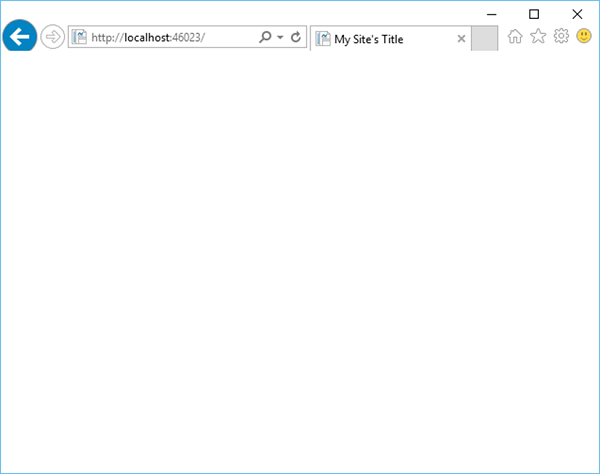
Now to test this web page, lets select the arrow which is below the Run option on the Home tab and select Internet Explorer as shown in the following screenshot.
Now you will see the following empty web page.
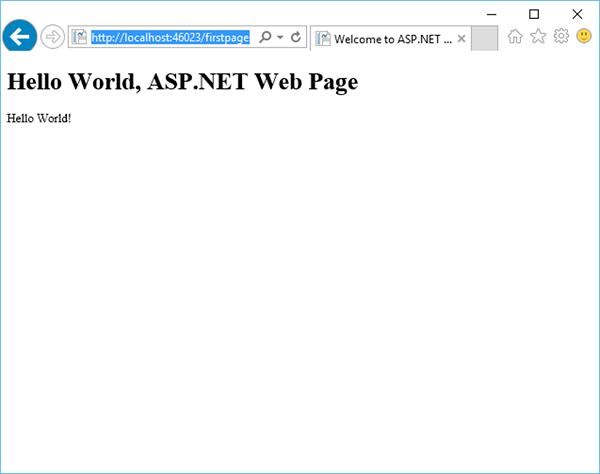
Now lets specify the following url − http://localhost:46023/firstpage in the browser and you will see the following output.
ASP.NET WP - View Engines
The View Engine in ASP.NET is used to translate our views to HTML and then render them to the browser. By default, ASP.Net supports ASPX and the Razor View Engine. The view engine templates have a different syntax than the implementation. In this chapter, we will discuss the two most important view engines which are −
ASPX View Engine also known as Web Form View Engine and
Razor View Engine
There are many more third-party view engines, like Spark, Nhaml, etc.
ASPX View Engine
ASPX or Web Form Engine is the default view engine for ASP.NET that is included with ASP.NET MVC from the beginning itself.
The syntax used for writing a view with the ASPX View Engine is the same as the syntax used in the ASP.NET web forms.
The file extensions are also the same as for ASP.NET web forms (like .aspx, .ascx, .master).
ASPX uses "<% = %>" or "<% : %>" to render server-side content.
The namespace for Webform Engine is System.Web.Mvc.WebFormViewEngine.
ASPX View Engine does nothing to avoid Cross-Site Scripting attacks by default.
ASPX View Engine is comparatively faster than Razor View Engine.
Razor View Engine
Razor Engine is an advanced view engine that was introduced with MVC3. It is not a new language, but it is a new markup syntax.
The Razor syntax is based on the C# programming language.
The Razor syntax also supports the Visual Basic language, and everything that we will do using C#, you can do all of that in Visual Basic as well.
The namespace for Razor Engine is System.Web.Razor.
Razor uses the "@" character instead of "<% %>" as used by the ASPX View Engine.
The Razor file extension is "cshtml" for the C# language.
By default, Razor View Engine encodes html tags or scripts before its being rendered to view that avoids Cross-Site Scripting attacks.
Razor View Engine is slow as compared to ASPX View Engine.
Syntax Differences
To understand the syntax difference, lets have a look into a simple example that is written in both ASPX and Razor view engines. Following is the code snippet for ASPX view engine.
<%foreach (var student in Students){ %>

   <% if (student.IsPassed){ %>
      <% = student.FirstName%> is going to next grade.
   <% } else{ %>
      <% = student. FirstName %> is not going to next grade.
   <% } %>

<% } %>
Following is the same example code written in Razor View engine.
@foreach (var student in Students){
   @if(student.IsPassed){
      @student. FirstName is going to next grade.
   } else {
      @student. FirstName is not going to next grade.
   }
}
If you look at both the above code snippets written in ASPX and Razor syntax, then you can see quite clearly that Razor syntax is clean and simpler as compared to the ASPX syntax. One of the disadvantages of Razor is, it is not supported by visual editors like Dream Viewer.
ASP.NET WP - Project Folder Structure
In this chapter, we will cover the project folder structure that is convenient for any ASP.NET application. To make it easier to work with your application, ASP.NET reserves certain file and folder names that you can use for specific types of content.
How to Create a new Project in WebMatrix?
To understand the project folder structure, lets create a new Project in WebMatrix.
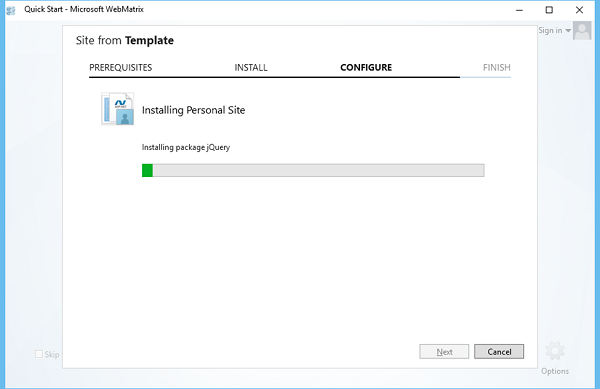
To start with, click on the New icon in the Quick Start dialog.

Select the Personal Site from the template and enter DemoSite in the Site Name and click Next as shown in the following screenshot.

The personal site packages will be installed as shown in the following screenshot.
Once all the packages are installed and the project is created, you will see the following folder structure.
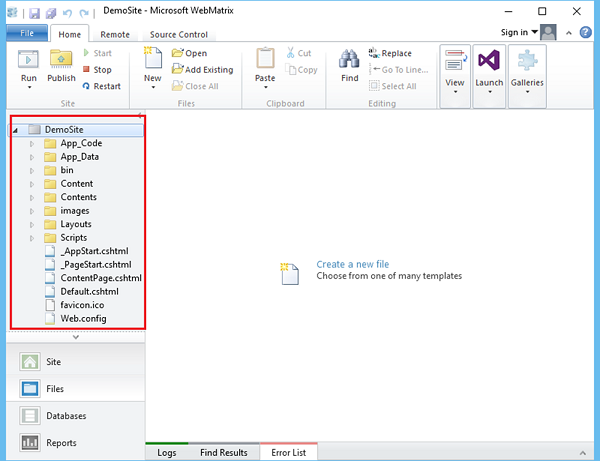
As you can see in the folder structure under the DemoSite there are subfolders like App_Code, App_Data etc.
Folders in WebMatrix
The most important folders that are created by default are explained in detail.
App_Code
This folder contains the source code for shared classes and business objects that you want to compile as a part of your application.

In a dynamically compiled Web site project, these classes are compiled on initial request to your application. All the classes/items are then recompiled when any changes are detected in this folder.
App_Data
The App_Data folder contains application data files including .mdf database files, XML files, and other data store files. This folder is used by ASP.NET to store an application's local database, such as the database for maintaining membership and role information
It also includes the package folder which contains different packages that are a part of your application like Razor package or Web Pages package etc.
Bin
The Bin folder contains compiled assemblies such as .dlls for controls, components, or other code that you want to reference in your application like Razor, Web Pages dlls.
Any classes represented by the code in the Bin folder are automatically referenced in your application.
Content
The Content folder contains different resources like images and style sheets files such as css, png and gif files
These files also define the appearance of ASP.NET Web Pages and controls.
Contents
The Contents folder contains the main web pages such as ASPX or cshtml files.

Similarly, you can see the images folder which contains images used in the website. The Layouts folder contains the layout files and the Scripts folder contains the JavaScript files.
ASP.NET WP - Global Pages
In this chapter, we will be covering the global pages like _AppStart.cshtml and _PageStart.cshtml, which are not mentioned often, and when they are, it seems to be mentioned as a part of WebMatrix / ASP.Net Web Pages.
_AppStart
The _AppStart.cshtml is executed once when the application first starts. In the root folder of your website, you will see a _AppStart.cshtml file, which is a special file that is used to contain global settings.
It's an official part of the Web Pages framework which is what the Razor View Engine is based on.
The _AppStart in the root folder have a startup code that is executed before the site starts.
The _AppStart has an underscore prefix, because of this, the files cannot be browsed directly.
If this page exists, ASP.NET runs it the first time before any other page in the site is requested.
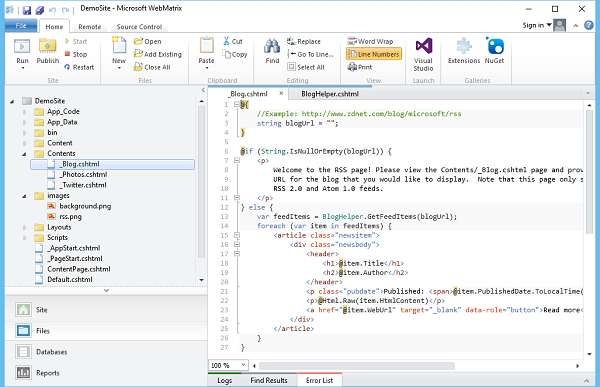
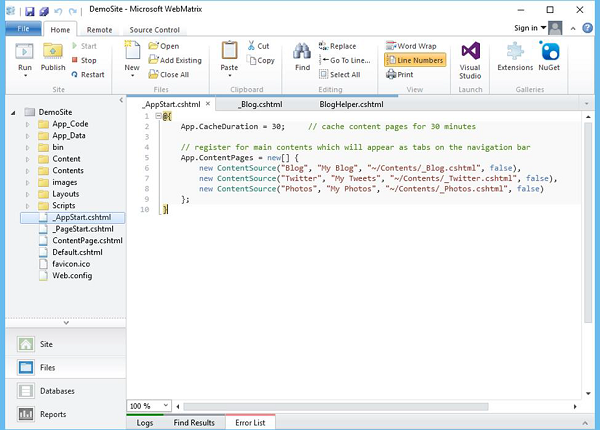
Lets have a look into the AppStart.cshtml file
@{
   App.CacheDuration = 30;
   // cache content pages for 30 minutes
   // register for main contents which will appear as tabs on the navigation bar
   App.ContentPages = new[] {
      new ContentSource("Blog", "My Blog", "~/Contents/_Blog.cshtml", false),
      new ContentSource("Twitter", "My Tweets", "~/Contents/_Twitter.cshtml", false),
      new ContentSource("Photos", "My Photos", "~/Contents/_Photos.cshtml", false)
   };
}
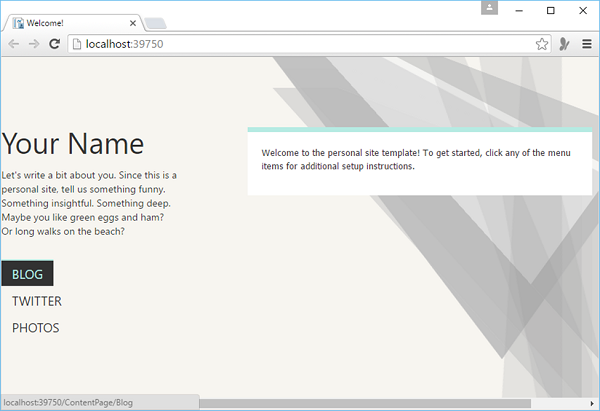
As you can see that the contents of three pages − blog, twitter and photos will be displayed as tabs in the navigation bar when you run this application as shown in the following screenshot.
_PageStart
Similar to _AppStart, which runs before your site starts, you can also write a code that runs before any other page. For each folder in your web, you can add a file named _PageStart.
The _PageStart.cshtml executes every time a page in the same or lower level folder is requested.
It is the place for performing per-request processing, such as setting layout pages.

Work Flow
When a request comes in for a page, and if this is the first request for any page in the site, ASP.NET first checks whether a _AppStart.cshtml page exists. If an _AppStart.cshtml page exists, then any code in the _AppStart.cshtml page runs first, and then the requested page will run.
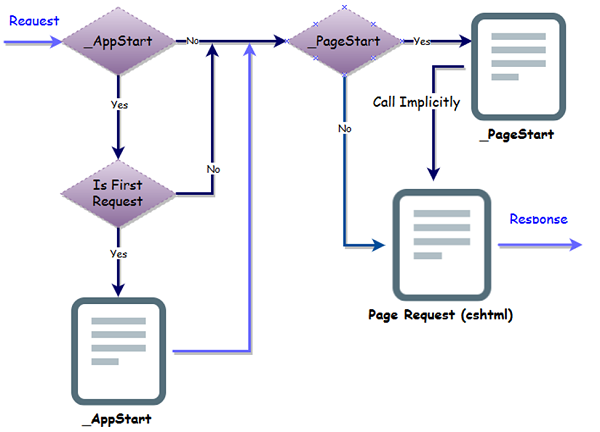
When a request comes in for a page, ASP.NET first checks whether there is a _PageStart.cshtml page, and if so, runs that and then runs the requested page.
ASP.NET WP - Programming Concepts
In this chapter, we will cover programming concepts with ASP.NET Web Pages using the Razor Syntax. ASP.NET is Microsoft's technology for running dynamic web pages on web servers.
The main aim of this chapter is to make you will familiar with programming syntax which you will use for ASP.NET Web Pages.
You will also learn about Razor syntax and code that is written in the C# programming language.
We have already seen this syntax in the previous chapters, but in this chapter, we will explain the syntax in detail.
What is Razor
The Razor Syntax is an ASP.NET programming syntax used to create dynamic web pages with the C# or Visual Basic .NET programming languages. This Razor Syntax was in development since June 2010 and was released for Microsoft Visual Studio 2010 in January 2011.
Razor is a markup syntax for adding server-based code to web pages.
Razor has the power of traditional ASP.NET markup, but is easier to learn, and easier to use.
Razor is a server side markup syntax much like ASP and PHP.
Razor supports C# and Visual Basic programming languages.
Basic Razor Syntax
The Razor Syntax is based on ASP.NET and designed for creating web applications. It has the power of traditional ASP.NET markup, but is easier to use, and easier to learn.
Razor code blocks are enclosed in @{...}
Inline expressions (variables and functions) start with @
Code statements end with semicolon (;)
Variables are declared with the var keyword
Strings are enclosed with quotation marks
C# code is case sensitive
C# files have the extension .cshtml
Lets have a look at the following example −
<!-- Single statement blocks -->
@{
var total = 7;
}
@{
var myMessage = "Hello World";
}
<!-- Inline expressions -->
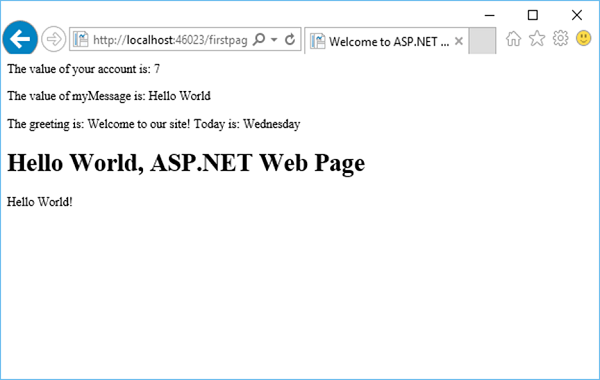
<p>The value of your account is: @total </p>
<p>The value of myMessage is: @myMessage</p>
<!-- Multi-statement block -->
@{
var greeting = "Welcome to our site!";
var weekDay = DateTime.Now.DayOfWeek;
var greetingMessage = greeting + " Today is: " + weekDay;
}
<p>The greeting is: @greetingMessage</p>
<!DOCTYPE html>
<html lang = "en">
<head>
<meta charset = "utf-8" />
<title>Welcome to ASP.NET Web Pages Tutorials</title>
</head>
<body>
<h1>Hello World, ASP.NET Web Page</h1>
<p>Hello World!</p>
</body>
</html>
As you can see in the above example that inside a code block each complete code statement must end with a semicolon. Inline expressions do not end with a semicolon.
Lets run your application and specify the following url http://localhost:46023/firstpage in the browser and you will see the following output.
Variables to Store Data
You can store values in a variable, including strings, numbers, and dates, etc. You create a new variable using the var keyword. You can insert variable values directly in a page using @. Lets have a look at another simple example in which we will store the data in another variable.
<!-- Storing a string -->
@{
var welcomeMessage = "Welcome to ASP.NET Web Pages!";
}
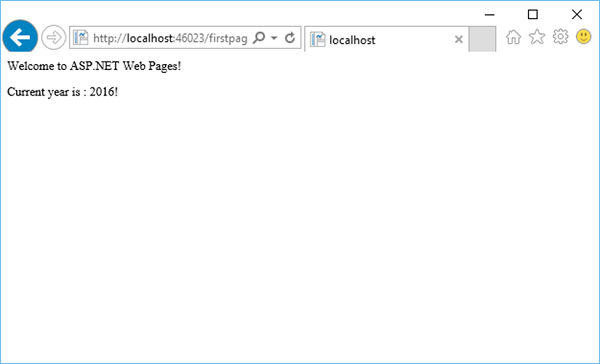
<p>@welcomeMessage</p>
<!-- Storing a date -->
@{
var year = DateTime.Now.Year;
}
<!-- Displaying a variable -->
<p>Current year is : @year!</p>
Lets run your application and specify the following url http://localhost:46023/firstpage in the browser and you will see the following output.
Decisions Making
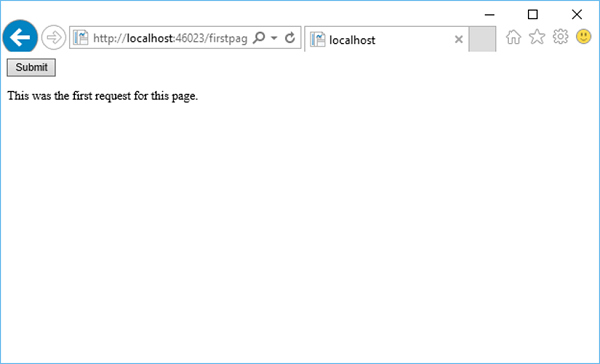
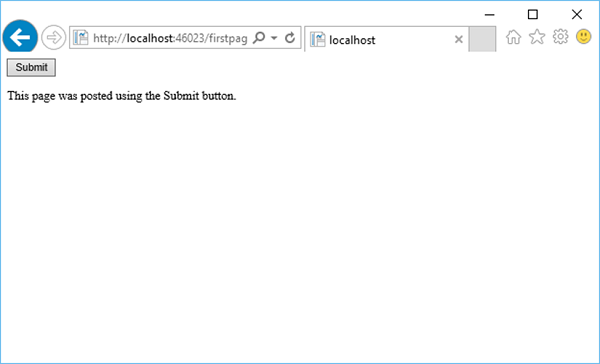
A key feature of dynamic web pages is that you can determine what to do based on conditions. The most common way to do this is with the If and Else statements. Lets have a look into the Decisions Making code shown in the following program.
@{
   var result = "";

   if(IsPost){
      result = "This page was posted using the Submit button.";
   } else{
      result = "This was the first request for this page.";
   }
}

<!DOCTYPE html>
<html>

   <head>
      <title></title>
   </head>

   <body>
      <form method = "POST" action = "" >
         <input type = "Submit" name = "Submit" value = "Submit"/>
         <p>@result</p>
      </form>
   </body>

</html>
Lets run your application and specify the following url − http://localhost:46023/firstpage in the browser and you will see the following output.
Now lets click on Submit and you will see that it also updates the message as shown in the following screenshot.
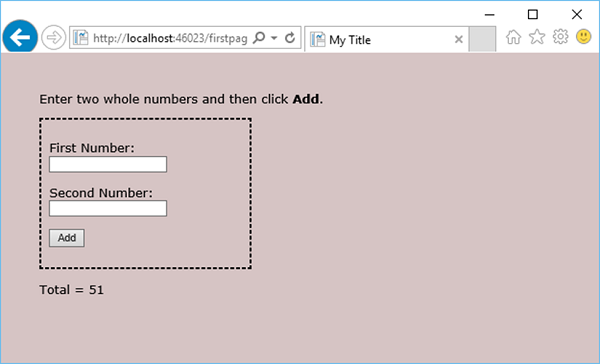
Lets have a look into another example in which we have to create a simple add functionality that lets users enter two numbers, then it adds them and displays the result.
@{
var total = 0;
var totalMessage = "";
if (IsPost){
// Retrieve the numbers that the user entered.
var num1 = Request["text1"];
var num2 = Request["text2"];
// Convert the entered strings into integers numbers and add.
total = num1.AsInt() + num2.AsInt();
totalMessage = "Total = " + total;
}
}
<!DOCTYPE html>
<html lang = "en">
<head>
<title>My Title</title>
<meta charset = "utf-8" />
<style type = "text/css">
body {
background-color: #d6c4c4;
font-family: Verdana, Arial;
margin: 50px;
}
form {
padding: 10px;
border-style: dashed;
width: 250px;
}
</style>
</head>
<body>
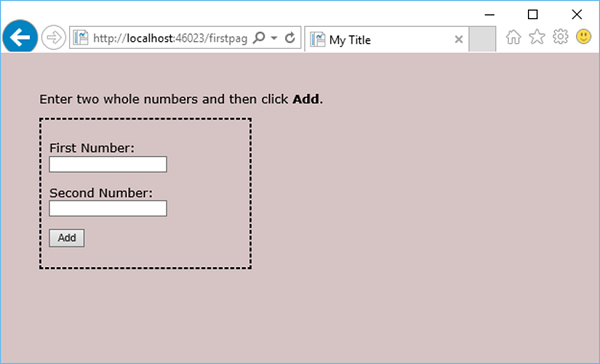
<p>Enter two whole numbers and then click <strong>Add</strong>.</p>
<form action = "" method = "post">
<p>
<label for = "text1">First Number:</label>
<input type = "text" name = "text1" />
</p>
<p>
<label for = "text2">Second Number:</label>
<input type = "text" name = "text2" />
</p>
<p><input type = "submit" value = "Add" /></p>
</form>
<p>@totalMessage</p>
</body>
</html>
Lets run the application and specify the following url − http://localhost:46023/firstpage in the browser and you will see the following output.
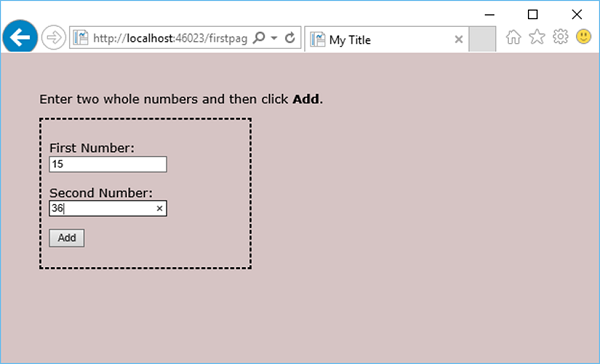
Now enter two numbers in the mentioned fields as shown in the following screenshot.
Click Add and you will see the sum of these two numbers as shown in the following screenshot.
ASP.NET WP - Layouts
In this chapter, we will be covering how to create a website with a consistent layout. On a daily basis you might have seen many websites with a consistent look and feel, like −
Every page has the same header
Every page has the same footer
Every page has the same style and layout
To make it more efficient and to create web pages for your site, you can create reusable blocks of content like headers and footers for your website, and you can create a consistent layout for all the pages.
Create Reusable Blocks of Content
The ASP.NET lets you create a separate file with a content block that can contain text, markup, and code, just like a regular web page.
You can then insert the content block in other pages on the site where you want the information to appear.
That way you don't have to copy and paste the same content into every page.
Creating common content like this also makes it easier to update your site.
If you need to change the content, you can just update a single file, and the changes are then reflected everywhere the content has been inserted.
Lets have a look into a simple example in which we will create a page that references two content blocks − a header and a footer that are located in separate files. You can use these same content blocks in any page of your website.
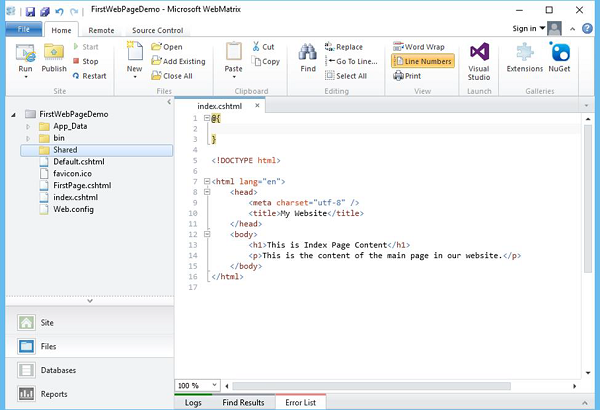
Create a new index.cshtml file in your root directory by right clicking on the project and selecting a new file.
Select CSHTML file type and enter index.cshtml in the Name field and click OK and replace the code with following in index.cshtml file
@{ }
<!DOCTYPE html>
<html lang = "en">
<head>
<meta charset = "utf-8" />
<title>My Website</title>
</head>
<body>
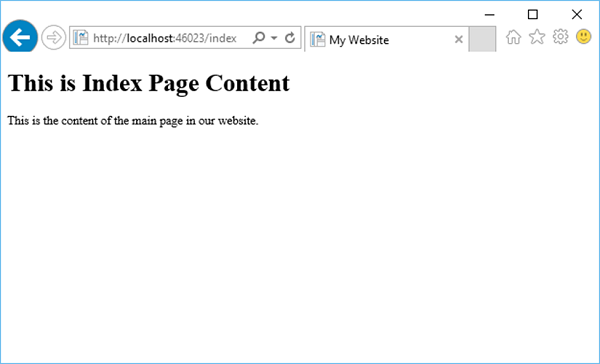
<h1>This is Index Page Content</h1>
<p>This is the content of the main page in our website.</p>
</body>
</html>
Now lets run the application and specify the following url http://localhost:46023/index then you will see the following output.
Now, we need to add a header and a footer in the website, so in the root folder, create a folder by right clicking on the project and select a New Folder and then name it as Shared. It is a common practice to store files that are shared among Web pages in a folder named Shared. You can refer to the following screenshot as well.
Right click on the Shared folder and select New File.
Select the CSHTML file type and enter _Header.cshtm in the Name field and click OK.
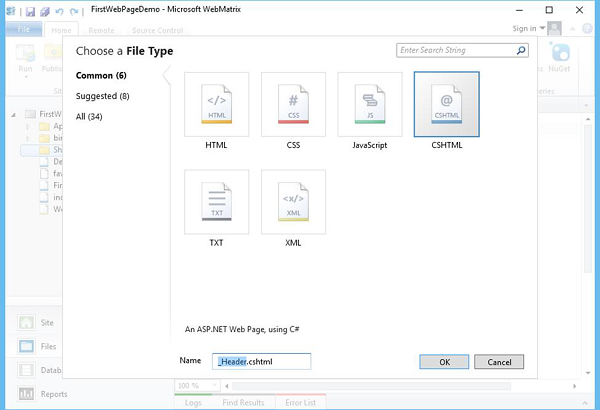
The leading underscore (_) character is significant. If a page name starts with an underscore, ASP.NET will not directly send that page to the browser. This convention lets you define pages that are required for your site, but at the same time the users shouldn't be able to request them directly.
Replace the code in _Header.cshtm as shown in the following program.
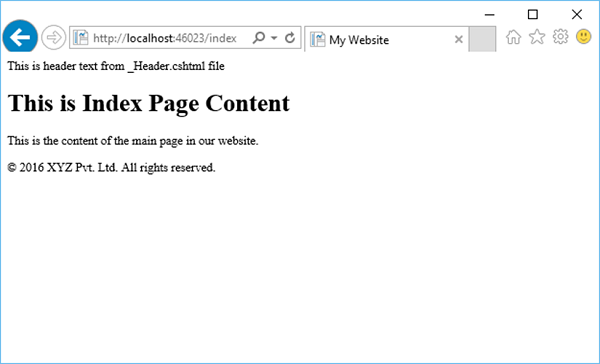
<div class = "header">
   This is header text from _Header.cshtml file
</div>
Similarly, add another file _footer.cshtml in the Shared folder and replace the code as shown in the following program.
<div class = "footer">
   © 2016 XYZ Pvt. Ltd. All rights reserved.
</div>
As you can see that we have added the header and the footer, now we need to show these from the Index.cshtml page by calling the RenderPage method as shown in the following program.
@{ }
<!DOCTYPE html>
<html lang = "en">

   <head>
      <meta charset = "utf-8" />
      <title>My Website</title>
   </head>

   <body>
      @RenderPage("/Shared/_Header.cshtml")
      <h1>This is Index Page Content</h1>
      <p>This is the content of the main page in our website.</p>
      @RenderPage("/Shared/_Footer.cshtml")
   </body>

</html>
You can insert a content block into a web page by calling RenderPage method and pass it on to the name of the file whose contents you want to insert at that point. In the above code you can see that we have inserted the contents of the _Header.cshtml and _Footer.cshtml files into the Index.cshtml file.
Now lets run the application again and specify the following url − http://localhost:46023/indexthen you will see the following output.
Similarly, you can add the header and footer on all the pages of your website just by calling RenderPage method and pass it the name of the file.
Create a Consistent look using Layout Pages
A more structured approach for creating a consistent look for a site is to use layout pages. A layout page defines the structure of a web page, but doesn't contain any actual content.
The layout page is just like any HTML page, except that it contains a call to the RenderBody method.
The position of the RenderBody method in the layout page determines where the information from the content page will be included.
When the layout page is created, you can create web pages that contain the content and then link them to the layout page easily.
When these pages are displayed, they will be formatted according to the layout page.
layout page acts as a kind of template for content that's defined in other pages.
Lets add a layout page into the root of the website by right clicking and selecting a New File.
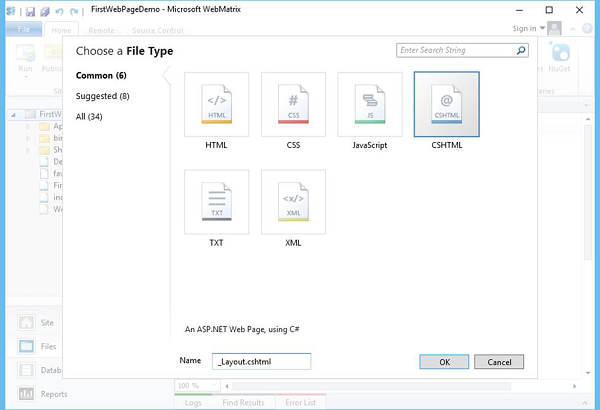
Click OK to continue and replace the following code.
@{ }
<!DOCTYPE html>
<html lang = "en">

   <head>
      <title> Structured Content </title>
      <link href = "@Href("/Styles/Site.css")" rel = "stylesheet" type = "text/css" />
   </head>

   <body>
      @RenderPage("/Shared/_Header.cshtml")
      <div id = "main">@RenderBody()</div>
      @RenderPage("/Shared/_Footer.cshtml")
   </body>

</html>
You can use the RenderPage method in a layout page to insert content blocks like we have used for header and footer in the above code. A layout page can contain only one call to the RenderBody method.
In the above code you can see that we have added reference to Site.css file, but we have not created this file, so we need to add a new folder in the root folder, and name it Styles.
In the Styles folder, create a file named Site.css
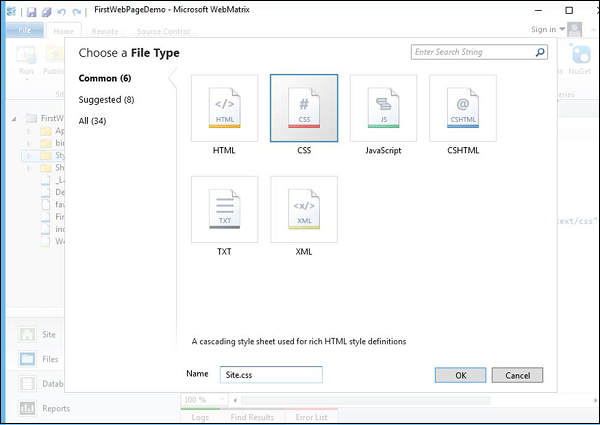
Add the following style definitions in Site.css file −
h1 {
   border-bottom: 3px solid #2f84d6;
   font: 3em/2em Georgia, serif;
   color: #911a42;
}
ul {
   list-style-type: none;
}
body {
   margin: auto;
   padding: 1em;
   background-color: #d9dbdb;
   font: 75%/1.75em "Trebuchet MS", Verdana, sans-serif;
   color: #100478;
}
#list {
   margin: 1em 0 7em -3em;
   padding: 1em 0 0 0;
   background-color: #ffffff;
   color: #996600;
   width: 25%;
   float: left;
}
#header, #footer {
   margin: 0;
   padding: 0;
   color: #996600;
}
Now lets add another cshtml file in your project with MyLayoutPage.cshtml name and by adding the following code.
@{
Layout = "~/_Layout.cshtml";
}
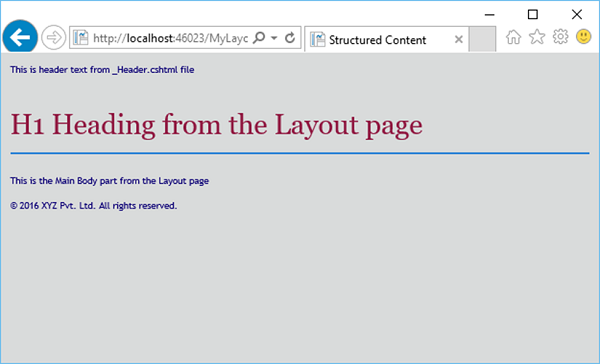
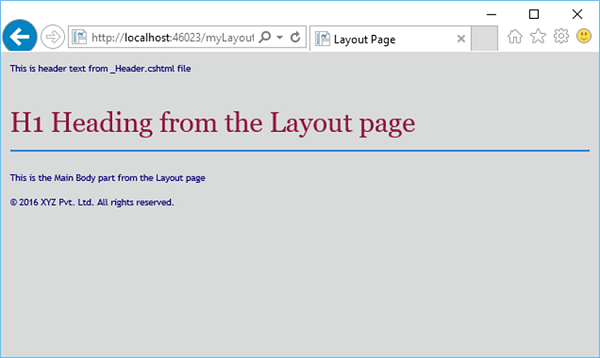
<h1> H1 Heading from the Layout page </h1>
<p> This is the Main Body part from the Layout page</p>
To use the new layout from any page you can just add the following line at the top of any page as shown in the following program.
@{
   Layout = "~/_Layout.cshtml";
}
Now lets run the application again and specify the following url http://localhost:46023/MyLayoutPage then you will see the following output.
ASP.NET WP - Working with Forms
In this chapter, we will be covering how to create an input form and how to handle the user's input when you use the ASP.NET Web Pages using Razor syntax.
A form is a section of an HTML document where you put user-input controls, like text boxes, check boxes, radio buttons, and pull-down lists.
You use forms when you want to collect and process user input.
How to Create an Input Form?
Lets have a look into a simple example by creating a new cshtml file with MyForm.cshtml name and replace the code with the following program.
<!DOCTYPE html>
<html>

   <head>
      <title>Customer Form</title>
   </head>

   <body>
      <form method = "post" action = "">
         <fieldset>
            <legend>Add Student</legend>
            <div>
               <label for = "StudentName">Student Name: </label>
               <input type = "text" name = "StudentName" value = "" />
            </div>

            <div>
               <label for = "UniName">University Name:</label>
               <input type = "text" name = "UniName" value = "" />
            </div>

            <div>
               <label for = "Address">Res. Address:</label>
               <input type = "text" name = "Address" value = "" />
            </div>

            <div>
               <label> </label>
               <input type = "submit" value = "Submit" class = "submit" />
            </div>
         </fieldset>
      </form>

   </body>
</html>
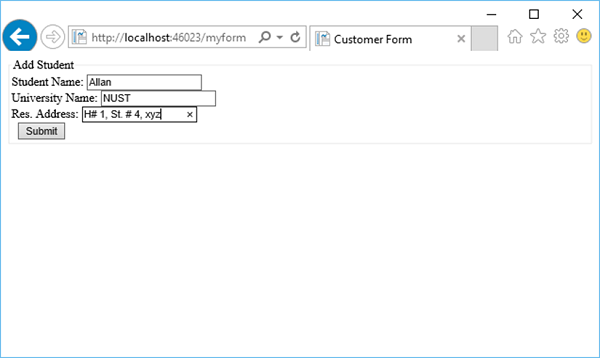
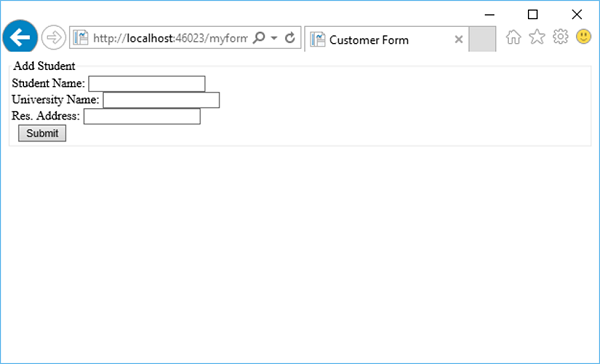
Now lets run the application again and specify the following url − http://localhost:46023/myform, then you will see the following output.

Lets enter some data in all the fields as shown in the following screenshot.
Now, when you click the Submit button then you will see that nothing happens. To make the form useful, we need to add some code that will run on the server.
Reading User Input from the Form
To read the user input from the form we will add some code that will read the values from all the fields and then process them as we want. This procedure shows you how to read the fields and display the user input on the page.
Lets have a look into the same example again in which we have added some code that will handle all the values from the fields.
<!DOCTYPE html>
<html>

   <head>
      <title>Customer Form</title>
   </head>

   <body>
      @{
         if (IsPost){
            string StudentName = Request["StudentName"];
            string UniName = Request["UniName"];
            string Address = Request["Address"];

            <p>
               You entered: <br />
               Student Name: @StudentName <br />
               University Name: @UniName <br />
               Res. Address: @Address <br />
            </p>
         } else{
            <form method = "post" action = "">
               <fieldset>
                  <legend>Add Student</legend>
                  <div>
                     <label for = y"StudentName">Student Name: </label>
                     <input type = "text" name = "StudentName" value = "" />
                  </div>

                  <div>
                     <label for = "UniName">University Name:</label>
                     <input type = "text" name = "UniName" value = "" />
                  </div>

                  <div>
                     <label for = "Address">Res. Address:</label>
                     <input type = "text" name="Address" value = "" />
                  </div>

                  <div>
                     <label> </label>
                     <input type = "submit" value = "Submit" class = "submit" />
                  </div>

               </fieldset>
            </form>
         }
      }
   </body>
</html>
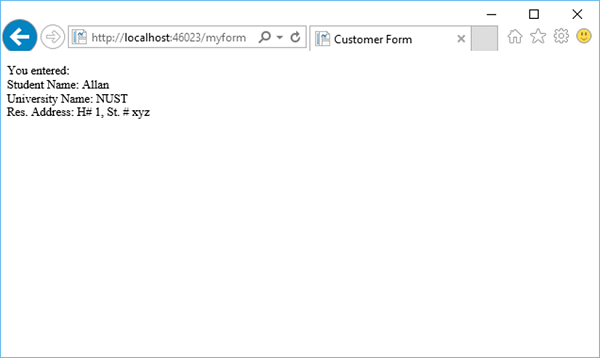
Now lets run the application again and specify the following url − http://localhost:46023/myform then you will see the following output.
Lets enter some data in all the fields.

Now when you click the Submit button then you will see the following output.
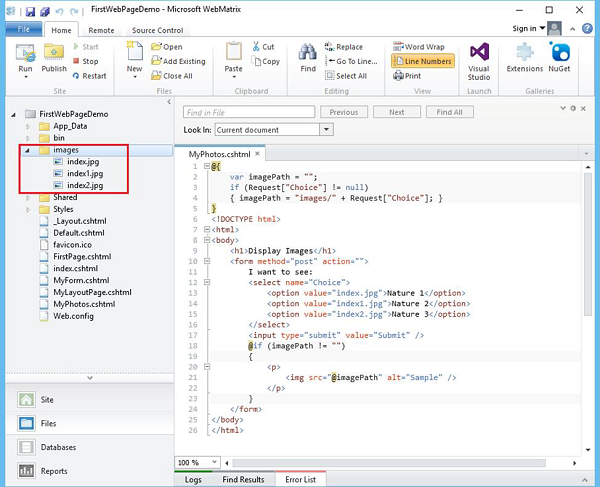
Lets have a look into another simple example by creating a new folder in your project and by naming it as images and then add some images in that folder.
Now add another cshtml file with MyPhotos.cshtml name and replace the following code.
@{
   var imagePath = "";

   if (Request["Choice"] != null)
   { imagePath = "images/" + Request["Choice"]; }
}

<!DOCTYPE html>
<html>

   <body>
      <h1>Display Images</h1>

      <form method = "post" action = "">
         I want to see:
         <select name = "Choice">
            <option value = "index.jpg">Nature 1</option>
            <option value = "index1.jpg">Nature 2</option>
            <option value = "index2.jpg">Nature 3</option>
         </select>
         <input type = "submit" value = "Submit" />

         @if (imagePath != ""){
            <p><img src = "@imagePath" alt = "Sample" /></p>
         }
      </form>

   </body>
</html>
As you can see that we have added references of some jpg files which are in the images folder as shown in the following screenshot.
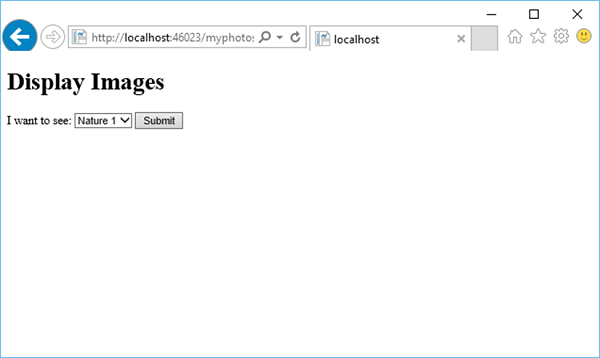
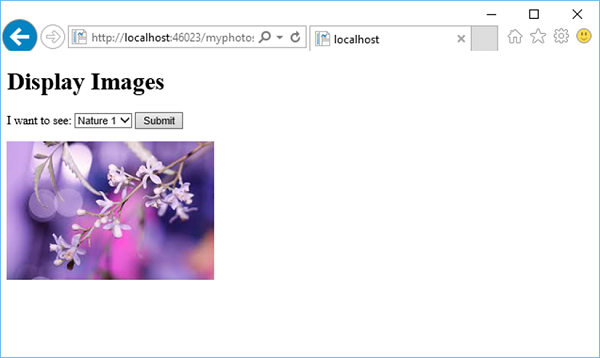
When you run the application and specify the following url − http://localhost:46023/myphotos then you will see the following output.
Lets click on Submit and you will see that the index.jpg file is loaded on the page.
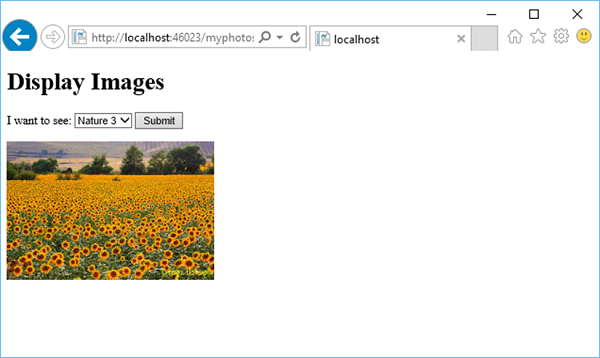
When selecting another photo from the dropdown list, lets say Nature 3 and click Submit, then it will update the photo on the page as shown in the following image.
ASP.NET WP - Page Object Model
The most basic object in ASP.NET is the page. You can access properties of the page object directly without any qualifying object. In the previous chapters, we have used some of the properties and methods of page object like Layout, RenderPage and RenderBody. WebPageBase Class is the base class for classes that represent an ASP.NET Razor page.
Properties and Methods of Page Object Model
Following are some of the most commonly used properties of Page Object.
| S.No | Property & Description |
|---|---|
| 1 | IsPost Returns true if the HTTP data transfer method used by the client is a POST request. |
| 2 | Layout Gets or sets the path of a layout page. |
| 3 | Output Gets the current TextWriter object for the page. |
| 4 | Page Provides property-like access to data shared between pages and layout pages |
| 5 | Request Gets the HttpRequest object for the current HTTP request. |
| 6 | Server Gets the HttpServerUtility object that provides web-page processing methods. |
Following are some of the most commonly used methods of Page Object.
| S.No | Method & Description |
|---|---|
| 1 | ConfigurePage When overridden in a derived class, configures the current web page based on the configuration of the parent web page. |
| 2 | DefineSection Called by content pages to create named content sections. |
| 3 | ExecutePageHierarchy() Executes the code in a set of dependent web pages. |
| 4 | GetOutputWriter Returns the text writer instance that is used to render the page. |
| 5 | href Builds a URL using the specified parameters |
| 6 | InitializePage Initializes the current page. |
| 7 | IsSectionDefined Returns a value that indicates whether the specified section is defined in the page. |
| 8 | PopContext Returns and removes the context from the top of the OutputStack instance. |
| 9 | PushContext Inserts the specified context at the top of the OutputStack instance. |
| 10 | RenderBody() Renders the portion of a content page that is not within a named section (In layout pages) |
| 11 | RenderPage(page) Renders the content of one page within another page |
| 12 | RenderSection(section) Renders the content of a named section (In layout pages) |
| 13 | Write(object) Writes the object as an HTML-encoded string |
| 14 | WriteLiteral Writes an object without HTML-encoding it first. |
Lets have a look into a simple example of Page property of Page Object which provides property-like access to data shared between pages and layout pages. In this example, we will set the title of the page using the Page.Title property.
Here is the implementation of MyLayoutPage.cshtml file in which we have set the page title.
@{
   Layout = "~/_Layout.cshtml";
   page.Title = "Layout Page";
}
<h1> H1 Heading from the Layout page </h1>
<p> This is the Main Body part from the Layout page</p>
Now we need to specify the same page title in the _Layout.cshtml page as shown in the following code.
@{ }
<!DOCTYPE html>
<html lang = "en">

   <head>
      <title>@Page.Title</title>
      <link href = "@Href("/Styles/Site.css")" rel = "stylesheet" type = "text/css" />
   </head>

   <body>
      @RenderPage("/Shared/_Header.cshtml")
      <div id = "main">@RenderBody()</div>
      @RenderPage("/Shared/_Footer.cshtml")
   </body>

</html>
Lets run the application and specify the following url − http://localhost:46023/MyLayoutPage then you will see the following page.
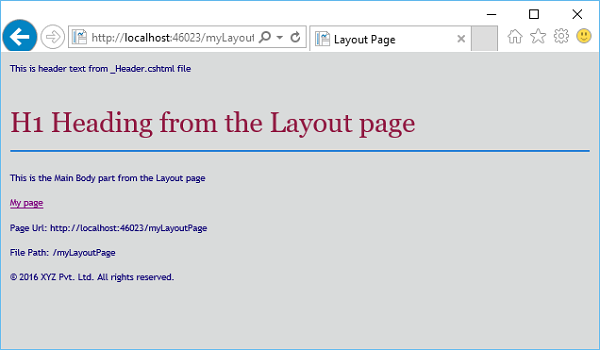
As you can see the title is now a Layout Page which we have set using the Page property of Page object.
Lets have a look into another simple example in which we will use the Request Property of Page object
@{
   Layout = "~/_Layout.cshtml";
   Page.Title = "Layout Page";
   var path = Request.FilePath;
   var pageUrl = this.Request.Url;
}

<h1> H1 Heading from the Layout page </h1>
<p> This is the Main Body part from the Layout page</p>
<a href = "@pageUrl">My page</a>
<p>Page Url: @pageUrl</p>
<p>File Path: @path</p>
You can get the page's file path and URL using the Request object of the page. Lets run your application again and you will see the following output.
ASP.NET WP - Database
In this chapter, we will be covering how to create a database in WebMatrix using ASP.NET Web Pages (Razor) and how to display database data in a page.
A database contains one or more tables that contain information, like table for Customers information or table for Students.
In any given table you have several pieces of information, for example in Customers table there will be their first name, last name, and address, etc.
In most database tables, there is a column that contains a unique identifier which is also known as primary key, like a CustomerID, or StudentID, etc.
The primary key identifies each row in the table.
Create a Database
WebMatrix provides tools in which you can easily create a database and then can add tables in that database. The structure of a database is referred to as the database's schema. Now lets open the WebMatrix and create a new empty site.
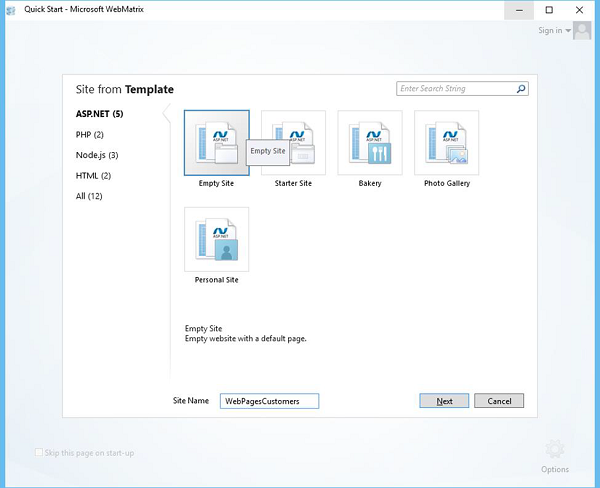
Enter WebPagesCustomers in the Site Name field and click Next.
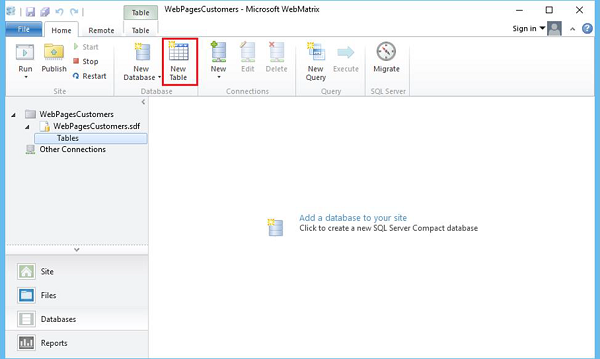
In the left pane, click Database as highlighted in the following screenshot.
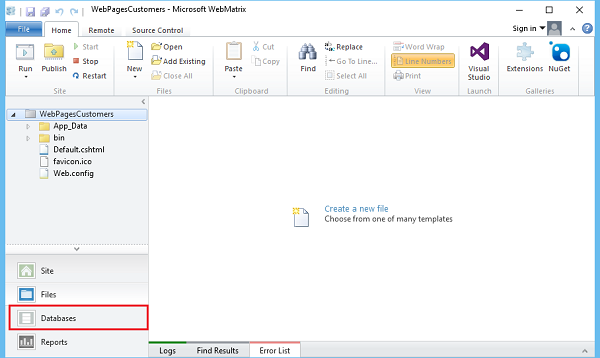
Now you will see that it opens the database related options in the ribbon.
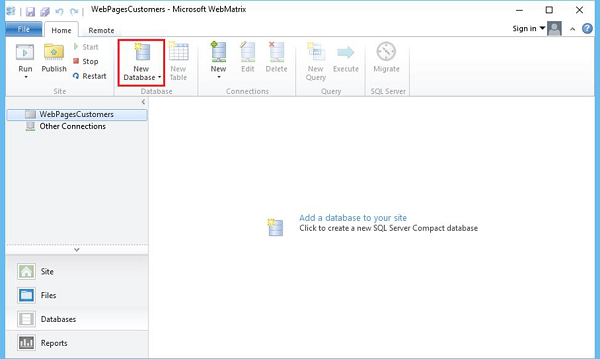
Click on the New Database option.
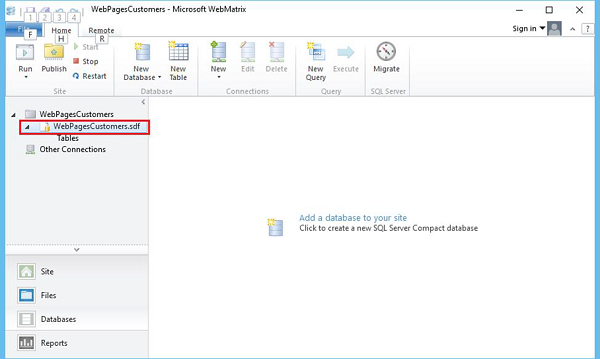
You will see that WebMatrix creates a SQL Server database which is a *.sdf file that has the same name as your site WebPagesCustomers.sdf and you can also rename this file as well.
Create Table
You can easily create a table in the database either by right clicking on Tables in the left pane and then selecting a New Table or you can click on the New Table option in the ribbon.
Now you can see that WebMatrix has opened the table designer.
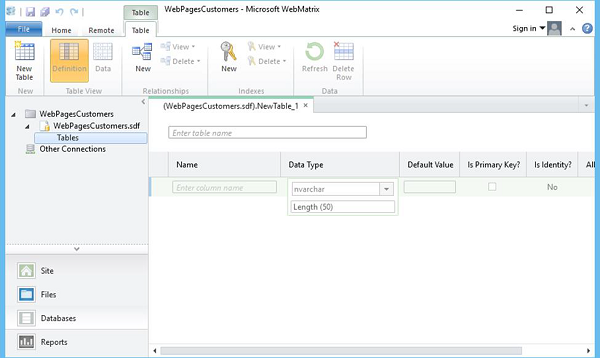
Enter the Table Name and then some columns and press Ctrl+S to save as shown in the following screenshot.
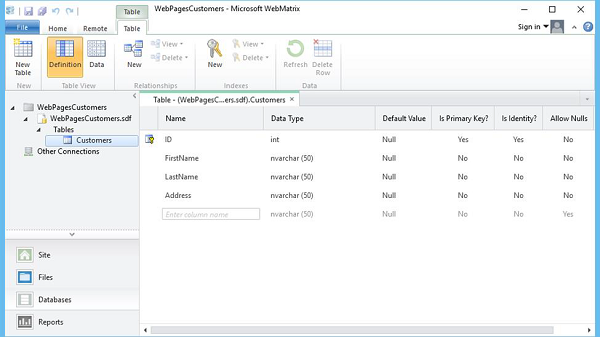
For ID row set, the Is Primary Key? and Is Identify? options to be changed to Yes (if they are not).
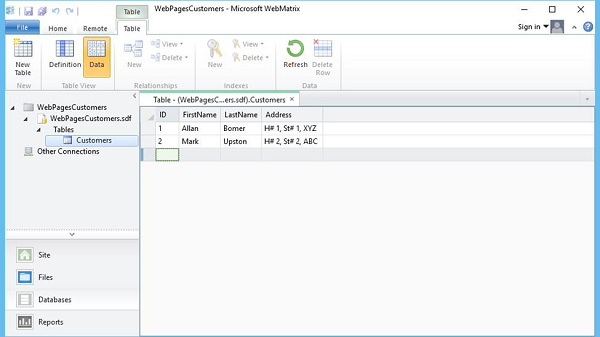
Now lets enter some raw data to work with by clicking on the Data option and then entering some data as shown in the following screenshot.
Display Database Data
As we have a database and a Customers table and we also have some data in the database. Now we need to display that on the web page from the database. Lets create a new CSHTML file.
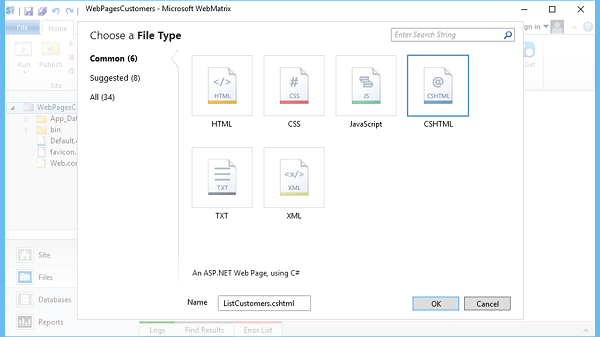
Enter ListCustomers.cshtml in the Name field and click OK. Now to retrieve all the customers from the database lets replace all the code in ListCustomers.cshtml file as shown in the following program.
@{
   var db = Database.Open("WebPagesCustomers");
   var selectQueryString = "SELECT * FROM Customers ORDER BY FirstName";
}

<!DOCTYPE html>
<html>

   <head>
      <title>Customers List</title>
      <style>
         table, th, td {
            border: solid 1px #bbbbbb;
            border-collapse: collapse;
            padding: 2px;
         }
      </style>
   </head>

   <body>
      <h1>Customers List</h1>
      <table>
         <thead>
            <tr>
               <th>Id</th>
               <th>First Name</th>
               <th>Last Name</th>
               <th>Address</th>
            </tr>
         </thead>

         <tbody>
            @foreach(var row in db.Query(selectQueryString)){
               <tr>
                  <td>@row.ID</td>
                  <td>@row.FirstName</td>
                  <td>@row.LastName</td>
                  <td>@row.Address</td>
               </tr>
            }
         </tbody>
      </table>

   </body>
</html>
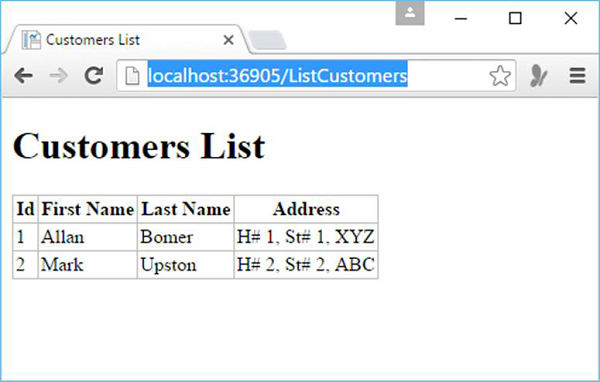
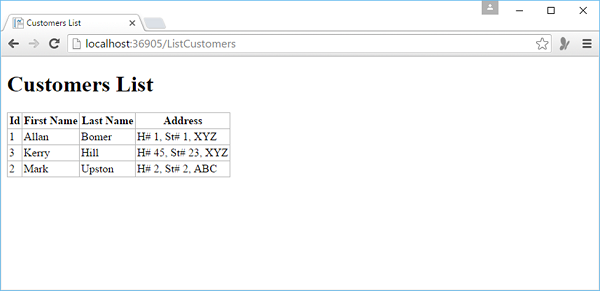
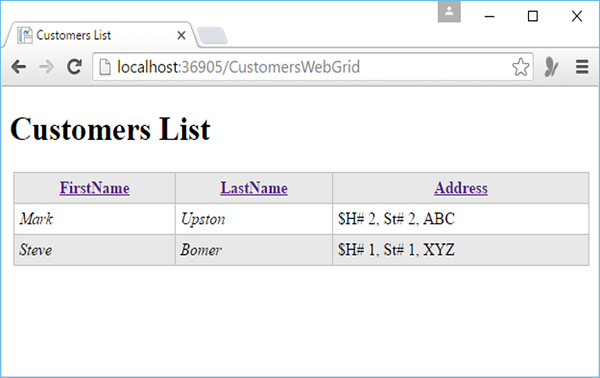
Now lets run the application and specify the following url − http://localhost:36905/ListCustomers and you will see the list of customers on the web page as shown in the following screenshot.
ASP.NET WP - Add Data to Database
In this chapter, we will be covering how to create a page that lets users add data to the Customers table in the database.
In this example, you will also understand when the record is inserted, then the page displays the updated table using the ListCustomers.cshtml page that we have created in the previous chapter.
In this page, we also add validation to make sure that the data which the user enters is valid for the database. For example, user has entered data for all the required columns.
How to add Data to the Customer Table in the Database?
Lets add a new CSHTML file to your website.
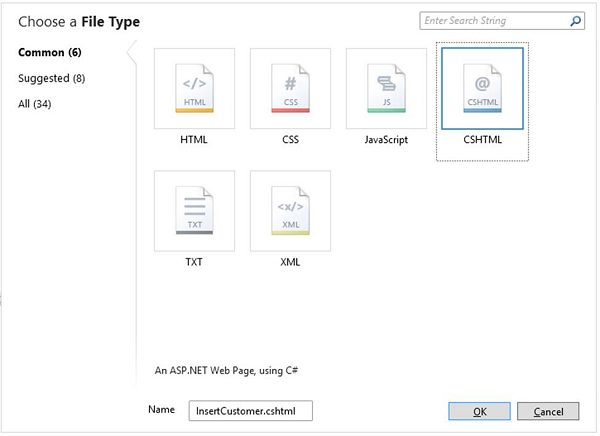
Enter InsertCustomer.cshtml in the Name field and click OK.
Now create a new web page in which the user can insert data in the Customers table, so replace InsertCustomer.cshtml file with the following code.
@{
   Validation.RequireField("FirstName", "First Name is required.");
   Validation.RequireField("LastName", "Last Name is required.");
   Validation.RequireField("Address", "Address is required.");

   var db = Database.Open("WebPagesCustomers");
   var FirstName = Request.Form["FirstName"];
   var LastName = Request.Form["LastName"];
   var Address = Request.Form["Address"];

   if (IsPost && Validation.IsValid()) {
      // Define the insert query. The values to assign to the
      // columns in the Customers table are defined as parameters
      // with the VALUES keyword.

      if(ModelState.IsValid) {
         var insertQuery = "INSERT INTO Customers (FirstName, LastName, Address) " +
            "VALUES (@0, @1, @2)";
         db.Execute(insertQuery, FirstName, LastName, Address);

         // Display the page that lists products.
         Response.Redirect("~/ListCustomers");
      }
   }
}

<!DOCTYPE html>
<html>

   <head>
      <title>Add Customer</title>
      <style type = "text/css">
         label {
            float:left;
            width: 8em;
            text-align:
            right;
            margin-right: 0.5em;
         }
         fieldset {
            padding: 1em;
            border: 1px solid;
            width: 50em;
         }
         legend {
            padding: 2px 4px;
            border: 1px solid;
            font-weight:bold;
         }
         .validation-summary-errors {
            font-weight:bold;
            color:red;
            font-size: 11pt;
         }
      </style>

   </head>
   <body>
      <h1>Add New Customer</h1>
      @Html.ValidationSummary("Errors with your submission:")

      <form method = "post" action = "">
         <fieldset>
            <legend>Add Customer</legend>
            <div>
               <label>First Name:</label>
               <input name = "FirstName" type = "text" size = "50" value = "@FirstName"/>
            </div>

            <div>
               <label>Last Name:</label>
               <input name = "LastName" type = "text" size = "50" value = "@LastName" />
            </div>

            <div>
               <label>Address:</label>
               <input name = "Address" type = "text" size = "50" value = "@Address" />
            </div>

            <div>
               <label> </label>
               <input type = "submit" value = "Insert" class = "submit" />
            </div>
         </fieldset>
      </form>

   </body>
</html>
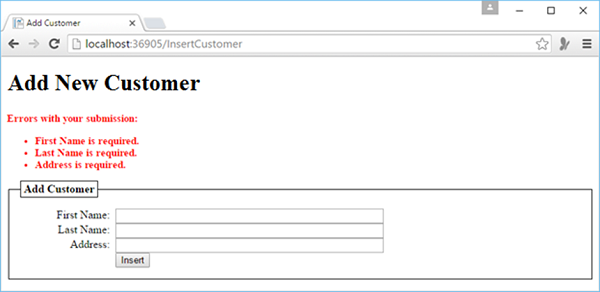
Now lets run the application and specify the following url − http://localhost:36905/InsertCustomer and you will see the following web page.
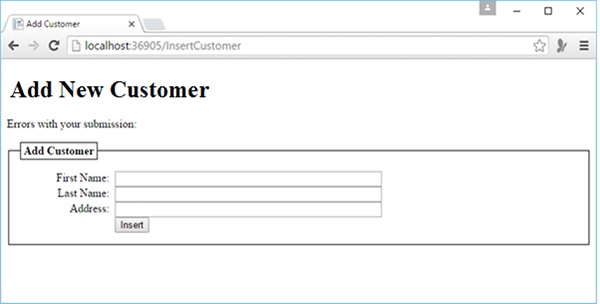
In the above screenshot, you can see that we have added validation, so you click the insert button without entering any data or miss any of the above mentioned field then you will see that it displays the error message as shown in the following screenshot.
Now lets enter some data in all the fields.
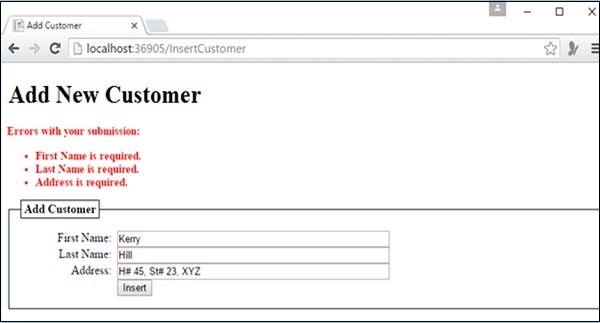
Now click on Insert and you will see the updated list of customers as shown in the following screenshot.
ASP.NET WP - Edit Database Data
In this chapter, we will be covering how to create a web page in which the user can edit the existing data of the database.
In this procedure, we will create two pages that are similar to the ones we have created for data insertion earlier.
The first page displays the customer list and lets the users select which one they want to be changed.
The second page lets the users actually make the edits and save them.
How to Edit the Existing Data of the Database?
Lets create a new CSHTML file in the project.

Enter EditCustomers.cshtml in the Name field and click OK.
Now replace the EditCustomers.cshtml file with the following code.
@{
   var db = Database.Open("WebPagesCustomers");
   var selectQueryString = "SELECT * FROM Customers ORDER BY FirstName";
}

<!DOCTYPE html>
<html>
   <head>
      <title>Customers List</title>
      <style>
         table, th, td {
            border: solid 1px #bbbbbb;
            border-collapse: collapse;
            padding: 2px;
         }
      </style>

   </head>
   <body>
      <h1>Customers List</h1>
      <table>
         <thead>
            <tr>
               <th> </th>
               <th>First Name</th>
               <th>Last Name</th>
               <th>Address</th>
            </tr>
         </thead>

         <tbody>
            @foreach(var row in db.Query(selectQueryString)){
               <tr>
                  <td><a href = "@Href("~/UpdateCustomers", row.Id)">Edit</a></td>
                  <td>@row.FirstName</td>
                  <td>@row.LastName</td>
                  <td>@row.Address</td>
               </tr>
            }
         </tbody>
      </table>

   </body>
</html>
The only difference between EditCustomers.cshtml page and the ListCustomers.cshtml page is that it includes an extra column that displays an Edit link.
When you click on that edit link, then it will take you to UpdateCustomer.cshtml page which is not created yet. So we need to create UpdateCustomer.cshtml file and replace it with the following code.
@{
   Validation.RequireField("FirstName", "First Name is required.");
   Validation.RequireField("LastName", "Last Name is required.");
   Validation.RequireField("Address", "Address is required.");

   var FirstName = "";
   var LastName = "";
   var Address = "";
   var CustomerId = UrlData[0];

   if (CustomerId.IsEmpty()) {
      Response.Redirect("~/EditCustomers");
   }
   var db = Database.Open("WebPagesCustomers");

   if (IsPost && Validation.IsValid()) {
      var updateQueryString = "UPDATE Customers SET FirstName = @0, LastName = @1,
         Address = @2 WHERE Id = @3" ;
      FirstName = Request["FirstName"];
      LastName = Request["LastName"];
      Address = Request["Address"];
      db.Execute(updateQueryString, FirstName, LastName, Address, CustomerId);

      // Display the page that lists products.
      Response.Redirect(@Href("~/EditCustomers"));
   } else {
      var selectQueryString = "SELECT * FROM Customers WHERE ID = @0";
      var row = db.QuerySingle(selectQueryString, CustomerId);
      FirstName = row.FirstName;
      LastName = row.LastName;
      Address = row.Address;
   }
}

<!DOCTYPE html>
<html>
   <head>
      <title>Update Customer</title>
      <style type = "text/css">
         label {
            float:left;
            width: 8em;
            text-align: right;
            margin-right: 0.5em;
         }
         fieldset {
            padding: 1em;
            border: 1px solid;
            width: 50em;
         }
         legend {
            padding: 2px 4px;
            border: 1px solid;
            font-weight:bold;
         }
         .validation-summary-errors {
            font-weight:bold;
            color:red;
            font-size: 11pt;
         }
      </style>

   </head>
   <body>
      <h1>Update Customer</h1>
      @Html.ValidationSummary("Errors with your submission:")

      <form method = "post" action = "">
         <fieldset>
            <legend>Update Customer</legend>
            <div>
               <label>First Name:</label>
               <input name = "FirstName" type = "text" size = "50" value = "@FirstName"/>
            </div>

            <div>
               <label>Last Name:</label>
               <input name = "LastName" type = "text" size = "50" value = "@LastName" />
            </div>

            <div>
               <label>Address:</label>
               <input name = "Address" type = "text" size = "50" value = "@Address" />
            </div>

            <div>
               <label> </label>
               <input type = "submit" value = "Save" class = "submit" />
            </div>

         </fieldset>
      </form>

   </body>
</html>
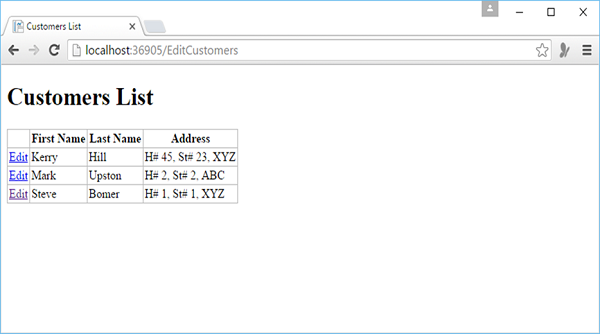
Now lets run the application and specify the following url − http://localhost:36905/EditCustomers and you will see the following web page.
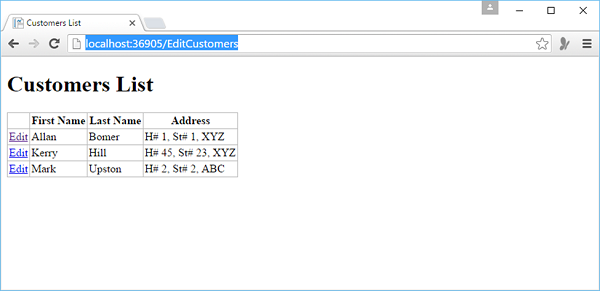
As you can see, it is the same web page as ListCustomer, but it has the Edit Link extra for each record. Now lets click on the Edit link of any customer, lets say the first one and you will see the following page.
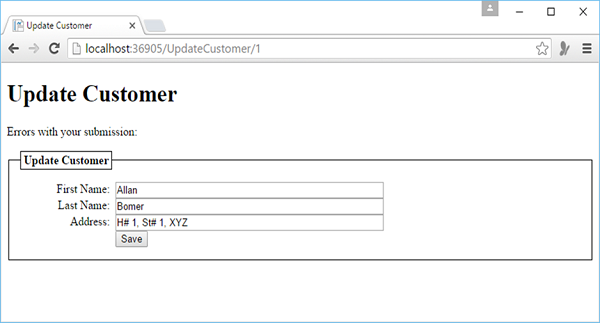
Lets change the first name from Allan to Steve and click Save.
You will see the following page with the updated first name which is now at the end because we have sorted the list according to the First Name.
ASP.NET WP - Delete Database Data
In this chapter, we will be covering how to delete an existing database record. This topic is similar to the previous chapter except that − instead of updating the record, we will delete it. Both deleting and updating processes are almost the same, except that deleting is simpler. This example will also contain two web pages.
On the first page, the users will select a record which they want to delete.
On the second page, the record to be deleted is then displayed so that the user can confirm that he/she wants to delete that record.
How to Delete a Database Record?
Lets have a look into a simple example in which we will delete an existing database record. First of all, we need to create a new CSHTML page.

Enter ListCustomersForDelete.cshtml in the Name field and click OK.
Now replace the following code in the ListCustomersForDelete.cshtml file.
@{
   var db = Database.Open("WebPagesCustomers");
   var selectQueryString = "SELECT * FROM Customers ORDER BY FirstName";
}

<!DOCTYPE html>
<html>

   <head>
      <title>Delete a Customer</title>
      <style>
         table, th, td {
            border: solid 1px #bbbbbb;
            border-collapse: collapse;
            padding: 2px;
         }
      </style>

   </head>
   <body>
      <h1>Delete a Customer</h1>

      <table>
         <thead>
            <tr>
               <th> </th>
               <th>First Name</th>
               <th>Last Name</th>
               <th>Address</th>
            </tr>
         </thead>

         <tbody>
            @foreach(var row in db.Query(selectQueryString)){
               <tr>
                  <td><a href = "@Href("~/DeleteCustomer", row.Id)">Delete</a></td>
                  <td>@row.FirstName</td>
                  <td>@row.LastName</td>
                  <td>@row.Address</td>
               </tr>
            }
         </tbody>
      </table>

   </body>
</html>
As you can see, the above page is similar to the EditCustomers.cshtml page, the only difference is that instead of displaying an Edit link for each customer. Use the following code to add the Delete link. Once this is done, it will display a Delete link that will help in deleting the selected record.
<td><a href = "@Href("~/DeleteCustomer", row.Id)">Delete</a></td>
Delete a Customer from the Database
We should start with creating a CHTML file as shown in the following screenshot.
Enter DeleteCustomer.cshtml in the name field and click OK. Now replace DeleteCustomer.cshtml file with the following code.
@{
   var db = Database.Open("WebPagesCustomers");
   var CustomerId = UrlData[0];

   if (CustomerId.IsEmpty()) {
      Response.Redirect("~/ListCustomersForDelete");
   }
   var customer = db.QuerySingle("SELECT * FROM CUSTOMERS WHERE ID = @0", CustomerId);

   if( IsPost && !CustomerId.IsEmpty()) {
      var deleteQueryString = "DELETE FROM Customers WHERE Id=@0";
      db.Execute(deleteQueryString, CustomerId);
      Response.Redirect("~/ListCustomersForDelete");
   }
}

<!DOCTYPE html>
<html>

   <head>
      <title>Delete Customer</title>
   </head>

   <body>
      <h1>Delete Customer - Confirmation</h1>

      <form method = "post" action = "" name = "form">
         <p>Are you sure you want to delete the following Customer?</p>
         <p>FirstName: @customer.FirstName <br />
         LastName: @customer.LastName <br />
         Address: @customer.Address</p>
         <p><input type = "submit" value = "Delete" /></p>
      </form>

   </body>
</html>
Now lets run the application and specify the following url − http://localhost:36905/ListCustomersForDelete and you will see the following web page.
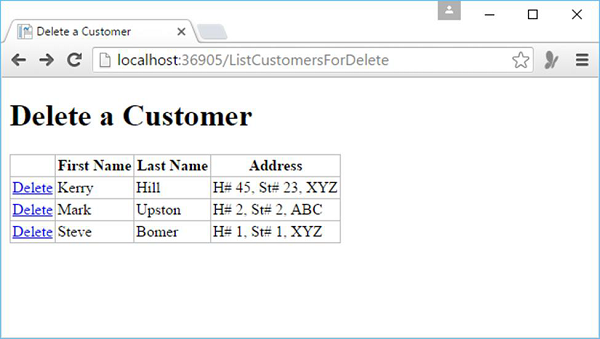
As you can see all the customers from the database and also the Delete link for each customer. Lets select the Delete link for Kerry Hill and you will see the following page.
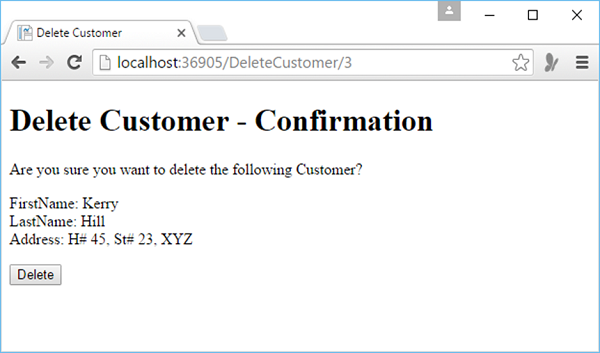
All the information is displayed for that customer. When you click on the Delete button then this customer will be deleted from the database.
Lets click the Delete button and you will see that it is deleted from the database as shown in the following screenshot.

Now the database only has two records.
ASP.NET WP - WebGrid
In the previous chapters of databases, we have displayed database data by using a razor code, and doing the HTML markup ourselves. But in ASP.NET Web Pages while using a Razor, we also have an easier way to display data by using the WebGrid helper.
This helper can render an HTML table for you that displays data.
This helper supports options for formatting, for creating a way to page through the data.
In the WebGrid helper you can sort the data just by clicking a column heading.
Lets have a look into a simple example in which we will display the same data, but this time we will be using the WebGrid helper. In this example, we will create a copy of ListCustomers.cshtml file and then use the WebGrid instead of manually creating the table using HTML markup like <tr> and <td> tags.
Display and Sort Data with WebGrid
We will need to create a CSHTML file to start with.
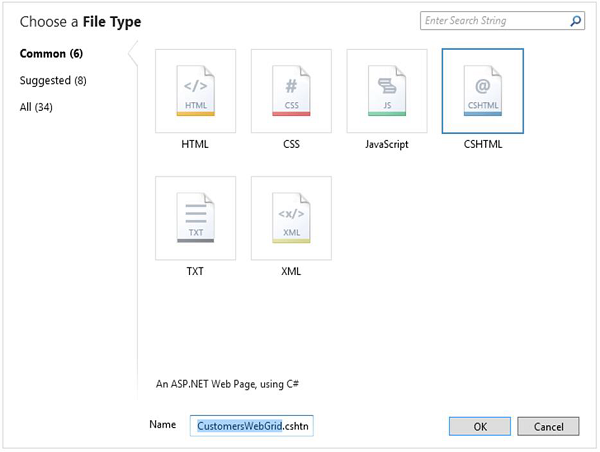
Enter CustomersWebGrid.cshtml in the name field and Click OK to continue.
Replace the following code in CustomersWebGrid.cshtml file.
@{
   var db = Database.Open("WebPagesCustomers");
   var selectQueryString = "SELECT * FROM Customers ORDER BY FirstName";
   var data = db.Query(selectQueryString);
   var grid = new WebGrid(data);
}

<!DOCTYPE html>
<html>

   <head>
      <title>Customers List</title>
      <style>
         table, th, td {
            border: solid 1px #bbbbbb;
            border-collapse: collapse;
            padding: 2px;
         }
      </style>

   </head>
   <body>
      <h1>Customers List</h1>

      <div id = "grid">
         @grid.GetHtml()
      </div>

   </body>
</html>
As you can see that the code first opens the WebPagesCustomers database file and then creates a simple SQL query.
var selectQueryString = "SELECT * FROM Customers ORDER BY FirstName";
A variable named data is populated with the returned data from the SQL Select statement.
var data = db.Query(selectQueryString);
Then the WebGrid helper is used to create a new grid from data.
var grid = new WebGrid(data);
This code creates a new WebGrid object and assigns it to the grid variable. In the body of the page, you render the data using the WebGrid helper as shown in the following program.
<div id = "grid">
   @grid.GetHtml()
</div>
Now lets run the application and specify the following url − http://localhost:36905/CustomersWebGrid and you will see the following web page.
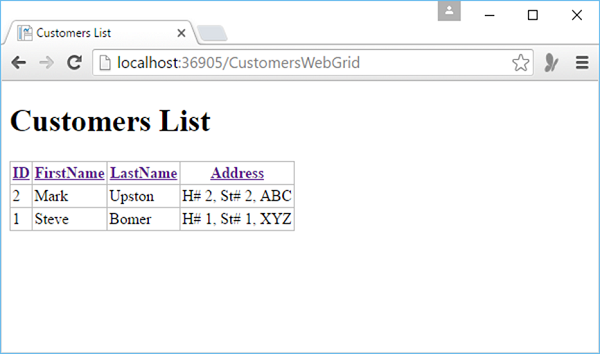
As you can see, by using the simplest possible code, the WebGrid helper does a lot of work when displaying and sorting the data.
In the above output, you can see that the data is sorted by FirstName, now you can easily sort the data by ID or LastName, etc. just by clicking on the column header.
So lets click on the ID column header and you will see that data is now sorted by ID as shown in the following screenshot.

The WebGrid helper can do quite a lot more as well like formatting the columns and styling the whole grid.
Lets have a look into the same example, but this time, we will format the columns.
@{
   var db = Database.Open("WebPagesCustomers");
   var selectQueryString = "SELECT * FROM Customers ORDER BY FirstName";
   var data = db.Query(selectQueryString);
   var grid = new WebGrid(data);
}

<!DOCTYPE html>
<html>

   <head>
      <title>Customers List</title>
      <style>
         table, th, td {
            border: solid 1px #bbbbbb;
            border-collapse: collapse;
            padding: 2px;
         }
      </style>

   </head>
   <body>
      <h1>Customers List</h1>

      <div id = "grid">
         @grid.GetHtml(
            columns: grid.Columns(
               grid.Column("FirstName", format:@<i>@item.FirstName</i>),
               grid.Column("LastName", format:@<i>@item.LastName</i>),
               grid.Column("Address", format:@<text>$@item.Address</text>)
            )
         )
      </div>

   </body>
</html>
Now lets run the application and specify the following url − http://localhost:36905/CustomersWebGrid and you will see the following web page.
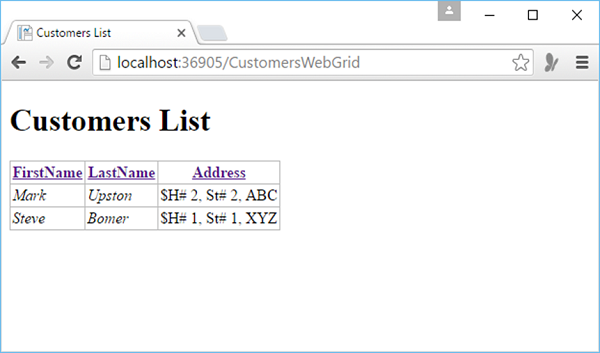
As you can see that the data in the FirstName and LastName columns are now displayed in the italic format.
Lets have a look into another simple example in which we will set the style of the whole grid by defining the CSS classes that specify how the rendered HTML table will look as shown in the following code.
@{
   var db = Database.Open("WebPagesCustomers");
   var selectQueryString = "SELECT * FROM Customers ORDER BY FirstName";
   var data = db.Query(selectQueryString);
   var grid = new WebGrid(data);
}

<!DOCTYPE html>
<html>

   <head>
      <title>Customers List</title>
      <style type = "text/css">
         .grid { margin: 4px; border-collapse: collapse; width: 600px; }
         .head { background-color: #E8E8E8; font-weight: bold; color: #FFF; }
         .grid th, .grid td { border: 1px solid #C0C0C0; padding: 5px; }
         .alt { background-color: #E8E8E8; color: #000; }
         .product { width: 200px; font-weight:bold;}
      </style>

   </head>
   <body>
      <h1>Customers List</h1>

      <div id = "grid">
         @grid.GetHtml(
            tableStyle: "grid",
            headerStyle: "head",
            alternatingRowStyle: "alt",
            columns: grid.Columns(
               grid.Column("FirstName", format:@<i>@item.FirstName</i>),
               grid.Column("LastName", format:@<i>@item.LastName</i>),
               grid.Column("Address", format:@<text>$@item.Address</text>)
            )
         )
      </div>

   </body>
</html>
Now lets run the application and specify the following url − http://localhost:36905/CustomersWebGrid and you will see the following web page.
ASP.NET WP - Charts
In this chapter, we will cover the chart helper and how to display data on charts. In the last chapter, we have displayed data on the WebGrid helper. Chart helper can be used to display data in a graphical format.
The Chart helper can render an image that displays data in a variety of chart types.
It can also support different formatting and labeling options.
It has the ability to render more than 30 types of charts in which you might have seen in Microsoft office, like area chart, bar chart column chart, etc.
Charts show data and additional elements like legends, axes, series, etc.
The data you display in a chart can be from an array, from the results returned from a database, or from the data that's in an XML file.
How to Display Data on Charts?
Lets have a look into a simple example in which we will display data on the charts. So first we need to create a new CSHTML file.
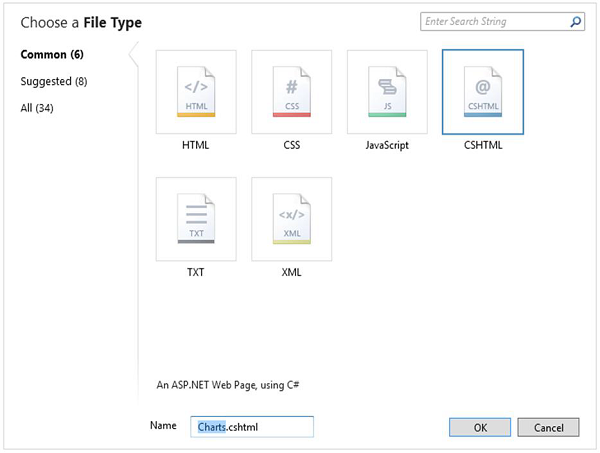
Enter Charts.cshtml in the name field and click OK and then replace the following code in the Charts.cshtml file.
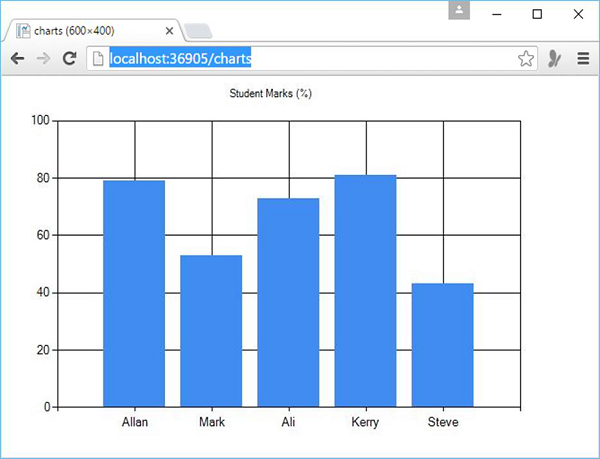
@{
   var myChart = new Chart(width: 600, height: 400)
   .AddTitle("Student Marks (%)")
   .AddSeries(
      name: "Student",
      xValue: new[] { "Allan", "Mark", "Ali", "Kerry", "Steve" },
      yValues: new[] { "79", "53", "73", "81", "43" })
   .Write();
}
As you can see in the above code that first it will create a new chart and the set its width and height.
var myChart = new Chart(width: 600, height: 400)
You can specify the chart title by using the AddTitle method as shown in the following code.
.AddTitle("Student Marks (%)")
The AddSeries method can be used to add data and then assign the values to xValue, and yValues parameters of the AddSeries method. The name parameter is displayed in the chart legend.
.AddSeries(
   name: "Student",
   xValue: new[] { "Allan", "Mark", "Ali", "Kerry", "Steve" },
   yValues: new[] { "79", "53", "73", "81", "43" })
The xValue parameter contains an array of data that will be displayed along the horizontal axis of the chart, while the yValues parameter contains an array of data that will be used to plot the vertical points of the chart.
The Write method actually renders the chart. In this case, because you didn't specify a chart type, the Chart helper renders its default chart, which is a column chart.
Now lets run your application and specify the following url − http://localhost:36905/charts and you will see the following web page.
Now lets have look into another example in which we will use the database query to retrieve the data and then that data will be displayed on the chart. So, first we need to add another Student table to our database as shown in the following screenshot.
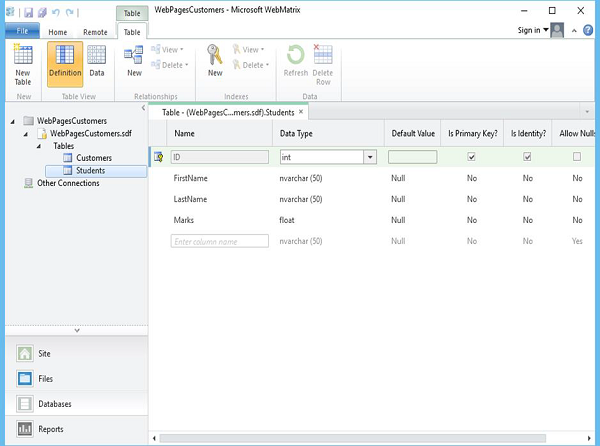
Now lets add some data to the Students table as shown in the following screenshot.
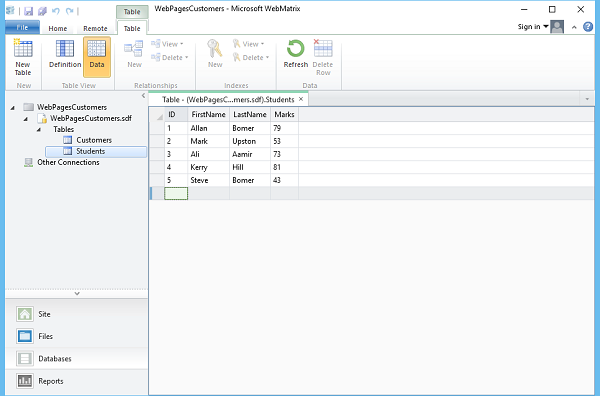
As you can see, now we have Students data.
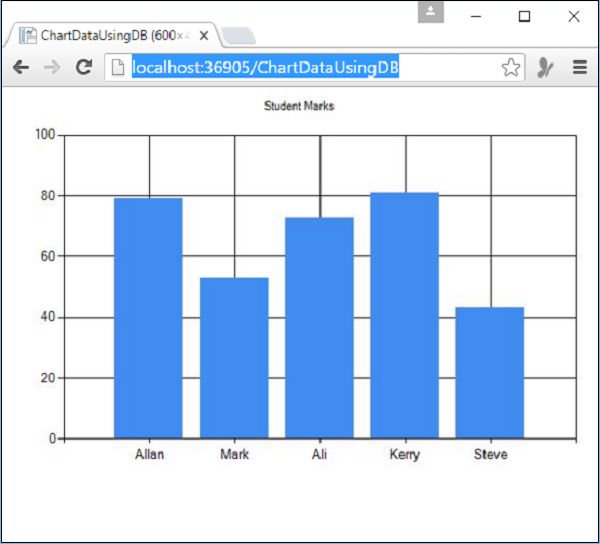
Now to display this data on the chart, lets create a new CSHTML file.

Enter ChartDataUsingDB.cshtml in the Name field and click OK and then replace all the code in ChartDataUsingDB.cshtml file.
@{
   var db = Database.Open("WebPagesCustomers");
   var data = db.Query("SELECT FirstName, Marks FROM Students");
   var myChart = new Chart(width: 600, height: 400)
   .AddTitle("Student Marks")
   .DataBindTable(dataSource: data, xField: "FirstName")
   .Write();
}
As you can see in the above code that first it will open WebPagesCustomers database and then assigns it to a variable named db.
var db = Database.Open("WebPagesCustomers");
Next a simple SQL query is created which will retrieve the FirstName and Marks from the Students table.
var data = db.Query("SELECT FirstName, Marks FROM Students");
Then a new chart is created and passes the database query to it by calling the chart's DataBindTable method.
var myChart = new Chart(width: 600, height: 400)
   .AddTitle("Student Marks")
   .DataBindTable(dataSource: data, xField: "FirstName")
   .Write();
This method takes two parameters
The dataSource parameter is for the data from the query.
The xField parameter lets you set which data column is used for the chart's x-axis.
Now lets run this application and specify the following url − http://localhost:36905/ChartDataUsingDB and you will see the following web page.
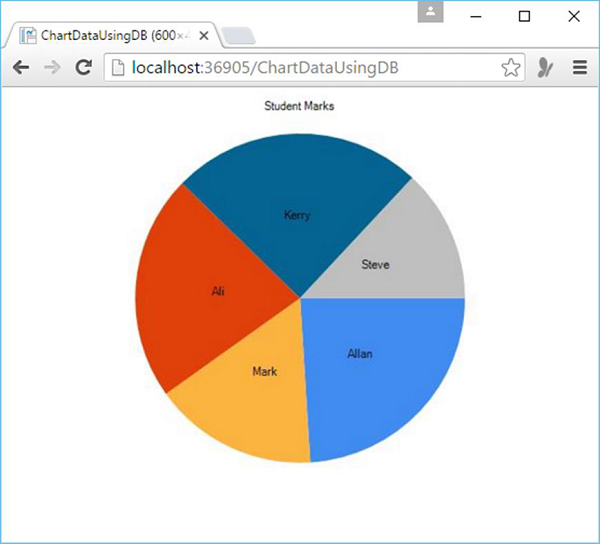
You can use the AddSeries method instead of DataBindTable and you can also specify the chart type parameter in the AddSeries method as shown in the following code.
@{
   var db = Database.Open("WebPagesCustomers");
   var data = db.Query("SELECT FirstName, Marks FROM Students");
   var myChart = new Chart(width: 600, height: 400)
      .AddTitle("Student Marks")
      .AddSeries("Default", chartType: "Pie",
      xValue: data, xField: "FirstName",
      yValues: data, yFields: "Marks")
      .Write();
}
Now lets run the application again and specify the following url − http://localhost:36905/ChartDataUsingDB and you will see the following web page.
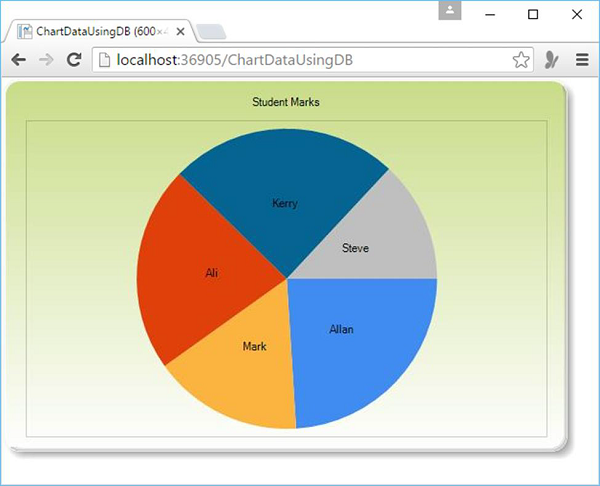
You can also change the theme of the chart by simply specifying the theme parameter while creating a chart as explained in the following code.
var myChart = new Chart(width: 600, height: 400, theme: ChartTheme.Green)
Now lets run this application again and specify the following url − http://localhost:36905/ChartDataUsingDB and you will see the following web page.
ASP.NET WP - Working with Files
In this chapter, we will cover how you can work with text files in your website. You can use text files as a simple way to store data for your website.
Text files can be in different formats, such as *.txt, *.xml, or *.csv.
You can use the File.WriteAllText method to specify the file to create and then write data to it.
You can read/write and move data from/to the text file.
Write Data to a File
Lets have a look into a simple example in which we will write a student information into a text file. First we need to create a new CSHTML file
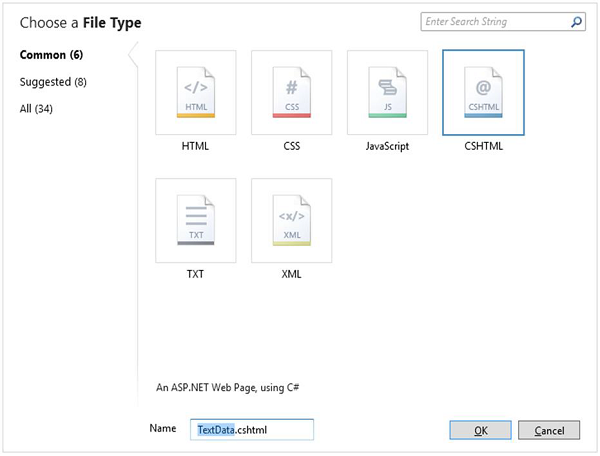
Enter TextData.cshtml in the name field and click OK to continue. In this example, we will create a simple form in which the user can enter Student information like first name, last name and marks.
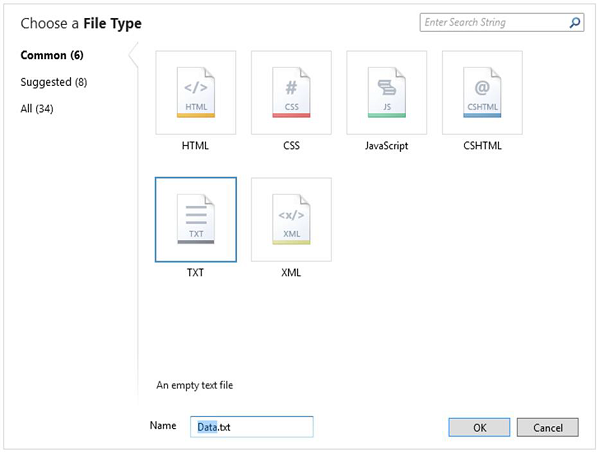
We also need to create a text file in the App_Data folder with Data.txt name
Lets replace the following code in the TextData.cshtml file.
@{
   var result = "";

   if (IsPost){
      var firstName = Request["FirstName"];
      var lastName = Request["LastName"];
      var marks = Request["Marks"];
      var userData = firstName + "," + lastName + "," + marks + Environment.NewLine;
      var dataFile = Server.MapPath("~/App_Data/Data.txt");
      File.WriteAllText(@dataFile, userData);
      result = "Information saved.";
   }
}

<!DOCTYPE html>
<html>

   <head>
      <title>Write Data to a File</title>
   </head>

   <body>
      <form id = "form1" method = "post">

         <div>
            <table>
               <tr>
                  <td>First Name:</td>
                  <td><input id = "FirstName" name = "FirstName" type = "text" /></td>
               </tr>

               <tr>
                  <td>Last Name:</td>
                  <td><input id = "LastName" name = "LastName" type = "text" /></td>
               </tr>

               <tr>
                  <td>Marks:</td>
                  <td><input id = "Marks" name = "Marks" type = "text" /></td>
               </tr>

               <tr>
                  <td></td>
                  <td><input type="submit" value="Submit"/></td>
               </tr>
            </table>

         </div>

         <div>
            @if(result != ""){
               <p>Result: @result</p>
            }
         </div>

      </form>

   </body>
</html>
In the code, we have used the IsPost property to determine whether the page has been submitted before it starts processing. The WriteAllText method of the File object takes two parameters, the file name path and the actual data to write to the file.
Now lets run this application and specify the following url − http://localhost:36905/TextData and you will see the following web page.
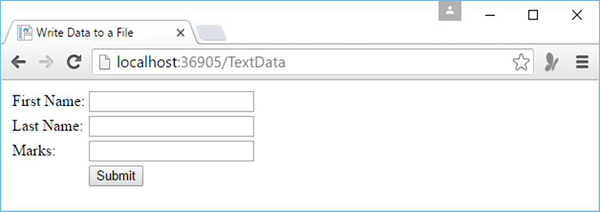
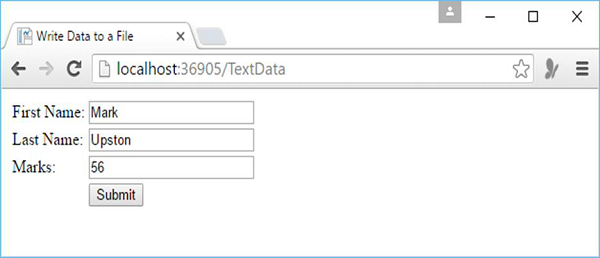
Lets enter some data in all the fields.
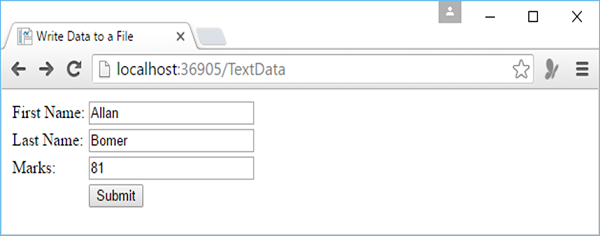
Now click on the submit button.
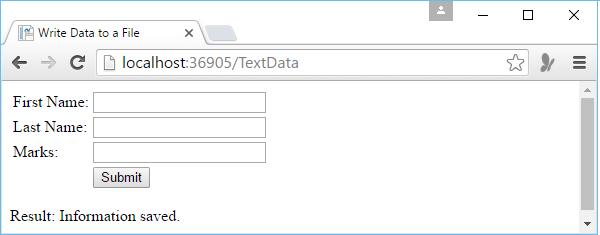
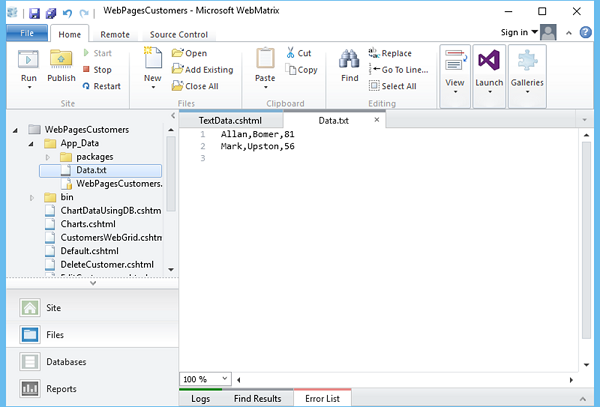
As you can see the information is saved, now lets open the Data.txt file and you will see that data is written to the file.

Append Data to an Existing File
For writing data to the text file we have used WriteAllText. If you call this method again and pass it with the same file name, then it will overwrite the existing file completely. But in most cases, we often want to add new data to the end of the file, so we can do that by using the AppendAllText method of the file object.
Lets have a look into the same example, we will just change the WriteAllText() to AppendAllText () as shown in the following program.
@{
   var result = "";

   if (IsPost){
      var firstName = Request["FirstName"];
      var lastName = Request["LastName"];
      var marks = Request["Marks"];
      var userData = firstName + "," + lastName + "," + marks + Environment.NewLine;
      var dataFile = Server.MapPath("~/App_Data/Data.txt");
      File.AppendAllText(@dataFile, userData);
      result = "Information saved.";
   }
}

<!DOCTYPE html>
<html>

   <head>
      <title>Write Data to a File</title>
   </head>

   <body>
      <form id = "form1" method = "post">
         <div>

            <table>
               <tr>
                  <td>First Name:</td>
                  <td><input id = "FirstName" name = "FirstName" type = "text" /></td>
               </tr>

               <tr>
                  <td>Last Name:</td>
                  <td><input id = "LastName" name = "LastName" type = "text" /></td>
               </tr>

               <tr>
                  <td>Marks:</td>
                  <td><input id = "Marks" name = "Marks" type = "text" /></td>
               </tr>

               <tr>
                  <td></td>
                  <td><input type = "submit" value = "Submit"/></td>
               </tr>
            </table>
         </div>

         <div>
            @if(result != ""){
               <p>Result: @result</p>
            }
         </div>

      </form>

   </body>
</html>
Now lets run the application and specify the following url http://localhost:36905/TextData and you will see the following web page.
Enter some data and click the submit button.
Now when you open the Data.txt file then you will see that the data is appended at the end of this file.
Read Data from a File
To read the data from a file, you can use the File object and then call ReadAllLines(), which will read all the lines from the file. To do so, lets create a new CSHTML file.
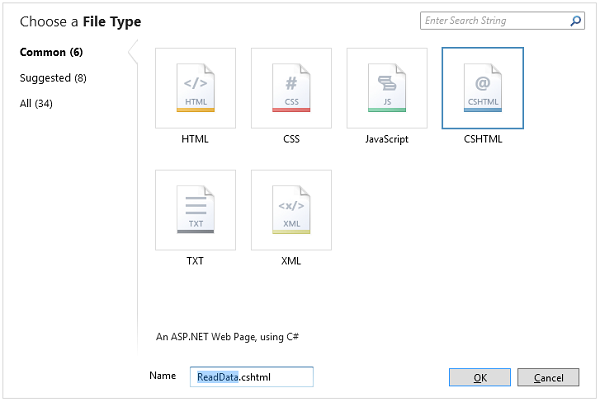
Enter ReadData.cshtml in the Name field and click OK.
Now replace the following code in the ReadData.cshtml file.
@{
   var result = "";
   Array userData = null;
   char[] delimiterChar = {','};
   var dataFile = Server.MapPath("~/App_Data/Data.txt");

   if (File.Exists(dataFile)) {
      userData = File.ReadAllLines(dataFile);
      if (userData == null) {
         // Empty file.
         result = "The file is empty.";
      }
   } else {
      // File does not exist.
      result = "The file does not exist.";
   }
}

<!DOCTYPE html>
<html>

   <head>
      <title>Reading Data from a File</title>
   </head>

   <body>
      <div>
         <h1>Reading Data from a File</h1>
         @result

         @if (result == "") {
            <ol>
               @foreach (string dataLine in userData) {
                  <li>
                     Student
                     <ul>
                        @foreach (string dataItem in dataLine.Split(delimiterChar)) {
                           <li>@dataItem</li >
                        }
                     </ul>
                  </li>
               }
            </ol>
         }
      </div>

   </body>
</html>
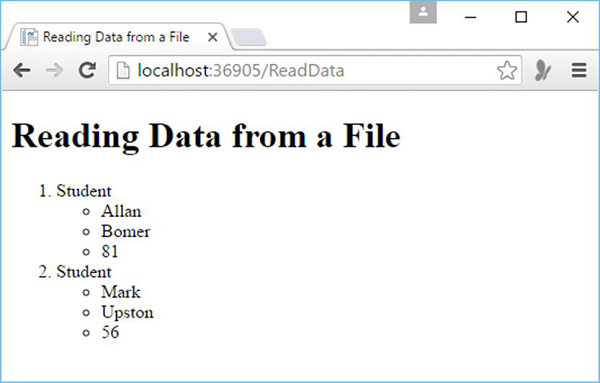
Now lets run the application again and specify the following url http://localhost:36905/ReadData and you will see the following web page.
ASP.NET WP - Working with Images
In this chapter, we will discuss how to add and display images on your website. You can add images to your website and to individual pages when you are developing your website. If an image is already available on your site, then you can use HTML <img> tag to display it on a page.
Display Image Dynamically
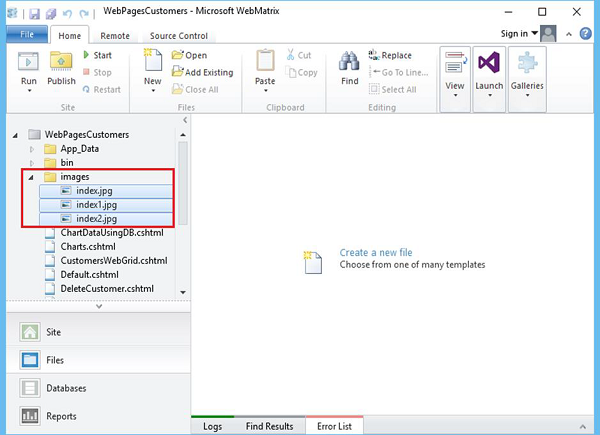
Lets have a look into a simple example by creating a new folder in the project and name it Images and then add some images in that folder.
Now add another cshtml file and Name it as DynamicImages.cshtml.
Click OK and then replace the following code in the DynamicImages.cshtml file.
@{
   var imagePath = "";
   if (Request["Choice"] != null){ imagePath = "images/" + Request["Choice"]; }
}

<!DOCTYPE html>
<html>

   <body>
      <h1>Display Images</h1>
      <form method = "post" action = "">
         I want to see:

         <select name = "Choice">
            <option value = "index.jpg">Nature 1</option>
            <option value = "index1.jpg">Nature 2</option>
            <option value = "index2.jpg">Nature 3</option>
         </select>

         <input type = "submit" value = "Submit" />

         @if (imagePath != ""){
            <p><img src = "@imagePath" alt = "Sample" /></p>
         }
      </form>

   </body>
</html>
As you can see, the body of the page has a drop-down list which is a <select> tag and it is named Choice. The list has three options, and the value attributes of each list option has the name of one of the images that has been put in the images folder.
In the above code, the list lets the user select a friendly name like Nature 1 and it then passes the .jpg file name when the page is submitted.
In the code, you can get the user's selection from the list by reading Request["Choice"]. To begin with, it will see if there is any selection then it will set a path for the image that consists of the name of the folder for the images and the user's image file name.
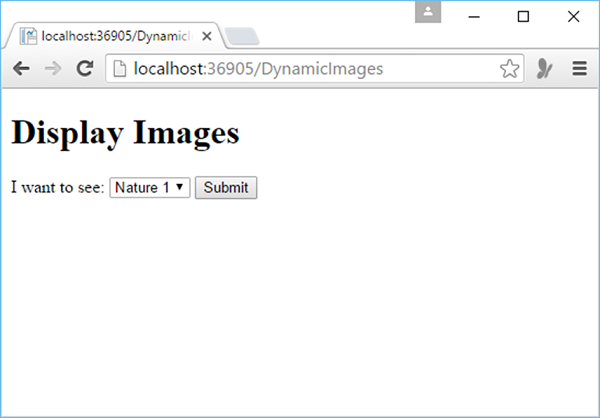
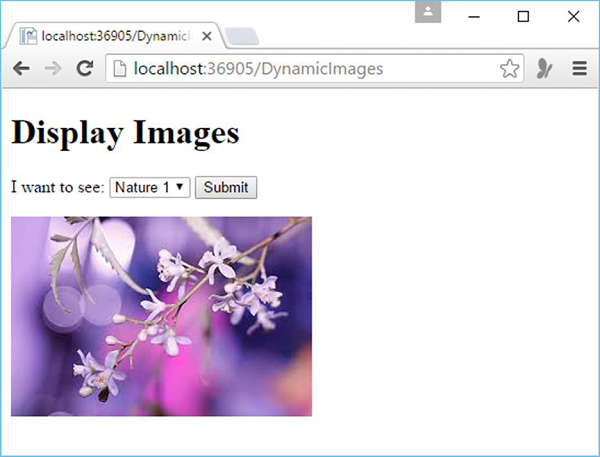
Lets run the application and specify the following url http://localhost:36905/DynamicImages then you will see the following output.
Lets click on the Submit button and you will see that index.jpg file is loaded on the page as shown in the following screenshot.
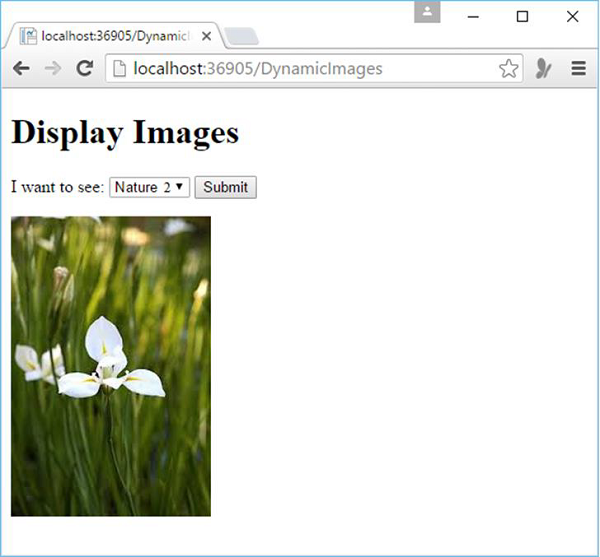
If you would like to select another photo from the dropdown list, lets say Nature 2, then click the Submit button and it will update the photo on the page.
Upload Image
You can display an image dynamically only when it is available on your website, but sometimes you will have to display images which will not be available on your website. So you will need to upload it first and then you can display that image on your web page.
Lets have a look into a simple example in which we will upload image, first we will create a new CSHTML file.
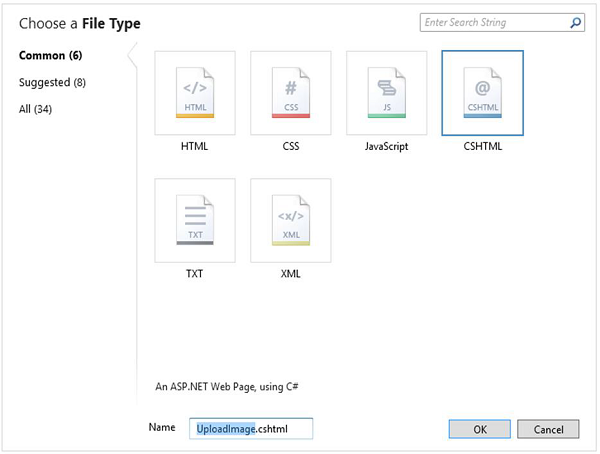
Enter UploadImage.cshtml in the Name field and click OK. Now lets replace the following code in UploadImage.cshtml file
@{ WebImage photo = null;
   var newFileName = "";
   var imagePath = "";

   if(IsPost){
      photo = WebImage.GetImageFromRequest();

      if(photo != null){
         newFileName = Guid.NewGuid().ToString() + "_" +
            Path.GetFileName(photo.FileName);
            imagePath = @"images\" + newFileName;
            photo.Save(@"~\" + imagePath);
      }
   }
}

<!DOCTYPE html>
<html>

   <head>
      <title>Image Upload</title>
   </head>

   <body>
      <form action = "" method = "post" enctype = "multipart/form-data">

         <fieldset>
            <legend> Upload Image </legend>
            <label for = "Image">Image</label>
            <input type = "file" name = "Image" size = "35"/>
            <br/>
            <input type = "submit" value = "Upload" />
         </fieldset>

      </form>
      <h1>Uploaded Image</h1>

      @if(imagePath != ""){
         <div class = "result"><img src = "@imagePath" alt = "image" /></div>
      }
   </body>

</html>
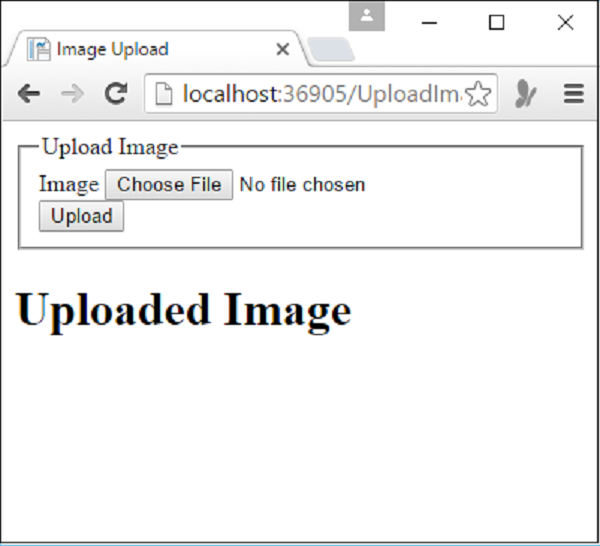
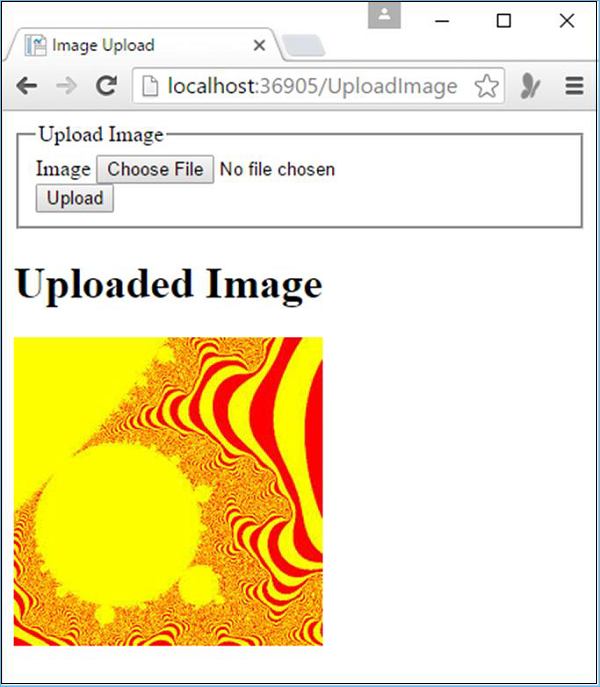
Lets run this application and specify the following url − http://localhost:36905/UploadImage then you will see the following output.
To upload the image, click on Choose File and then browse to the image which you want to upload. Once the image is selected then the name of the image will be displayed next to the Choose File button as shown in the following screenshot.
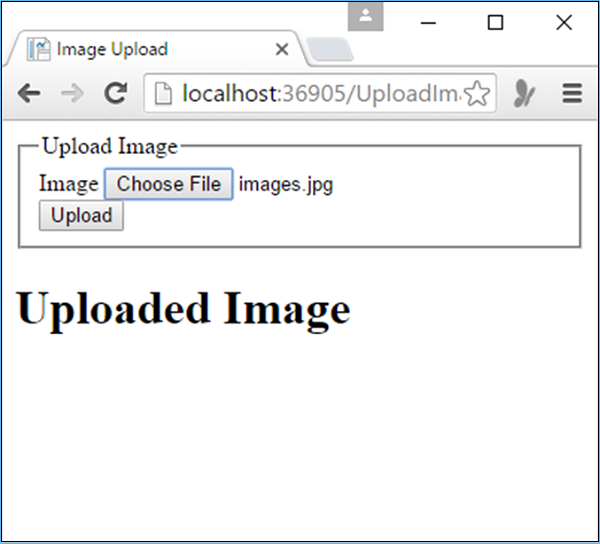
As you can see the that images.jpg image is selected, lets click on the Upload button to upload the image.
ASP.NET WP - Working with Videos
In this chapter, we will be covering how to display a video on your web page. In ASP.NET you can easily play Flash (*.swf), Media Player (*.wmv), and Silverlight (*.xap) videos.
Sometimes you might need to display a video on your website.
You can display a video by linking to a site that already has the video, like YouTube, Dailymotion, etc.
To embed a video from these sites into your own pages directly, you will need to get HTML markup from the site and then copy it into your page.
How to Embed a Video?
Lets have a look into a simple example in which we will embed a video from the YouTube. To begin with, we need to create a new CSHTML file.

Enter EmbededVideo.cshtml in the name field and click OK.
<!DOCTYPE html>
<html lang = "en">

   <head>
      <meta charset = "utf-8" />
      <title>Embedded Video Example</title>
   </head>

   <body>
      <h1>Embedded Video Example</h1>
      <p>The following video provides an introduction to WebMatrix:</p>

      <iframe
         width = "560"
         height = "315"
         src = "http://www.youtube.com/embed/fxCEcPxUbYA"
         frameborder  ="0"
         allowfullscreen>\
      </iframe>

   </body>
</html>
Lets run the application and specify the following url − http://localhost:36905/embededvideo then you will see the following output.
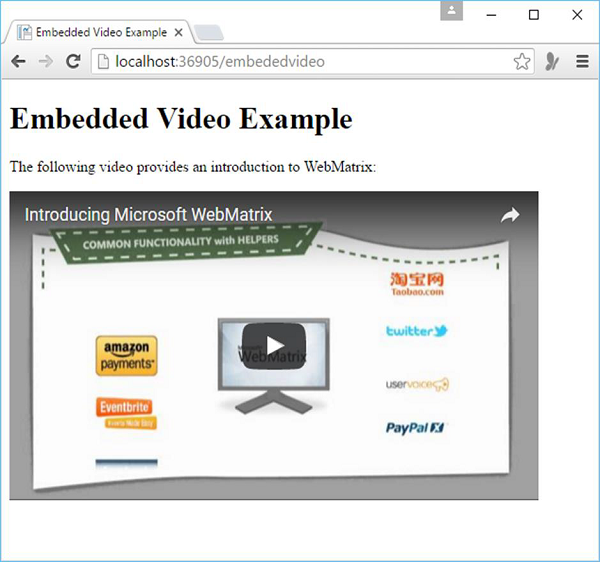
You can simply play the video now.
Choosing a Player
If you want to play a video which is available on your own website. You can play videos from your site by using the Video helper, which renders a media player directly in a page.
As you know that there are a lot of formats for video files, and each format typically requires a different player and a different way to configure the player.
In ASP.NET Razor pages, you can play a video in a web page using the Video helper.
The Video helper simplifies the process of embedding videos in a web page because it automatically generates the object and embeds HTML elements that are normally used to add video to the page.
The Video helper supports the following media players −
Adobe Flash
Windows MediaPlayer
Microsoft Silverlight
Displaying a Video using Windows Media Player
Lets have a look into a simple example in which we will display a video on our web page using the Windows Media Player. To start with, we will create a new CSHTML file.

Enter MediaPlayer.cshtml in the name field and click Ok.
Now lets create a new folder in your website and name it as Media, then add the video file which you want to play on your webpage as shown in the following screenshot.

Now replace the following code in FlashPlayer.cshtml file.
<!DOCTYPE html>
<html>

   <head>
      <title>Flash Video</title>
   </head>

   <body>
      @Video.Flash(path: "Media/Intro_WebMatrix.swf",
      width: "400",
      height: "600",
      play: true,
      loop: true,
      menu: false,
      bgColor: "red",
      quality: "medium",
      scale: "exactfit",
      windowMode: "transparent")
   </body>

</html>
When you run this application and specify the following url − http://localhost:36905/MediaPlayer then you will see the following error.
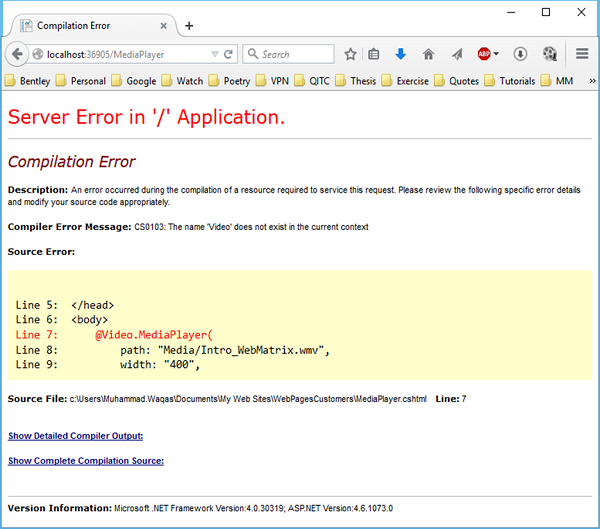
This is because we have not installed the Web helper. To do this, lets open the NuGet from the WebMatrix.
Search for ASP.NET Web Helpers Library and then click Install. Once the installation is completed successfully then you can run your application again by specifying the same url and you will see that it will play the video using Windows Media Player.
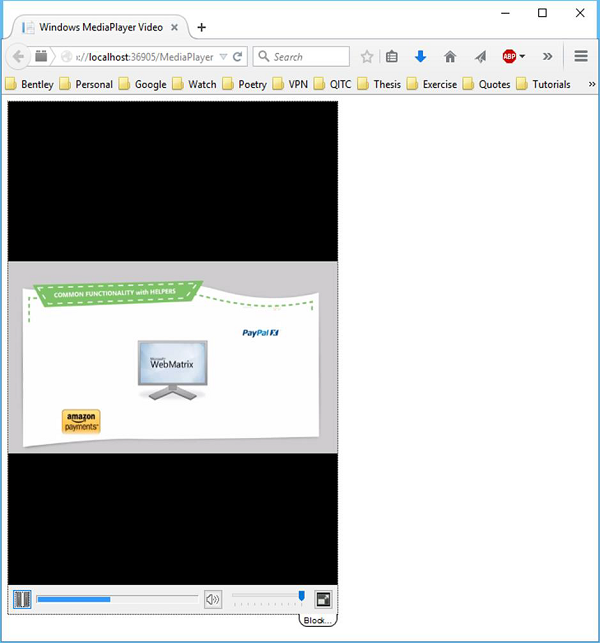
Similarly, you can also use Silverlight player and Flash player to display videos on your web page.
ASP.NET WP - Add Email
In this chapter, we will be covering how to add email to the website and how you can send an email from your web page. There can be many reasons why you might need to send email from your website.
You can send confirmation messages to the users.
You can also send notifications to yourself. For example, when a new user has registered on the website.
It is very easy to send email by using the WebMail helper. To use this WebMail helper, you have to have access to an SMTP (SMTP stands for Simple Mail Transfer Protocol) server.
An SMTP server is an email server that only forwards messages to the recipients server.
If you use a hosting provider for your website, then they will setup your email and they can tell you what your SMTP server name is.
If you're working inside a corporate network, an administrator or your IT department can usually give you the information about an SMTP server that you can use.
If you are working at home, you might even be able to test using your ordinary email provider, who can tell you the name of their SMTP server.
To work with an SMTP server, you will need the following;
The name of the SMTP server.
The port number is mostly 25. However, your ISP may require you to use port 587.
Credentials such as user name, password.
Lets have a look into a simple example in which we will send an email. To begin with, we need to create a new CSHTML file.
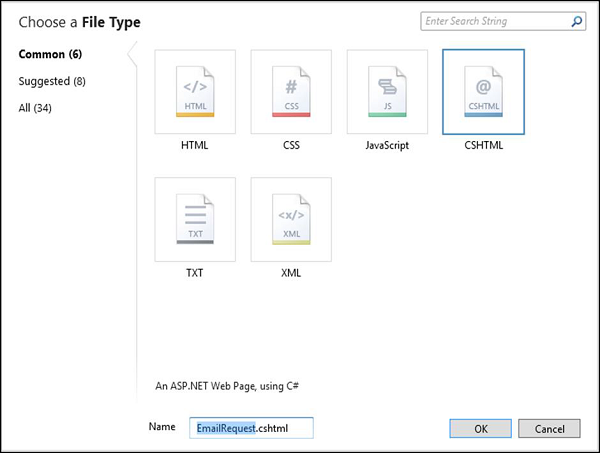
Enter EmailRequest.cshtml in the Name field and click OK.
Now replace the following code in EmailRequest.cshtml file.
<!DOCTYPE html>
<html>

   <head>
      <title>Request for Assistance</title>
   </head>

   <body>
      <h2>Submit Email Request for Assistance</h2>
      <form method = "post" action = "ProcessRequest.cshtml">
         <div>
            Your name:
            <input type = "text" name = "customerName" />
         </div>

         <div>
            Your email address:
            <input type = "text" name = "customerEmail" />
         </div>

         <div>
            Details about your problem: <br />
            <textarea name = "customerRequest" cols = "45" rows = "4"></textarea>
         </div>

         <div>
            <input type = "submit" value = "Submit" />
         </div>
      </form>

   </body>
</html>
As you can see in the above code that the action attribute of the form is set to ProcessRequest.cshtml, it means that the form will be submitted to that page. So lets create another CSHTML file ProcessRequest.cshtml and replace the following code.
@{
   var customerName = Request["customerName"];
   var customerEmail = Request["customerEmail"];
   var customerRequest = Request["customerRequest"];
   var errorMessage = "";
   var debuggingFlag = false;

   try {
      // Initialize WebMail helper
      WebMail.SmtpServer = "smtp.mail.yahoo.com";
      WebMail.SmtpPort = 465;
      WebMail.UserName = "waqasm78@yahoo.com";
      WebMail.Password = "**********";
      WebMail.From = "waqasm78@yahoo.com";

      // Send email
      WebMail.Send(to: customerEmail,
         subject: "Help request from - " + customerName,
         body: customerRequest
      );
   }catch (Exception ex ) {
      errorMessage = ex.Message;
   }
}

<!DOCTYPE html>
<html>

   <head>
      <title>Request for Assistance</title>
   </head>

   <body>
      <p>Sorry to hear that you are having trouble, <b>@customerName</b>.</p>

      @if(errorMessage == ""){
         <p>An email message has been sent to our customer service department regarding
            the following problem:</p>
         <p><b>@customerRequest</b></p>
      } else{
         <p><b>The email was <em>not</em> sent.</b></p>
         <p>Please check that the code in the ProcessRequest page has
            correct settings for the SMTP server name, a user name,
            a password, and a "from" address.</p>

         if(debuggingFlag){
            <p>The following error was reported:</p>
            <p><em>@errorMessage</em></p>
         }
      }

   </body>
</html>
If you are using Yahoo email provider, then you will have to replace the following code in the above program to make it run.
// Initialize WebMail helper
   WebMail.SmtpServer = "smtp.mail.yahoo.com";
   WebMail.SmtpPort = 465;
   WebMail.UserName = "waqasm78@yahoo.com";
   WebMail.Password = "**********";
   WebMail.From = "waqasm78@yahoo.com";
You need to type your own password in the WebMail.Password property.
Now lets run the application and specify the following url − http://localhost:59795/EmailRequest and you will see the following web page.
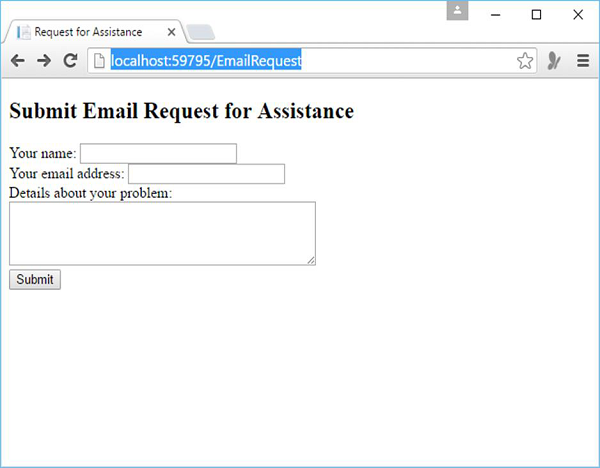
Now enter some information in all the mentioned fields as shown in the following screenshot.

Click submit and then you will see the following message when the email is successfully sent.
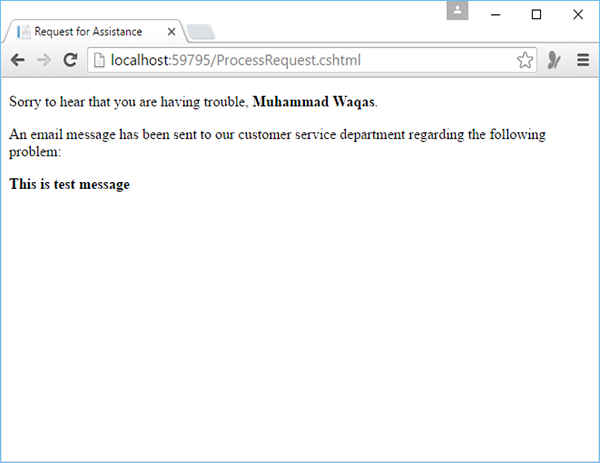
ASP.NET WP - Add Search
In this chapter, we will be covering how to add search functionality in your website using the Microsoft Bing search engine. Adding a search functionality to your website is very easy, you can use the Bing helper and specify the URL of the site to search. The Bing helper renders a text box where users can enter a search term.
By adding the capability to search, you can also include Internet search results without leaving your site. You can use the Search option in the following ways −
Add a Search, the dialog box in which a user can search your site only which makes it easy for users to find content on your site.
Add a box that lets the users to easily search the related sites.
Add a box that lets users search the Web, but without having to leave your site. This can be done by launching that search in another window.
There are two types of search options that you can use in your website.
- Simple search
- Advanced search
Simple Search
In this simple search option, the helper renders a box that includes the Bing search icon which users can click in order to launch the search.
In a simple search, the helper will also render radio buttons in which the user can specify whether to search only the specified site or the web in general.
When the user submits the search, the simple option just redirects the search to the Bing site − http://bing.com.
Then the results will be displayed in a new browser window, like user is searching in the Bing home page.
Advanced Search
In the advanced option, the helper will render a search box without radio buttons. In this case, the helper gets the search results and then formats and displays them right in that page instead of just redirecting to the Bing site.
Lets have a look into a simple example of search by creating a new CSHTML file.

Enter Search.cshtml file in the Name field and click OK.
Replace the following code in the Search.cshtml file.
<!DOCTYPE html>
<html>

   <head>
      <title>Custom Bing Search Box</title>
   </head>

   <body>
      <div>
         <h1>Simple Search</h1>
         <p>The simple option displays results by opening a new browser window
            that shows the Bing home page.</p>
         Search the ASP.NET site: <br/>
         @Bing.SearchBox(siteUrl: "www.asp.net")
      </div>

   </body>
</html>
As you can see in the above code, the siteUrl parameter in the @Bing.SearchBox() is optional, which means that you can specify the user has the option of which site to search. If you dont specify a URL, then Bing will search the web.
You can see that we have specified the www.asp.net website, so it will search that site, but if you want to search your own site, then you will need to specify that URL instead of www.asp.net.
Lets run the application and specify the following url − http://localhost:36905/Search and you will see the following output.
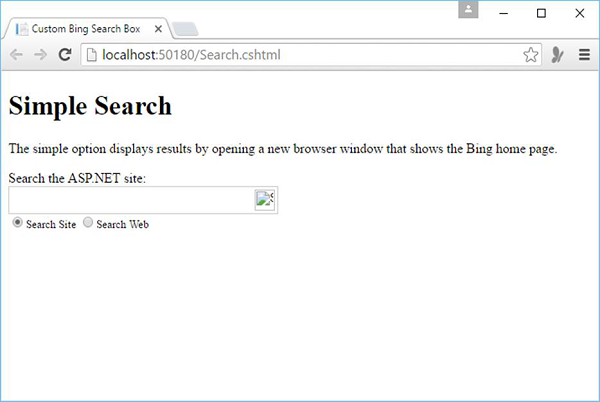
Lets enter some text to search in the search box.
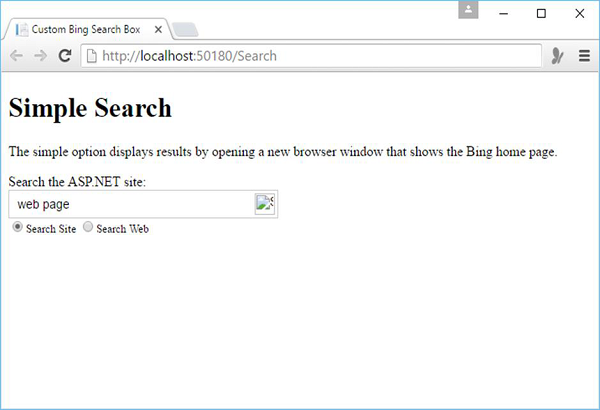
Press enter and you will see that the Microsoft Bing home page opens in another tab.
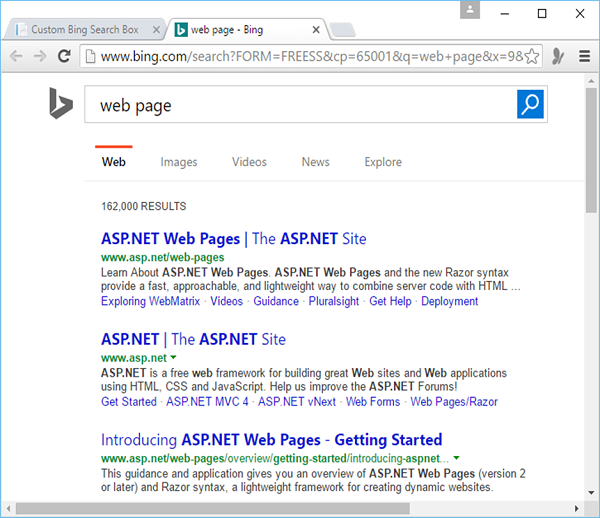
Add Social Networking to the Website
Now-a-days, you will see that many websites have integrated the social networking services to make their site more popular and fun. In this chapter, you will learn how you can integrate Social Networking to the Website.
When people visit your site and they like something on your site, they will often want to share it with friends.
To make things easy for users, you can simply display icons that people can click to share a page or post on any social networking sites like, Facebook, Twitter etc.
To display these glyphs or icons, you can add the LinkShare helper to a page.
People who visit your page can click an individual glyph/icon if they have an account with that social-networking site, and then they can post a link to your page or post on that site.
Lets have a look into a simple example in which we will add the option for social networking site on our web page. To start with, we need to create a new CSHTML file.

Enter LinkSharePage.cshtml in the Name field and click OK. Replace the following code in the LinkSharePage.cshtml file
<!DOCTYPE html>
<html>

   <head>
      <title>LinkShare Example</title>
   </head>

   <body>
      <h1>LinkShare Example</h1>
      Share: @LinkShare.GetHtml("LinkShare Example")
   </body>

</html>
Lets run the application and specify the following url − http://localhost:36905/LinkSharePage and you will see the following output.
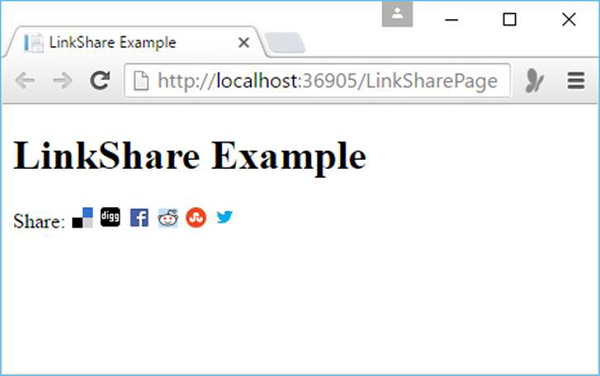
Lets click on the Twitter icon and you will see the following Twitter login page in a new tab.
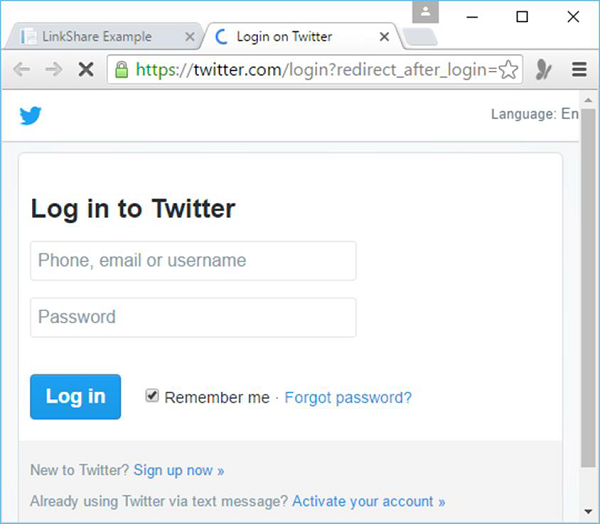
Game Card
When people play Microsoft Xbox games online, each user has a unique ID. Statistics are kept for each player in the form of a gamer card, which shows their reputation, gamer score, and recently played games. If you are an Xbox gamer, you can show your gamer card on pages in your site by using the GamerCard helper.
Lets have a look into a simple example in which we will display a game card, first we need to create a new CSHTML file
Enter GameCard.cshtml in the Name field and click OK and then replace the following code.
<html>
   <head>
      <title>Xbox Gamer Card</title>
   </head>

   <body>
      <h1>Xbox Gamer Card</h1>
      @GamerCard.GetHtml("major nelson")
   </body>

</html>
Lets run the application and you will see the following output.

ASP.NET WP - Caching
When someone requests a page from your site, then the web server has to do some work in order to fulfill the request. So the server might have to perform tasks which will take a long time, such as retrieving data from a database.
In some cases, if your site experiences a lot of traffic, a whole series of individual requests that cause the web server to perform the complicated or slow task can add up to a lot of work.
This can ultimately affect the performance of the site.
One way to improve the performance of your website is to cache data.
When your site gets repeated requests for the same information, and the information does not need to be modified for each person, and it's not time sensitive, so instead of re-fetching or recalculating it, you can fetch the data once and then store the results.
The next time a request comes in for that information, you just get it out of the cache.
How to Cache the Data?
Lets have a look into a simple example in which we will cache the data when the page is first time loaded. So lets create a new CSHTML file with WebCache.cshtml name, and replace the following code.
@{
   var cacheItemKey = "CachedTime";
   var cacheHit = true;
   var time = WebCache.Get(cacheItemKey);

   if (time == null){
      cacheHit = false;
   }

   if (cacheHit == false){
      time = @DateTime.Now;
      WebCache.Set(cacheItemKey, time, 1, false);
   }
}

<!DOCTYPE html>
<html>

   <head>
      <title>WebCache Helper Sample</title>
   </head>

   <body>
      <div>
         @if (cacheHit){
            @:Found the time data in the cache.
         } else {
            @:Did not find the time data in the cache.
         }
      </div>

      <div>
         This page was cached at @time.
      </div>

   </body>
</html>
As you can see in the above code, when we cache the data, we will put it into the cache using a name this is unique across the website. In this case, we will use a cache entry named CachedTime. This is the cacheItemKey.
The code first reads the CachedTime cache entry. If a value is returned, the code just sets the value of the time variable to the cache data.
But if the cache entry doesn't exist the code sets the time value, adds it to the cache, and sets an expiration value to one minute.
The WebCache.Set(cacheItemKey, time, 1, false) shows how to add the current time value to the cache and set its expiration to 1 minute.
Lets run the application and specify the following url − http://localhost:50180/WebCache.cshtml and you will see the following page.
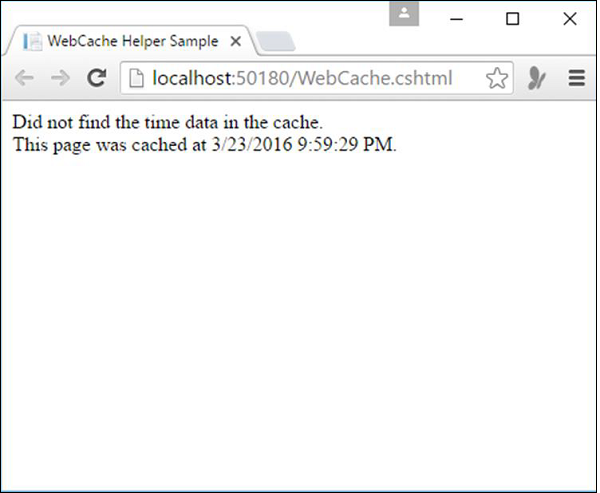
Now lets refresh your page within a minute and you will see the same time, this is because the time is loaded from the cache.
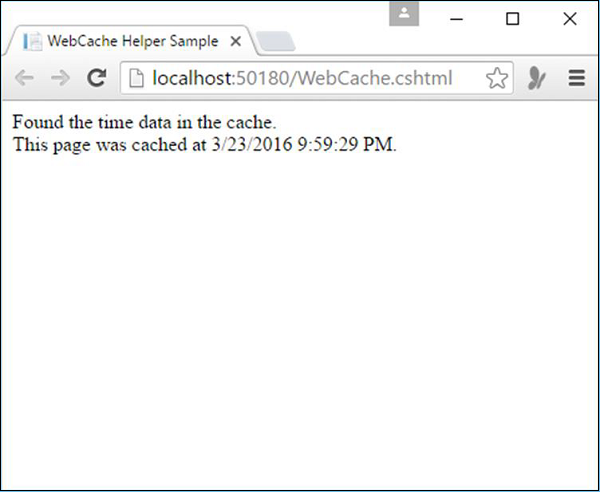
ASP.NET WP - Security
In this chapter, we will be covering how to secure the website so that some of the pages are available only to people who log in. To secure your website you can make your website so that users can log into it. Securing your website can be useful for many reasons.
Your site might have pages that should be available only to members.
Sometimes you will require users to log in so that they can send feedback or leave a comment on your website.
If the users are not logged in then they can still browse some of the pages, but not all of them.
Users who are not logged in are known as anonymous users.
How to Secure a Website with Authentication?
A user will first need to register on your website and can then log in to the site. To register on the website, a user will need a username and an email address along with a password to confirm that a user is who they claim to be. This process of logging in and confirming a user's identity is known as authentication.
WebMatrix provides a built-in template known as Starter Site to create a website, which contains the following properties.
A database that can store user names and passwords for users.
A registration page where users can register.
A login/logout page.
A password recovery and reset page.
Lets have a look into a simple example by creating a new Starter Site.
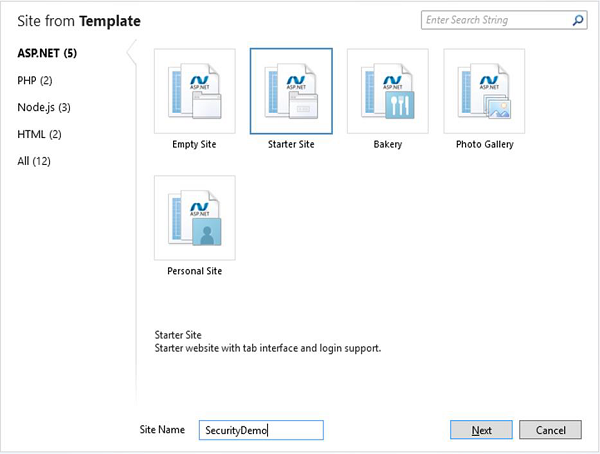
Enter SecurityDemo in the Site Name field and click Next. This will install and configure the required packages.
Once the installation is finished then lets run the application and you will see the following web page.
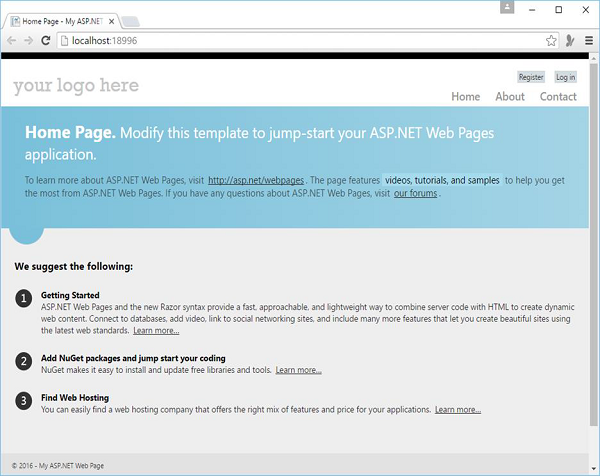
As you can see there are two buttons Register and Log in on the top right hand side of the page.
Lets click on the Register link and you will see the following webpage in which you can register by providing the following information.

Here is the implementation Register.cshtml file which is under the Account folder on the site.
@* Remove this section if you are using bundling *@
@section Scripts {
   <script src = "~/Scripts/jquery.validate.min.js"></script>
   <script src = "~/Scripts/jquery.validate.unobtrusive.min.js"></script>
}
@{
   Layout = "~/_SiteLayout.cshtml";
   Page.Title = "Register";

   // Initialize general page variables
   var email = "";
   var password = "";
   var confirmPassword = "";

   // Setup validation
   Validation.RequireField("email", "You must specify an email address.");
   Validation.RequireField("password", "Password cannot be blank.");
   Validation.Add("confirmPassword",
   Validator.EqualsTo("password", "Password and confirmation password do not match."));
   Validation.Add("password",
      Validator.StringLength(
         maxLength: Int32.MaxValue,
         minLength: 6,
         errorMessage: "Password must be at least 6 characters"));

   // If this is a POST request, validate and process data
   if (IsPost) {
      AntiForgery.Validate();
      email = Request.Form["email"];
      password = Request.Form["password"];
      confirmPassword = Request.Form["confirmPassword"];

      // Validate the user's captcha answer
      // if (!ReCaptcha.Validate("PRIVATE_KEY")) {
         // ModelState.AddError("recaptcha", "Captcha response was not correct");
      // }

      // If all information is valid, create a new account
      if (Validation.IsValid()) {
         // Insert a new user into the database
         var db = Database.Open("StarterSite");

         // Check if user already exists
         var user = db.QuerySingle("SELECT Email FROM UserProfile WHERE LOWER(Email) =
            LOWER(@0)", email);

         if (user == null) {
            // Insert email into the profile table
            db.Execute("INSERT INTO UserProfile (Email) VALUES (@0)", email);
            // Create and associate a new entry in the membership database.
            // If successful, continue processing the request

            try {
               bool requireEmailConfirmation = !WebMail.SmtpServer.IsEmpty();
               var token = WebSecurity.CreateAccount(email, password,
                  requireEmailConfirmation);

               if (requireEmailConfirmation) {
                  var hostUrl = Request.Url.GetComponents(UriComponents.SchemeAndServer,
                     UriFormat.Unescaped);
                  var confirmationUrl = hostUrl + VirtualPathUtility.ToAbsolute
                     ("~/Account/Confirm?confirmationCode = "
                     + HttpUtility.UrlEncode(token));
                  WebMail.Send(
                     to: email,
                     subject: "Please confirm your account",
                     body: "Your confirmation code is: " + token + ".
                     Visit <a href = \"" + confirmationUrl + "\">" +
                     confirmationUrl + "</a> to activate your account."
                  );
               }

               if (requireEmailConfirmation) {
                  // Thank the user for registering and let them know an
                     email is on its way
                  Response.Redirect("~/Account/Thanks");
               } else {
                  // Navigate back to the homepage and exit
                  WebSecurity.Login(email, password);
                  Response.Redirect("~/");
               }
            } catch (System.Web.Security.MembershipCreateUserException e) {
               ModelState.AddFormError(e.Message);
            }
         } else {
            // User already exists
            ModelState.AddFormError("Email address is already in use.");
         }
      }
   }
}

<hgroup class = "title">
   <h1>@Page.Title.</h1>
   <h2>Create a new account.</h2>
</hgroup>

<form method = "post">
   @AntiForgery.GetHtml()
   @* If at least one validation error exists, notify the user *@
   @Html.ValidationSummary("Account creation was unsuccessful.
      Please correct the errors and try again.",
      excludeFieldErrors: true, htmlAttributes: null)

   <fieldset>
      <legend>Registration Form</legend>
      <ol>
         <li class = "email">
            <label for = "email" @if(!ModelState.IsValidField("email")){
               <text>class = "error-label"</text>}>Email address</label>
            <input type = "text" id = "email" name = "email" value = "@email"
               @Validation.For("email") />

            @* Write any email validation errors to the page *@
            @Html.ValidationMessage("email")
         </li>

         <li class = "password">
            <label for = "password" @if(!ModelState.IsValidField("password")) {<text>
               class = "error-label"</text>}>Password</label>
            <input type = "password" id = "password" name = "password"
               @Validation.For("password") />

            @* Write any password validation errors to the page *@
            @Html.ValidationMessage("password")
         </li>

         <li class = "confirm-password">
            <label for = "confirmPassword"
               @if(!ModelState.IsValidField("confirmPassword"))
               {<text>class = "error-label"</text>}>Confirm password</label>
            <input type = "password" id = "confirmPassword" name = "confirmPassword"
               @Validation.For("confirmPassword") />

            @* Write any password validation errors to the page *@
            @Html.ValidationMessage("confirmPassword")
         </li>

         <li class = "recaptcha">
            <div class = "message-info">
               <p>
                  To enable CAPTCHA verification, <a href =
                  "http://go.microsoft.com/fwlink/?LinkId=204140">install the
                  ASP.NET Web Helpers Library</a> and uncomment ReCaptcha.GetHtml
                  and replace 'PUBLIC_KEY' with your public key. At the top of this
                  page, uncomment ReCaptcha. Validate and replace 'PRIVATE_KEY' with
                  your private key.Register for reCAPTCHA keys at <a href =
                  "http://recaptcha.net"> reCAPTCHA.net</a>.
               </p>
            </div>
            @*
               @ReCaptcha.GetHtml("PUBLIC_KEY", theme: "white")
               @Html.ValidationMessage("recaptcha")
            *@
         </li>
      </ol>
      <input type = "submit" value = "Register" />

   </fieldset>
</form>
When you click on the Register button then you will see the Home page again, but you will see that now you are logged in by mentioning your email id.
Create Page for Members Only
In the website you will want some pages that can only be accessed by the members only. ASP.NET lets you configure pages so they can be accessed only by logged-in members. Typically, if anonymous users try to access a members-only page, you redirect them to the login page.
Lets have a look into a simple example in which we modify the About page. When a user is logged in, then the user can access this page otherwise the user will be redirected to the login page. So lets replace the following code in About.cshtml file.
@if (!WebSecurity.IsAuthenticated) {
   Response.Redirect("~/Account/Login");
}
@{
   Layout = "~/_SiteLayout.cshtml";
   Page.Title = "About My Site";
}

<hgroup class = "title">
   <h1>@Page.Title.</h1>
   <h2>Your app description page.</h2>
</hgroup>

<article>
   <p>Use this area to provide additional information.</p>
   <p>Use this area to provide additional information.</p>
   <p>Use this area to provide additional information.</p>
</article>

<aside>
   <h3>Aside Title</h3>
   <p>Use this area to provide additional information.</p>

   <ul>
      <li><a href = "~/">Home</a></li>
      <li><a href = "~/About">About</a></li>
      <li><a href = "~/Contact">Contact</a></li>
   </ul>

</aside>
Lets run the application and you will see the following Home page.
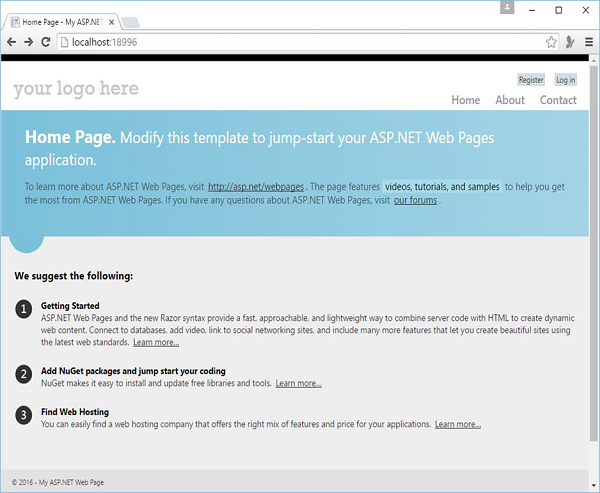
The user is not logged in as of now, so when you click on the About link then you will see that you will directed to the login page as shown in the following screenshot.
Lets enter the credentials.
Now click on Log in and you will see the Home page.
When you now click on the About link, you will see that About page is now accessible to you as shown in the following screenshot.
ASP.NET WP - Publish
In all the previous chapters, we have done all the work on a local computer, including testing pages. To run our *.cshtml pages, we were using the IIS Express web server that's built into the WebMatrix. But these pages were only accessible on the local computer. To make the website visible to others, we will need to publish it on the Internet.
Publishing your website means that you will have an account with a hosting provider.
A hosting provider is a company that owns publicly accessible web servers and that will rent you space for the site.
Hosting plans run from a few dollars a month or even free for small sites to hundreds of dollars a month for high-volume commercial websites.
Selecting a Hosting Provider
When you want to publish the website, the first thing you will need is to find a hosting provider. You can look for one by searching the web or also right from within the WebMatrix.
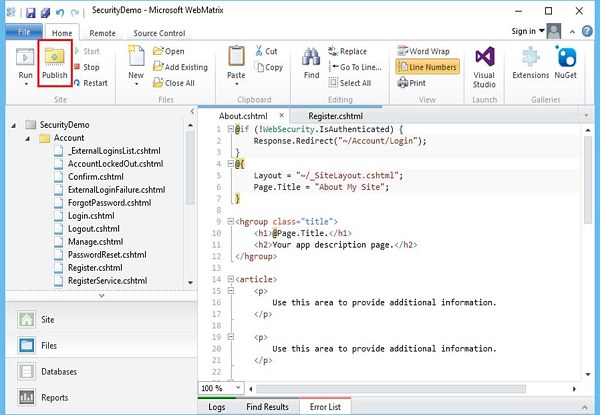
You can see the Publish button on the Home tab of the WebMatrix ribbon. Click on Publish and you will see the following dialog.
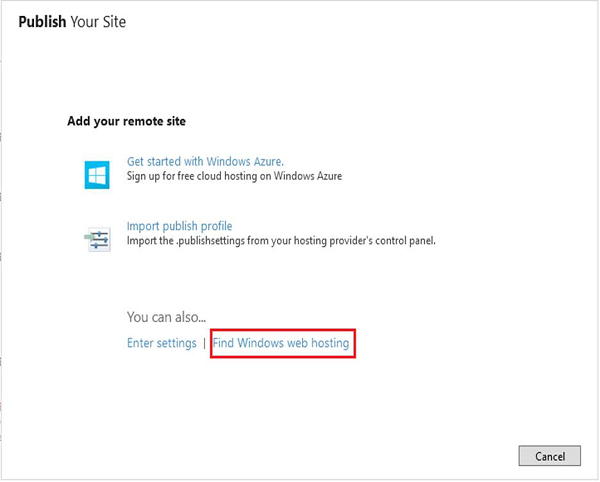
Click on the Find Windows web hosting and it will open a page on the Microsoft site that lists hosting providers that support ASP.NET as shown in the following screenshot.
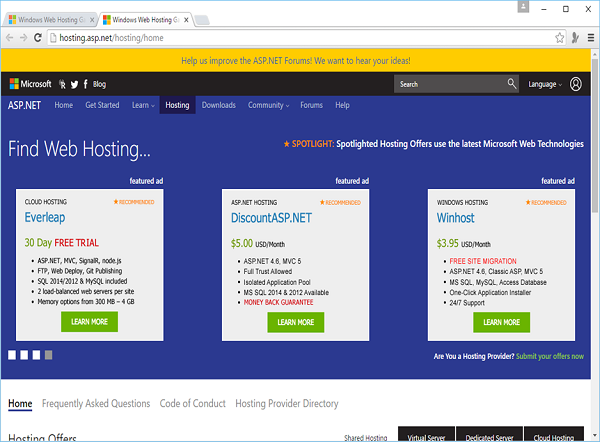
Some sites offer a free trial period. A free trial is a good way to try publishing and hosting a website by using the WebMatrix. We will select Everleap, which has a 30-day free trial.
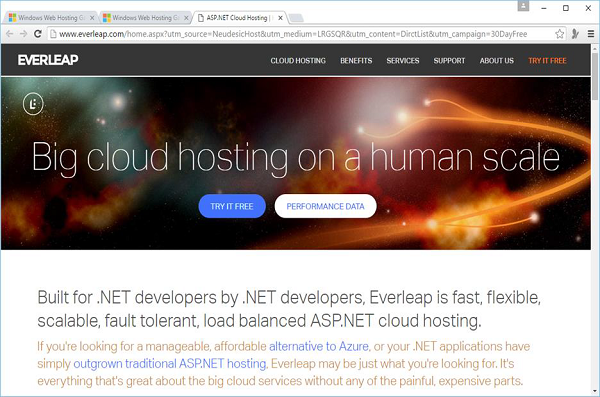
Click on the TRY IT FREE.
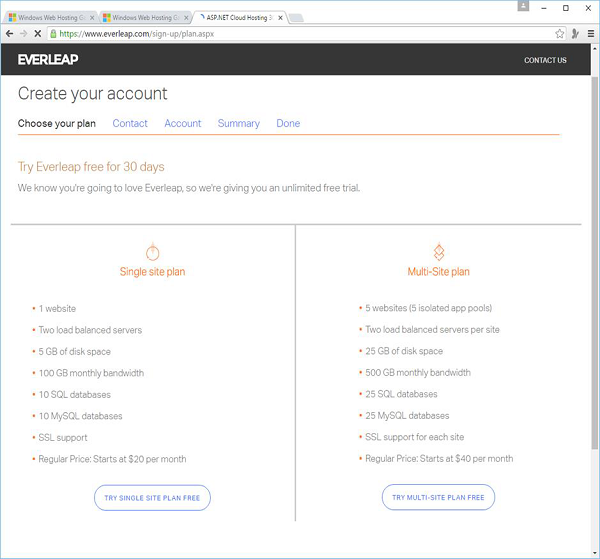
Create an account from any of the above shown site plans. Once the account is created, we will receive an email with all the necessary information. Then login to the Everleap website and go to the following page − https://cp.everleap.com/login.aspx?ReturnUrl=%2fsites%2fmanage.aspx
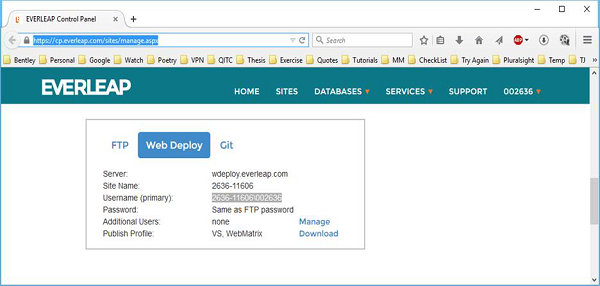
We will get to see all the necessary information with the help of which you can publish your website. Now lets go to the WebMatrix and click on Enter Settings on Publish your Site dialog and you will see the Publish Settings dialog and enter the following information from the above page.
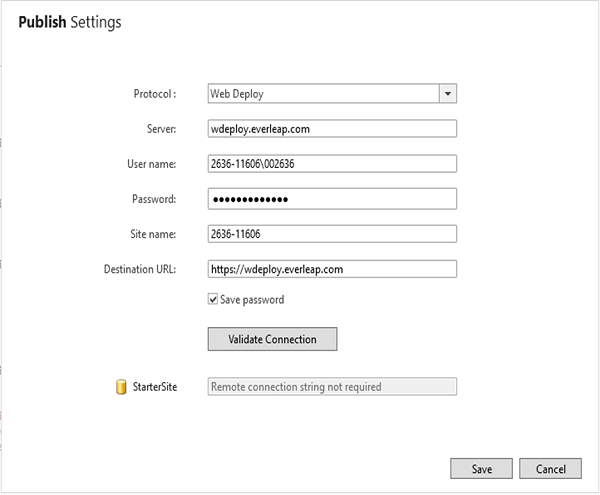
Click Validate Connection. If everything is ok, the dialog box reports Connected Successfully, which means it can communicate with the hosting provider's server as shown in the following screenshot.
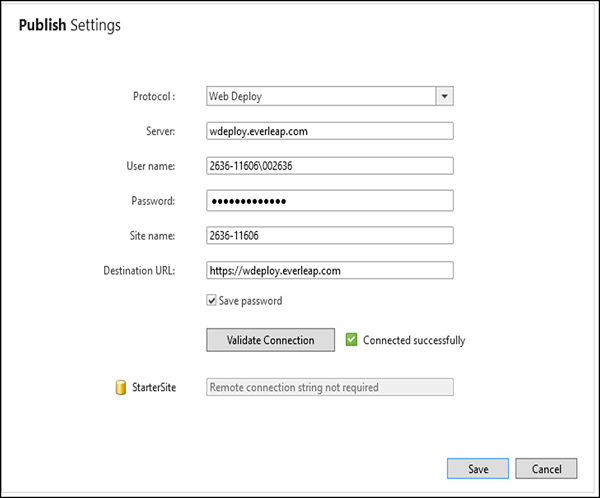
Click Save to save your settings.
WebMatrix offers to perform a test to make sure that it can communicate correctly with the hosting site as shown in the following screenshot.
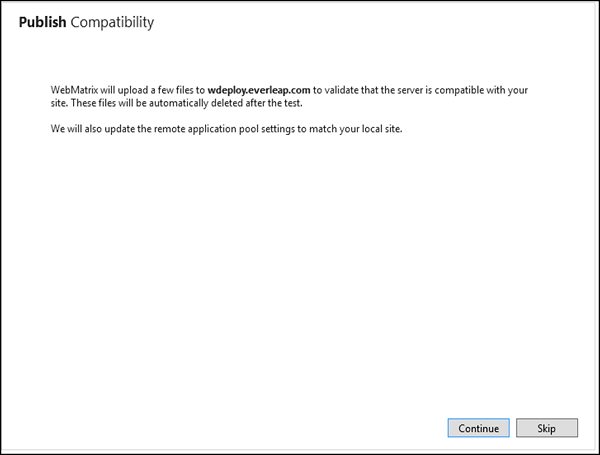
Click Continue to start the publish process.
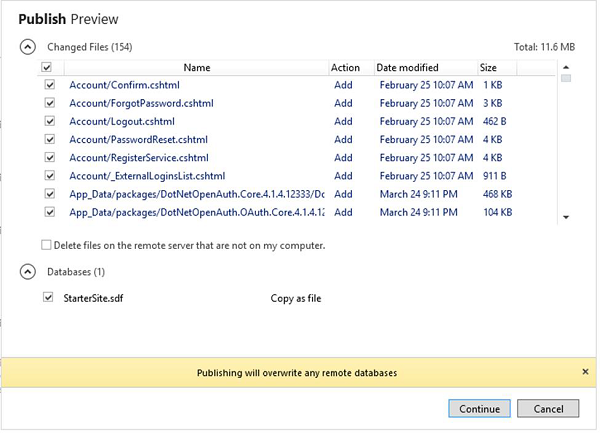
As you can see the list of files to publish includes the web pages that are created. Click Continue.
WebMatrix copies your files to the hosting provider's server. When it's done, the results are reported in the status bar. Once the site is published successfully, click on the url mentioned in the status bar and you will see that the site is live now.
