- Apache Tapestry - Home
- Apache Tapestry - Overview
- Apache Tapestry - Architecture
- Apache Tapestry - Installation
- Apache Tapestry - Quick Start
- Apache Tapestry - Project Layout
- Convention Over Configuration
- Apache Tapestry - Annotation
- Pages and Components
- Apache Tapestry - Templates
- Apache Tapestry - Components
- Built-In Components
- Forms & Validation Components
- Apache Tapestry - Ajax Components
- Apache Tapestry - Hibernate
- Apache Tapestry - Storage
- Advanced Features
Apache Tapestry - Quick Guide
Apache Tapestry - Overview
Apache Tapestry is an open source web framework written in Java. It is a component based web framework. Tapestry components are Java Classes. They are neither inherited from a framework specific base class nor implementation of an interface and they are just plain POJOs (Plain old Java Objects).
The important feature of the Java used by tapestry is Annotation. Tapestry web pages are constructed by using one or more components, each having a XML based template and component class decorated with a lot of Tapestry's Annotations. Tapestry can create anything ranging from a tiny, single-page web application to a massive one consisting of hundreds of pages.
Benefits of Tapestry
Some of the benefits provided by tapestry are −
- Highly scalable web applications.
- Adaptive API.
- Fast and mature framework.
- Persistent state storage management.
- Build-in Inversion of Control.
Features of Tapestry
Tapestry has the following features −
- Live class reloading
- Clear and detailed exception reporting
- Static structure, dynamic behaviors.
- Extensive use of Plain Old Java Objects (POJOs)
- Code less, deliver more.
Why Tapestry?
Already Java has a lot of web frameworks like JSP, Struts, etc., Then, why do we need another framework? Most of the today's Java Web Frameworks are complex and have a steep learning curve. They are old fashioned and requires compile, test and deploy cycle for every update.
On the other hand, Tapestry provides a modern approach to web application programming by providing live class reloading. While other frameworks are introducing lots of interfaces, abstract & base classes, Tapestry just introduces a small set of annotations and still provides the ability to write large application with rich AJAX support.
Apache Tapestry - Architecture
Tapestry tries to use the available features of Java as much as possible. For example, all Tapestry pages are simply POJOs. It does not enforce any custom interfaces or base class to write the application. Instead, it uses Annotation (a light weight option to extend the functionality of a Java class) to provide features. It is based on battle-tested Java Servlet API and is implemented as a Servlet Filter. It provides a new dimension to the web application and the programming is quite Simple, Flexible, Understandable and Robust.
Workflow
Let us discuss the sequence of action taking place when a tapestry page is requested.
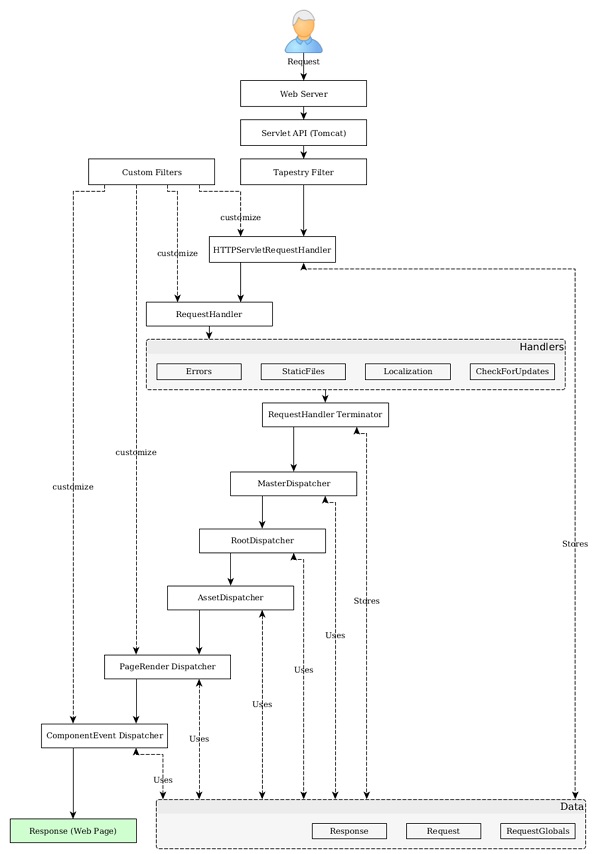
Step 1 − The Java Servlet receives the page request. This Java Servlet is the configured in such a way that the incoming request will be forwarded to tapestry. The configuration is done in the web.xml as specified in the following program. Filter and Filter Mapping tag redirects all the request to Tapestry Filter.
<!DOCTYPE web-app PUBLIC "-//Sun Microsystems, Inc.//DTD Web Application 2.3//EN"
   "http://java.sun.com/dtd/web-app_2_3.dtd">
<web-app>
   <display-name>My Tapestry Application</display-name>
   <context-param>
      <param-name>tapestry.app-package</param-name>
      <param-value>org.example.myapp</param-value>
   </context-param>
   <filter>
      <filter-name>app</filter-name>
      <filter-class>org.apache.tapestry5.TapestryFilter</filter-class>
   </filter>
   <filter-mapping>
      <filter-name>app</filter-name>
      <url-pattern>/*</url-pattern>
   </filter-mapping>
</web-app>
Step 2 − The Tapestry Filter calls the HttpServletRequestHandler Service by its Service() method.
Step 3 − HttpServletRequestHandler stores the request and response in RequestGlobals. It also wraps the request and response as a Request and Response object and sends it to the RequestHandler.
Step 4 − The RequestHandler is an abstraction on top of HttpServletRequest of Servlet API. Some of the salient feature of the tapestry is done in RequestHandler section. The feature of tapestry can be extended by writing a filter in RequestHandler. RequestHandler provides several build-in filters, which include −
CheckForUpdates Filter − Responsible for live class reloading. This filter checks the java classes for changes and update the application as necessary.
Localization Filter − Identify the location of the user and provide localization support for the application.
StaticFiles Filter − Identify the static request and aborts the process. Once the process is aborted, Java Servlet takes control and process the request.
Error Filter − Catches the uncaught exception and presents the exception report page.
The RequestHandler also modifies and stores the request and response in the RequestQlobalsand invokes the MasterDispatcher service.
Step 5 − The MasterDispatcher is responsible for rendering the page by calling several dispatchers is a specific order. The four-main dispatchers called by MasterDispatcher is as follows −
RootPath Dispatcher − It recognizes the root path / of the request and render the same as Start page.
Asset Dispatcher − It recognized the asset (Java assets) request by checking the url pattern /assets/ and sends the requested assets as byte streams.
PageRender Dispatcher − Bulk of the tapestry operations are done in PageRender Dispatcher and the next dispatcher Component Dispatcher. This dispatcher recognizes the particular page of that request and its activation context (extra information). It then renders that particular page and sends it to the client. For example, if the request url is /product/12123434, the dispatcher will check if any class with name product/12123434 is available. If found, it calls product/12123434 class, generate the response and send it to the client. If not, it checks for product class. If found, it calls product class with extra information 121234434, generates the response and sends it to the client. This extra information is called Activation Context. If no class is found, it simply forwards the request to Component Dispatcher.
Component Dispatcher − Component Dispatcher matches the URL of the page with the pattern /<class_name>/<component_id>:<event_type>/<activation_context>. For example, /product/grid:sort/asc represents the product class, grid component, sortevent type and asc activation context. Here, event_type is optional and if none is provided, the default event type action will be triggered. Usually, the response of the component dispatcher is to send a redirect to the client. Mostly, the redirect will match PageRender Dispatcher in the next request and proper response will be send to the client.
Apache Tapestry - Installation
In this chapter, we will discuss how to install Tapestry on our machine.
Prerequisite
Tapestry's only dependency is Core Java. Tapestry is developed independently without using any third party library / framework. Even the IoC library used by tapestry is developed from the scratch. Web application written in tapestry can be built and deployed from console itself.
We can use Maven, Eclipse and Jetty to improve the development experience. Maven provides quick start application templates and options to host application in Jetty, Java's de-facto development server. Eclipse provides extensive project management features and integrates well with maven.
An ideal tapestry application development needs the following −
- Java 1.6 or later
- Apache Maven
- Eclipse IDE
- Jetty Server
Verify Maven Installation
Hopefully, you have installed Maven on your machine. To verify the Maven installation, type the command given below −
mvn --version
You could see the response as shown below −
Apache Maven 3.3.9 (bb52d8502b132ec0a5a3f4c09453c07478323dc5; 2015-1110T22:11:47+05:30)
Maven home: /Users/workspace/maven/apache-maven-3.3.9
Java version: 1.8.0_92, vendor: Oracle Corporation
Java home: /Library/Java/JavaVirtualMachines/jdk1.8.0_92.jdk/Contents/Home/jre
Default locale: en_US, platform encoding: UTF-8
OS name: "mac os x", version: "10.11.4", arch: "x86_64", family: "mac"
If Maven is not installed, then download and install the latest version of maven by visiting the Maven website.
Download Tapestry
The latest version of tapestry is 5.4 and can be downloaded from the Tapestry website. It is enough to download the binary package. If we use the Maven Quick Start Template, then it is not necessary to download Tapestry separately. Maven automatically downloads the necessary Tapestry Jars and configures the application. We will discuss how to create a basic Tapestry Application using Maven in the next chapter.
Apache Tapestry - Quick Start
After Tapestry installation, let us create a new initial project using Maven as shown below −
$ mvn archetype:generate -DarchetypeCatalog=http://tapestry.apache.org
You could see the response as shown below −
[INFO] Scanning for projects...
[INFO]
[INFO] ---------------------------------------------------------------------------------
[INFO] Building Maven Stub Project (No POM) 1
[INFO] ---------------------------------------------------------------------------------
[INFO]
[INFO] >>> maven-archetype-plugin:2.4:generate (default-cli) >
generatesources @ standalone-pom >>>
[INFO]
[INFO] <<< maven-archetype-plugin:2.4:generate (default-cli)
< generatesources @ standalone-pom <<<
[INFO]
[INFO] --- maven-archetype-plugin:2.4:generate (default-cli) @ standalone-pom ---
[INFO] Generating project in Interactive mode
[INFO] No archetype defined. Using maven-archetype-quickstart
(org.apache.maven.archetypes:maven-archetype-quickstart:1.0)
After Maven building all the operations, choose archetype to create Tapestry 5 QuickStart project as follows −
Choose archetype −
https://tapestry.apache.org → org.apache.tapestry:quickstart (Tapestry 5 Quickstart Project)
https://tapestry.apache.org → org.apache.tapestry:tapestry-archetype (Tapestry 4.1.6 Archetype)
Choose a number or apply filter (format: [groupId:]artifactId, case sensitive contains): : 1
Now you will get a response like what is shown below −
Choose org.apache.tapestry:quickstart version:
1: 5.0.19
2: 5.1.0.5
3: 5.2.6
4: 5.3.7
5: 5.4.1
Extract the QuickStart version number as follows −
Choose a number: 5: 5
Here, the QuickStart project takes the version for the option 5, 5.4.1. Now, Tapestry archetype asks the following information one by one as follows −
5.1 groupId − Define value for property 'groupId': : com.example
5.2 artifactId − Define value for property 'artifactId': : Myapp
5.3 version − Define value for property 'version': 1.0-SNAPSHOT: :
5.4 package name − Define value for property 'package': com.example: : com.example.Myapp
Now your screen asks confirmation from you −
Confirm properties configuration −
groupId − com.example
artifactId − Myapp
version − 1.0-SNAPSHOT
package − com.example.Myapp
Verify all the properties and confirm the changes using the option shown below −
Y: : Y
You would see the screen like the one shown below.
[INFO] ---------------------------------------------------------------------------------
[INFO] Using following parameters for creating project from Archetype: quickstart:5.4.1
[INFO] ---------------------------------------------------------------------------------
[INFO] Parameter: groupId, Value: com.example
[INFO] Parameter: artifactId, Value: Myapp
[INFO] Parameter: version, Value: 1.0-SNAPSHOT
[INFO] Parameter: package, Value: com.example.Myapp
[INFO] Parameter: packageInPathFormat, Value: com/example/Myapp
[INFO] Parameter: package, Value: com.example.Myapp
[INFO] Parameter: version, Value: 1.0-SNAPSHOT
[INFO] Parameter: groupId, Value: com.example
[INFO] Parameter: artifactId, Value: Myapp
[WARNING] Don't override file /Users/workspace/tapestry/Myapp/src/test/java
[WARNING] Don't override file /Users/workspace/tapestry/Myapp/src/main/webapp
[WARNING] Don't override file /Users/workspace/tapestry/Myapp/src/main/resources/com/
example/Myapp
[WARNING] Don't override file /Users/workspace/tapestry/Myapp/src/test/resource
[WARNING] Don't override file /Users/workspace/tapestry/Myapp/src/test/conf
[WARNING] Don't override file /Users/workspace/tapestry/Myapp/src/site
[INFO] project created from Archetype in dir: /Users/workspace/tapestry/Myapp
[INFO] ---------------------------------------------------------------------------------
[INFO] BUILD SUCCESS
[INFO] ---------------------------------------------------------------------------------
[INFO] Total time: 11:28 min
[INFO] Finished at: 2016-09-14T00:47:23+05:30
[INFO] Final Memory: 14M/142M
[INFO] ---------------------------------------------------------------------------------
Here, you have successfully built the Tapestry Quick Start project. Move to the location of the newly created Myapp directory with the following command and start coding.
cd Myapp
Run Application
To run the skeleton project, use the following command.
mvn jetty:run -Dtapestry.execution-mode=development
You get a screen like this,
[INFO] Scanning for projects...
[INFO]
[INFO] ---------------------------------------------------------------------------------
[INFO] Building Myapp Tapestry 5 Application 1.0-SNAPSHOT
[INFO] ---------------------------------------------------------------------------------
........
........
........
Application 'app' (version 1.0-SNAPSHOT-DEV) startup time: 346 ms to build IoC
Registry, 1,246 ms overall.
 ______                  __             ____
/_  __/__ ____  ___ ___ / /_______ __  / __/
 / / / _ `/ _ \/ -_|_-</ __/ __/ // / /__ \
/_/  \_,_/ .__/\__/___/\__/_/  \_, / /____/
        /_/                   /___/  5.4.1 (development mode)
[INFO] Started SelectChannelConnector@0.0.0.0:8080
[INFO] Started Jetty Server
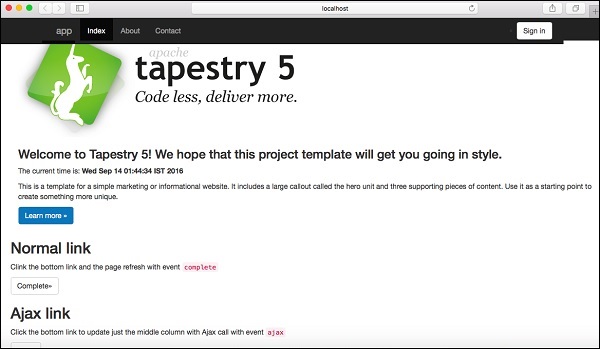
As of now, we have created a basic Quick Start project in Tapestry. To view the running application in the web browser, just type the following URL in the address bar and press enter −
https://localhost:8080/myapp
Here, myapp is the name of the application and the default port of the application in development mode is 8080.
Using Eclipse
In the previous chapter, we discussed about how to create a Tapestry Quick Start application in CLI. This chapter explains about creating a skeleton application in Eclipse IDE.
Let us use a Maven archetype to create skeleton application. To configure a new application, you can follow the steps given below.
Step 1: Open Eclipse IDE
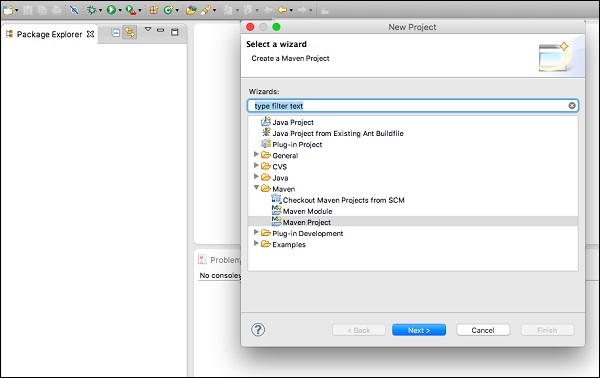
Open your Eclipse and choose File → New → Project → option as shown in the following screenshot.
Now, choose Maven → Maven project option.
Note − If Maven is not configured then configure and create a project.
After selecting the Maven project, click Next and again click the Next button.
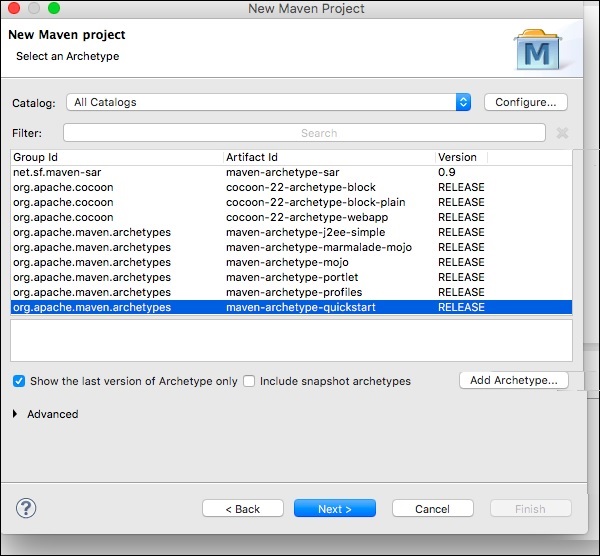
After that, you will get a screen where you should choose the configure option. Once it is configured, you will get the following screen.
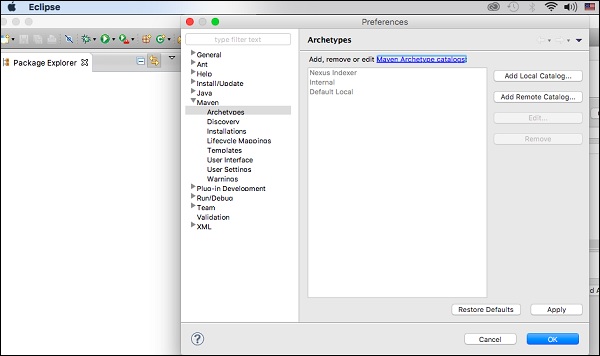
Step 2: Catalog Configuration
After the first step is done, you should click on Add Remote Catalog. Then add the following changes as shown in the following screenshot.
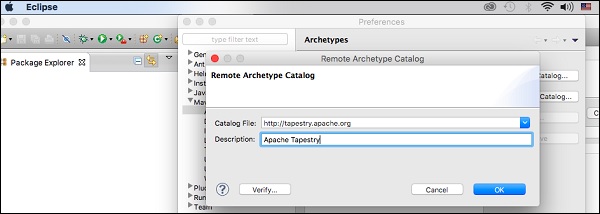
Now, Apache Tapestry Catalog is added. Then, choose filter option org.apache.tapestry quickstart 5.4.1 as shown below.
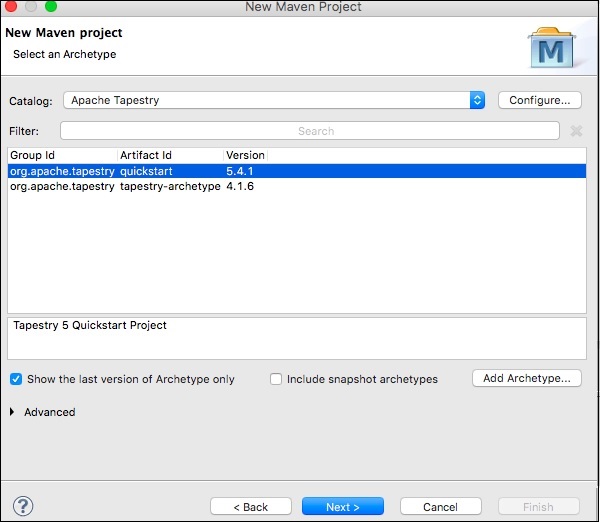
Then click Next and the following screen will appear.
Step 3: Configure GroupId, ArtifactId, version and package
Add the following changes to the Tapestry Catalog configuration.
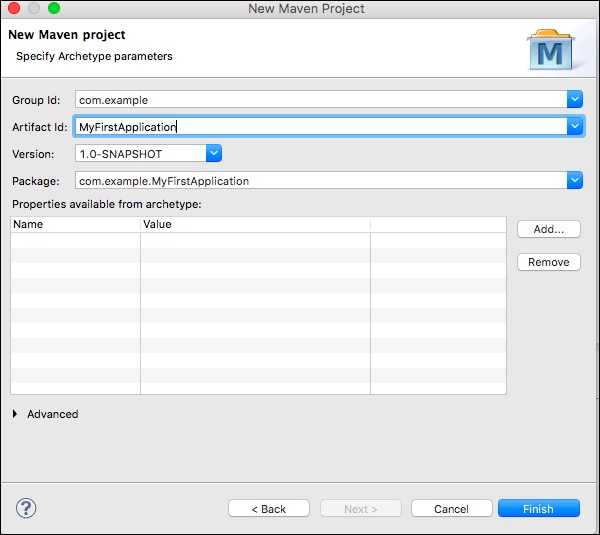
Then click Finish button, now we have created the first skeleton application. The first time you use Maven, project creation may take a while as Maven downloads many JAR dependencies for Maven, Jetty and Tapestry. After Maven finishes, you'll see a new directory, MyFirstApplication in your Package Explorer view.
Step 4: Run the application using Jetty server
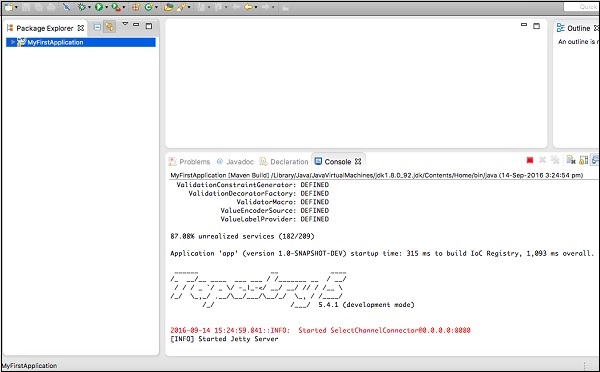
You can use Maven to run Jetty directly. Right-click on the MyFirstApplication project in your Package Explorer view and select Run As → Maven Build you will the screen shown below.

In the configuration dialog box, enter goals option as jetty:run then click Run button.

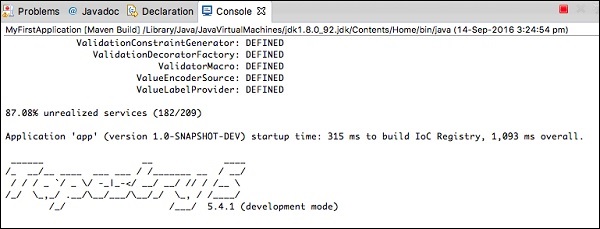
Once Jetty is initialized, you'll see the following screen in your console.
Step 5: Run in the web browser
Type the following URL to run the application in a web browser
https://loclhost:8080/MyFirstApplication
Step 6: Stop the Jetty server
To stop the Jetty server, click the red square icon in your console as shown below.
Apache Tapestry - Project Layout
Here is the layout of the source code created by Maven Quickstart CLI. Also, this is the suggested layout of a standard Tapestry Application.
 build.gradle
 gradle
    wrapper
        gradle-wrapper.jar
        gradle-wrapper.properties
 gradlew
 gradlew.bat
 pom.xml
 src
    main
       java
          com
              example
                  MyFirstApplication
                      components
                      data
                      entities
                      pages
                      services
       resources
          com
             example
                 MyFirstApplication
                     components
                     logback.xml
                     pages
                         Index.properties
          hibernate.cfg.xml
          log4j.properties
       webapp
           favicon.ico
           images
              tapestry.png
           mybootstrap
              css
                 bootstrap.css
                 bootstrap-theme.css
              fonts
                    glyphicons-halflings-regular.eot
                 glyphicons-halflings-regular.svg
                 glyphicons-halflings-regular.ttf
                 glyphicons-halflings-regular.woff
                 glyphicons-halflings-regular.woff2
              js
           WEB-INF
               app.properties
               web.xml
    site
       apt
          index.apt
       site.xml
    test
        conf
           testng.xml
           webdefault.xml
        java
           PLACEHOLDER
        resources
            PLACEHOLDER
 target
    classes
       com
          example
              MyFirstApplication
                  components
                  data
                  entities
                  logback.xml
                  pages
                     Index.properties
                  services
       hibernate.cfg.xml
       log4j.properties
    m2e-wtp
       web-resources
           META-INF
               MANIFEST.MF
               maven
                   com.example
                      MyFirstApplication
                         pom.properties
                           pom.xml
    test-classes
       PLACEHOLDER
    work
       jsp
       sampleapp.properties
       sampleapp.script
The default layout is arranged like the WAR Internal File Format. Using WAR format helps to run the application without packaging and deploying. This layout is just a suggestion, but the application can be arranged in any format, if it is packaged into a proper WAR format while deploying.
The source code can be divided into the following four main sections.
Java Code − All java source codes are placed under /src/main/java folder. Tapestry page classes are placed under the Pages folder and Tapestry component classes are placed under components folder. Tapestry service classes are placed under services folder.
ClassPath Resources − In Tapestry, most of the classes have associated resources (XML Template, JavaScript files, etc.). These resources are placed under the /src/main/resources folder. Tapestry Page Classes have its associated resources under the Pages folder and Tapestry components classes have its associated resources under the Components folder. These resources are packaged into the WEB-INF/classes folder of the WAR.
Context Resources − They are static resources of a web application like Images, Style Sheet and JavaScript Library / Modules. They are usually placed under the /src/main/webapp folder and they are called Context Resources. Also, the web application description file (of Java Servlet), web.xml is placed under the WEB-INF folder of context resources.
Testing Code − These are optional files used to test the application and placed under the src/test/java and src/test/Resources Folders. They are not packaged into WAR.
Convention Over Configuration
Apache Tapestry follows Convention over Configuration in every aspect of programming. Every feature of the framework does have a sensible default convention.
For example, as we learned in the Project Layout chapter, all pages need to be placed in the /src/main/java/«package_path»/pages/ folder to be considered as Tapestry Pages.
In another sense, there is no need configure a particular Java Class as Tapestry Pages. It is enough to place the class in a pre-defined location. In some cases, it is odd to follow the default convention of Tapestry.
For example, Tapestry component can have a method setupRender which will be fired at the start the rendering phase. A developer may want to use their own opiniated name, say initializeValue. In this situation, Tapestry provides Annotation to override the conventions as shown in the following code block.
void setupRender() {
   // initialize component
}
@SetupRender
void initializeValue() {
   // initialize component
}
Both ways of programming are valid in Tapestry. In short, Tapestry's default configuration is quite minimal. Only the Apache Tapestry Filter (Java Servlet Filter) needs to be configured in the Web.xml for the proper working of the application.
Tapestry provides one another way to configure application and it is called as the AppModule.java.
Apache Tapestry - Annotation
Annotation is a very important feature exploited by Tapestry to simplify the Web Application Development. Tapestry provides a lot of custom Annotations. It has Annotation for Classes, Methods and Member Fields. As discussed in the previous section, Annotation may also be used to override default convention of a feature. Tapestry annotations are grouped into four main categories and they are as follows.
Component Annotation
Used in Pages, Components and Mixins Classes. Some of the useful annotations are −
@Property − It is applicable to fields. Used to convert a field into a Tapestry Property.
@Parameter − It is applicable to fields. Used to specify a field as parameter of a component.
@Environmental − It is applicable to fields. Used to share a private field between different components.
@import − It is applicable to classes and fields. Used to include Assets, CSS and JavaScript.
@Path − Used in conjunction with the @Inject annotation to inject an Asset based on a path.
@Log − It is applicable to classes and fields. Used for debugging purposes. Can be used emit component's event information like start of the event, end of the event, etc.
IoC annotation
Used to inject objects into IoC Container. Some of the useful annotations are −
@Inject − It is applicable to fields. Used to mark parameters that should be injected into the IoC container. It marks fields that should be injected into components.
@Value − It is applicable to fields. Used along with @inject annotation to inject a literal value instead of a service (which is default behavior of @Inject annotation).
Annotation for Data Holding Classes
It is used to specify component specific information in a class (usually models or data holding classes) for high level components such as
Grid (used to create advanced tabular data such as report, gallery, etc.,)
BeanEditForm (Used to create advanced forms)
Hibernate (Used in advanced database access), etc.
These Annotations are aggregated and packaged into a separate jar without any tapestry dependency. Some of the annotations are −
@DataType − It is used to specify the data type of the field. Tapestry component may use this information to create design or markup in the presentation layer.
@Validate − It is used to specify the validation rule for a field.
These separations enable the Tapestry Application to use a Multi-Tier Design.
Apache Tapestry - Pages and Components
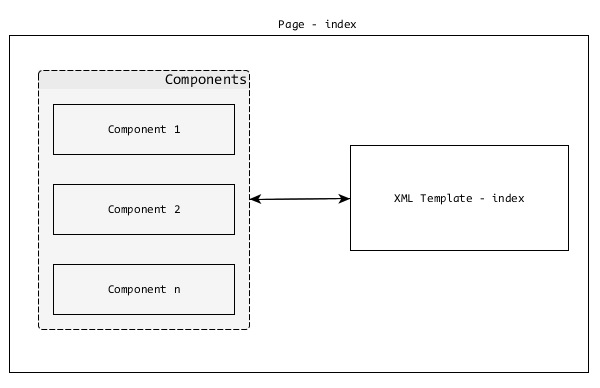
Tapestry Application is simply a collection of Tapestry Pages. They work together to form a well-defined Web Application. Each Page will have a corresponding XML Template and Zero, one or more Components. The Page and Component are same except that the Page is a root component and usually created by an application developer.
Components are children of the root Pagecomponent. Tapestry have lots of built-in components and has the option to create a custom component.
Pages
As discussed earlier, Pages are building blocks of a Tapestry Application. Pages are plain POJOs, placed under /src/main/java/«package_path»/pages/ folder. Every Page will have a corresponding XML Template and its default location is /src/main/resources/«package_name»/pages/.
You can see here that the path structure is similar for Page and Template except that the template is in the Resource Folder.
For example, a user registration page in a Tapestry application with package name com.example.MyFirstApplication will have the following Page and Template files −
Java Class −
/src/main/java/com/example/MyFirstApplication/pages/index.java
XML Template −
/src/main/resources/com/example/MyFirstApplication/pages/index.tml
Let us create a simple Hello World page. First, we need to create a Java Class at /src/main/java/com/example/MyFirstApplication/pages/HelloWorld.java.
package com.example.MyFirstApplication.pages;
public class HelloWorld {
}
Then, create an XML Template at
/src/main/resources/com/example/MyFirstApplication/pages/helloworld.html.
<html xmlns:t = "http://tapestry.apache.org/schema/tapestry_5_4.xsd">
   <head>
      <title>Hello World Page</title>
   </head>
   <body>
      <h1>Hello World</h1>
   </body>
</html>
Now, this page can be accessed at https://localhost:8080/myapp/helloworld. This is a simple tapestry page. Tapestry offers lot more features to develop dynamic web pages, which we will discuss in the following chapters.
Apache Tapestry - Templates
Let us consider the Tapestry XML Template in this section. XML Template is a well-formed XML document. The presentation (User Interface) layer of a Page is XML Template. An XML Template have normal HTML markup in addition to the items given below −
- Tapestry Namespace
- Expansions
- Elements
- Components
Let us now discuss them in detail.
Tapestry Namespace
Tapestry Namespaces are nothing but XML Namespaces. Namespaces should be defined in the root element of the template. It is used to include Tapestry Components and component related information in the Template. The most commonly used namespaces are as follows −
xmlns:t = https://tapestry.apache.org/schema/tapestry_5_4.xsd It is used to identify Tapestry's Elements, Components and Attributes.
xmlns:p = tapestry:parameter It is used to pass arbitrary chunks of code to components.
An example of Tapestry Namespace is as follows −
<html xmlns:t = "https://tapestry.apache.org/schema/tapestry_5_3.xsd"
   xmlns:p = "tapestry:parameter">

   <head>
      <title>Hello World Page</title>
   </head>
   <body>
      <h1>Hello World</h1>
      <t:eventlink page = "Index">refresh page</t:eventlink>
   </body>
</html>
Expansions
Expansion is simple and efficient method to dynamically change the XML Template during rendering phase of the Page. Expansion uses ${<name>} syntax. There are many options to express the expansion in the XML Template. Let us see some of the most commonly used options −
Property Expansions
It maps the property defined in the corresponding Page class. It follows the Java Bean Specification for property definition in a Java class. It goes one step further by ignoring the cases for property name. Let us change the Hello World example using property expansion. The following code block is the modified Page class.
package com.example.MyFirstApplication.pages;
public class HelloWorld {
   // Java Bean Property
   public String getName {
      return "World!";
   }
}
Then, change the corresponding XML Template as shown below.
<html xmlns:t = "http://tapestry.apache.org/schema/tapestry_5_4.xsd">
   <head>
      <title>Hello World Page</title>
   </head>
   <body>
      <!-- expansion -->
      <h1>Hello ${name}</h1>
   </body>
</html>
Here, we have defined name as Java Bean Property in the Page class and dynamically processed it in XML Template using expansion ${name}.
Message Expansion
Each Page class may or may not have an associated Property file «page_name».properties in the resources folder. The property files are plain text files having a single key / value pair (message) per line. Let us create a property file for HelloWorld Page at
/src/main/resources/com/example/MyFirstApplication/pages/helloworld.properties and add a Greeting message.
Greeting = Hello
The Greeting message can be used in the XML Template as ${message:greeting}
<html xmlns:t = "http://tapestry.apache.org/schema/tapestry_5_4.xsd">
   <head>
      <title>Hello World Page</title>
   </head>
   <body>
      <!-- expansion -->
      <h1>${message:greeting} ${name}</h1>
   </body>
</html>
Elements
Tapestry has a small set of elements to be used in XML Templates. Elements are predefined tags defined under the Tapestry namespace −
https://tapestry.apache.org/schema/tapestry_5_4.xsd
Each element is created for a specific purpose. The available tapestry elements are as follows −
<t:body>
When two components are nested, the parent component's template may have to wrap the child component's template. The <t:body> element is useful in this situation. One of the uses of <t:body> is in the Template Layout.
In general, the User Interface of a web application will have a Common Header, Footer, Menu, etc. These common items are defined in an XML Template and it is called Template Layout or Layout Component. In Tapestry, it needs to be created by an application developer. A Layout Component is just another component and is placed under the components folder, which has the following path src/main/«java|resources»/«package_name»/components.
Let us create a simple layout component called MyCustomLayout. The code for MyCustomLayout is as follows −
<!DOCTYPE html>
<html xmlns:t = "http://tapestry.apache.org/schema/tapestry_5_4.xsd">
   <head>
      <meta charset = "UTF-8" />
      <title>${title}</title>
   </head>
   <body>
      <div>Sample Web Application</div>
      <h1>${title}</h1>
      <t:body/>

      <div>(C) 2016 TutorialsPoint.</div>
   </body>
</html>
package com.example.MyFirstApplication.components;

import org.apache.tapestry5.*;
import org.apache.tapestry5.annotations.*;
import org.apache.tapestry5.BindingConstants;

public class MyCustomLayout {
   @Property
   @Parameter(required = true, defaultPrefix = BindingConstants.LITERAL)
      private String title;
}
In the MyCustomLayout component class, we declared a title field and by using annotation, we have made it mandatory. Now, change HelloWorld.html template to use our custom layout as shown in the code block below.
<html>
   t:type = "mycustomlayout" title = "Hello World Test page"
      xmlns:t = "http://tapestry.apache.org/schema/tapestry_5_4.xsd">
   <h1>${message:greeting} ${name}</h1>
</html>
We can see here that the XML Template does not have head and body tags. Tapestry will collect these details from the layout component and the <t:body> of the layout component will be replaced by the HelloWorld Template. Once everything is done, Tapestry will emit similar markup as specified below −
<!DOCTYPE html>
<html>
   <head>
      <meta charset = "UTF-8" />
      <title>Hello World Test Page</title>
   </head>
   <body>
      <div>Sample Web Application</div>
      <h1>Hello World Test Page</h1>
      <h1>Hello World!</h1>
      <div>(C) 2016 TutorialsPoint.</div>
   </body>
</html>
Layouts can be nested. For example, we may extend our custom layout by including administration functionality and use it for admin section as specified below.
<html t:type = "MyCommonLayout"
   xmlns:t = "http://tapestry.apache.org/schema/tapestry_5_4.xsd">

   <div><!-- Admin related items --><div>
   <t:body/>

</html>
<t:container>
The <t:container> is a top-level element and includes a tapestry namespace. This is used to specify the dynamic section of a component.
For example, a grid component may need a template to identify how to render its rows - tr (and column td) within a HTML table.
<t:container xmlns:t = "http://tapestry.apache.org/schema/tapestry_5_4.xsd">
   <td>${name}</td>
   <td>${age}</td>
</t:container>
<t:block>
The <t:block> is a placeholder for a dynamic section in the template. Generally, block element does not render. Only, components defined in the template uses block element. Components will inject data dynamically into the block element and render it. One of the popular use case is AJAX.
The block element provides the exact position and markup for the dynamic data to be rendered. Every block element should have a corresponding Java Property. Only then it can be dynamically rendered. The id of the block element should follow Java variable identifier rules. The partial sample is provided below.
@Inject
private Block block;
<html t:type = "mycustomlayout" title = "block example"
   xmlns:t = "https://tapestry.apache.org/schema/tapestry_5_4.xsd"
   xmlns:p = "tapestry:parameter">
<h1>${title}</h1>
<!--
   ...
   ...
-->
<t:block t:id = "block">
   <h2>Highly dynamic section</h2>
   I'v been updated through AJAX call
   The current time is: <strong>${currentTime}</strong>
</t:block>
<!--
   ...
   ...
-->
</html>
<t:content>
The <t:content> element is used to specify the actual content of the template. In general, all the markup is considered part of the template. If <t:content> is specified, only the markup inside it will be considered. This feature is used by designers to design a page without a layout component.
<t:remove>
The <t:remove> is just the opposite of content element. The markup inside the remove element is not considered part of the template. It can be used for server only comments and for designing purposes.
Assets
Assets are static resource files such as style sheets, images and JavaScript files. Generally, assets are placed in the web application root directory /src/main/webapp.
<head>
   <link href = "/css/site.css" rel = "stylesheet" type = "text/css"/>
Tapestry also treats files stored in the Java Classpath as Assets. Tapestry provides advanced options to include Assets into the template through expansion option.
Context − Option to get assets available in web context.
<img src = "${context:image/tapestry_banner.gif}" alt = "Banner"/>
asset − Components usually store its own assets inside the jar file along with Java classes. Starting from Tapestry 5.4, the standard path to store assets in classpath is META-INF/assets. For libraries, the standard path to store assets is META-INF/assets/«library_name»/. asset: can also call context: expansion to get assets from the web context.
<img src = "${asset:context:image/tapestry_banner.gif}" alt = "Banner"/>
Assets can be injected into the Tapestry Page or Component using Inject and Path annotation. The parameter for the Path annotation is relative path of the assets.
@Inject
@Path("images/edit.png")
private Asset icon;
The Path parameter can also contain Tapestry symbols defined in the AppModule.java section.
For example, we can define a symbol, skin.root with value context:skins/basic and use it as shown below −
@Inject
@Path("${skin.root}/style.css")
private Asset style;
Localization
Including resources through tapestry provides extra functionality. One such functionality is Localization. Tapestry will check the current locale and include the proper resources.
For example, if the current locale is set as de, then edit_de.png will be included instead of edit.png.
CSS
Tapestry has built-in style sheet support. Tapestry will inject tapestry.css as a part of the core Javascript stack. From Tapestry 5.4, tapestry includes bootstrap css framework as well. We can include our own style sheet using normal link tag. In this case, the style sheets should be in the web root directory /src/main/webapp/.
<head>
   <link href = "/css/site.css" rel = "stylesheet" type = "text/css"/>
Tapestry provides advanced options to include style sheets into the template through expansion option as discussed earlier.
<head>
   <link href = "${context:css/site.css}" rel = "stylesheet" type = "text/css"/>
Tapestry also provides Import annotation to include style sheet directly into the Java classes.
@Import(stylesheet="context:css/site.css")
public class MyCommonLayout {
}
Tapestry provides a lot of options to manage style sheet through AppModule.java. Some of the important options are −
The tapestry default style sheet may be removed.
@Contribute(MarkupRenderer.class)

public static void
deactiveDefaultCSS(OrderedConfiguration<MarkupRendererFilter> configuration) {
   configuration.override("InjectDefaultStyleheet", null);
}
Bootstrap can also be disabled by overriding its path.
configuration.add(SymbolConstants.BOOTSTRAP_ROOT, "classpath:/METAINF/assets");
Enable dynamic minimizing of the assets (CSS and JavaScript). We need to include tapestry-webresources dependency (in pom.xml) as well.
@Contribute(SymbolProvider.class)
@ApplicationDefaults

public static void contributeApplicationDefaults(
   MappedConfiguration<String, String> configuration) {

   configuration.add(SymbolConstants.MINIFICATION_ENABLED, "true");
}

<dependency>
   <groupId>org.apache.tapestry</groupId>
   <artifactId>tapestry-webresources</artifactId>
   <version>5.4</version>
</dependency>
Client Side JavaScript
The current generation of web application heavily depends on JavaScript to provide rich client side experience. Tapestry acknowledges it and provide first class support for JavaScript. JavaScript support is deeply ingrained into the tapestry and available at every phase of the programming.
Earlier, Tapestry used to support only Prototype and Scriptaculous. But, from version 5.4, tapestry completely rewritten the JavaScript layer to make it as generic as possible and provide first class support for JQuery, the de-facto library for JavaScript. Also, tapestry encourages Modules based JavaScript programming and supports RequireJS, a popular client side implementation of AMD (Asynchronous Module Definition - JavaScript specification to support modules and its dependency in an asynchronous manner).
Location
JavaScript files are assets of the Tapestry Application. In accordance with asset rules, JavaScript files are placed either under web context, /sr/main/webapp/ or placed inside the jar under META-INF/assets/ location.
Linking JavaScript Files
The simplest way to link JavaScript files in the XML Template is by directly using the script tag, which is − <script language = "javascript" src = "relative/path/to/js"></script>. But, tapestry does not recommend these approaches. Tapestry provides several options to link JavaScript files right in the Page / Component itself. Some of these are given below.
@import annotation − @import annotation provides option to link multiple JavaScript library using context expression. It can be applied to both Page class and its method. If applied to a Page class, it applies to all its methods. If applied to a Page's Method, it only applies to that method and then Tapestry links the JavaScript library only when the method is invoked.
@Import(library = {"context:js/jquery.js","context:js/myeffects.js"})

public class MyComponent {
   // ...
}
JavaScriptSupport interface − The JavaScriptSupport is an interface defined by tapestry and it has a method, importJavaScriptLibrary to import JavaScript files. JavScriptSupport object can be easily created by simply declaring and annotating with @Environmental annotation.
@Inject @Path("context:/js/myeffects.js")
private Asset myEffects;

@Environmental
private JavaScriptSupport javaScriptSupport;
void setupRender() {
   javaScriptSupport.importJavaScriptLibrary(myEffects);
}
JavaScripSupport can only be injected into a component using the @Environmental annotation. For services, we need to use an @Inject annotation or add it as an argument in the service constructor method.
@Inject
private JavaScriptSupport javaScriptSupport;
public MyServiceImpl(JavaScriptSupport support) {
   // ...
}
addScript method − This is similar to the JavaScriptSupport interface except that it uses the addScript method and the code is directly added to the output at the bottom of the page.
void afterRender() {
   javaScriptSupport.addScript(
      "$('%s').observe('click', hideMe());", container.getClientId());
}
JavaScript Stack
Tapestry allows a group of JavaScript files and related style sheets to be combined and used as one single entity. Currently, Tapestry includes Prototype based and JQuery based stacks.
A developer can develop their own stacks by implementing the JavaScriptStack interface and register it in the AppModule.java. Once registered, the stack can be imported using the @import annotation.
@Contribute(JavaScriptStackSource.class)
public static void addMyStack(
   MappedConfiguration<String, JavaScriptStack> configuration) {

   configuration.addInstance("MyStack", myStack.class);
}

@Import(stack = "MyStack")
public class myPage {
}
Apache Tapestry - Components
As discussed earlier, Components and Pages are the same except that the Page is the root component and includes one or more child components. Components always resides inside a page and do almost all the dynamic functionality of the page.
Tapestry components renders a simple HTML links to complex grid functionality with interactive AJAX. A Component can include another component as well. Tapestry components consists of following items −
Component Class − The main Java class of the component.
XML Template − XML template is similar to the Page template. The component class renders the template as the final output. Some components may not have templates. In this case, the output will be generated by the component class itself using the MarkupWriter class.
Body − The component specified inside the page template may have custom markup and it is called Component body. If the component template has <body /> element, then the <body /> element will be replaced by the body of the component. This is similar to the layout discussed earlier in the XML template section.
Rendering − Rendering is a process which transforms XML template and body of the component into actual output of the component.
Parameters − Used to create communication between component & pages and thereby passing data between them.
Events − Delegates functionality from components to its container / parent (pages or another component). It is extensively used in page navigation purpose.
Rendering
The rendering of a component is done in a series of pre-defined phases. Each phase in the component system should have a corresponding method defined by convention or annotation in the component class.
// Using annotaion
@SetupRender
void initializeValues() {
   // initialize values
}

// using convention
boolean afterRender() {
   // do logic
   return true;
}
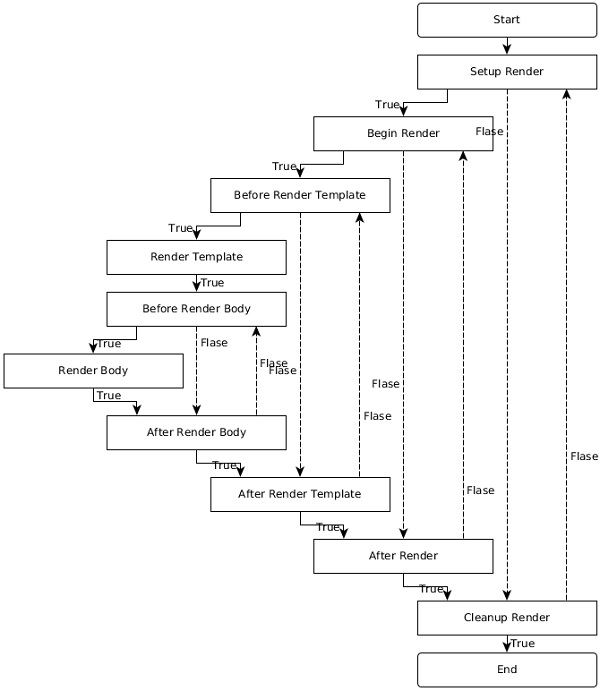
The phases, its method name and its annotations are listed below.
| Annotation | Default Method Names |
|---|---|
| @SetupRender | setupRender() |
| @BeginRender | beginRender() |
| @BeforeRenderTemplate | beforeRenderTemplate() |
| @BeforeRenderBody | beforeRenderBody() |
| @AfterRenderBody | afterRenderBody() |
| @AfterRenderTemplate | afterRenderTemplate() |
| @AfterRender | afterRender() |
| @CleanupRender | cleanupRender() |
Each phase has a specific purpose and they are as follows −
SetupRender
SetupRender kick-starts the rendering process. It usually sets up the parameters of the component.
BeginRender
BeginRender starts rendering the component. It usually renders the begin / start tag of the component.
BeforeRenderTemplate
BeforeRenderTemplate is used to decorate the XML template, adding special markup around the template. It also provides an option to skip the template rendering.
BeforeRenderBody
BeforeRenderTemplate provides an option to skip the rendering of the component's body element.
AfterRenderBody
AfterRenderBody will be called after the component's body is rendered.
AfterRenderTemplate
AfterRenderTemplate will be called after the component's template is rendered.
AfterRender
AfterRender is the counterpart of the BeginRender and usually renders the close tag.
CleanupRender
CleanupRender is the counterpart of the SetupRender. It releases / disposes all the objects created during rendering process.
The flow of the rendering phases is not forward only. It goes to and fro between phases depending on the return value of a phase.
For example, if the SetupRender method returns false, then rendering jumps to the CleanupRender phase and vice versa. To find a clear understanding of the flow between different phases, check the flow in the diagram given below.
Simple Component
Let us create a simple component, Hello which will have the output message as Hello, Tapestry. Following is the code of the Hello component and its template.
package com.example.MyFirstApplication.components;
public class Hello {
}
<html
   xmlns:t = "https://tapestry.apache.org/schema/tapestry_5_4.xsd"
   xmlns:p = "tapestry:parameter">

   <div>
      <p>Hello, Tapestry (from component).</p>
   </div>

</html>
The Hello component can be called in a page template as −
<html title = "Hello component test page"
   xmlns:t = "https://tapestry.apache.org/schema/tapestry_5_4.xsd"
   xmlns:p = "tapestry:parameter">
<t:hello />
</html>
Similarly, the component may render the same output using MarkupWriter instead of the template as shown below.
package com.example.MyFirstApplication.components;

import org.apache.tapestry5.MarkupWriter;
import org.apache.tapestry5.annotations.BeginRender;

public class Hello {
   @BeginRender
   void renderMessage(MarkupWriter writer) {
      writer.write("<p>Hello, Tapestry (from component)</p>");
   }
}
Let us change the component template and include the <body /> element as shown in the code block below.
<html>
   xmlns:t = "https://tapestry.apache.org/schema/tapestry_5_4.xsd"
   xmlns:p = "tapestry:parameter">

   <div>
      <t:body />
   </div>
</html>
Now, the page template may include body in the component markup as shown below.
<html title = "Hello component test page"
   xmlns:t = "https://tapestry.apache.org/schema/tapestry_5_4.xsd"
   xmlns:p = "tapestry:parameter">

   <t:hello>
      <p>Hello, Tapestry (from page).</p>
   </t:hello>
</html>
The output will be as follows −
<html>
   <div>
      <p>Hello, Tapestry (from page).</p>
   </div>
</html>
Parameters
The primary purpose of these parameters is to create a connection between a field of the component and a property / resource of the page. Using parameters, component and its corresponding page communicate and transfer data between each other. This is called Two Way Data Binding.
For example, a textbox component used to represent the age in a user management page gets its initial value (available in the database) through the parameter. Again, after the user's age is updated and submitted back, the component will send back the updated age through the same parameter.
To create a new parameter in the component class, declare a field and specify a @Parameter annotation. This @Parameter has two optional arguments, which are −
required − makes the parameter as mandatory. Tapestry raises exception if it is not provided.
value − specifies the default value of the parameter.
The parameter should be specified in the page template as attributes of the component tag. The value of the attributes should be specified using Binding Expression / Expansion, which we discussed in the earlier chapters. Some of the expansion which we learned earlier are −
Property expansion (prop:«val») − Get the data from property of the page class.
Message expansion (message:«val») − Get the data from key defined in index.properties file.
Context expansion (context:«val») − Get the data from web context folder /src/main/webapp.
Asset expansion (asset:«val») − Get the data from resources embedded in jar file, /META-INF/assets.
Symbol expansion (symbol:«val») − Get the data from symbols defined in AppModule.javafile.
Tapestry has many more useful expansions, some of which are given below −
Literal expansion (literal:«val») − A literal string.
Var expansion (var:«val») − Allow a render variable of the component to be read or updated.
Validate expansion (validate:«val») − A specialized string used to specify the validation rule of an object. For Example, validate:required, minLength = 5.
Translate (translate:«val») − Used to specify the Translator class (converting client-side to server-side representation) in input validation.
Block (block:«val») − The id of the block element within the template.
Component (component:«val») − The id of the another component within the template.
All the above expansions are read-only except Property expansion and Var expansion. They are used by the component to exchange data with page. When using expansion as attribute values, ${...} should not be used. Instead just use the expansion without dollar and braces symbols.
Component Using Parameter
Let us create a new component, HelloWithParameter by modifying the Hello component to dynamically render the message by adding a name parameter in the component class and changing the component template and page template accordingly.
Create a new component class HelloWithParameter.java.
Add a private field and name it with the @Parameter annotation. Use the required argument to make it mandatory.
@Parameter(required = true)
private String name;
Add a private field, result with @Propery annotation. The result property will be used in the component template. Component template does not have access to fields annotated with @Parameter and only able to access the fields annotated with @Property. The variable available in component templates are called Render Variables.
@Property
 private String result;
Add a RenderBody method and copy the value from the name parameter to result property.
@BeginRender
void initializeValues() {
   result = name;
}
Add a new component template HelloWithParamter.tml and use the result property to render the message.
<div> Hello, ${result} </div>
Add a new property, Username in the test page (testhello.java).
public String getUsername() {
   return "User1";
}
Use the newly created component in the page template and set the Username property in name parameter of HelloWithParameter component.
<t:helloWithParameter name = "username" />
The complete listing is as follows −
package com.example.MyFirstApplication.components;

import org.apache.tapestry5.annotations.*;
public class HelloWithParameter {
   @Parameter(required = true)
   private String name;

   @Property
   private String result;

   @BeginRender
   void initializeValues() {
      result = name;
   }
}
<html
   xmlns:t = "https://tapestry.apache.org/schema/tapestry_5_4.xsd"
   xmlns:p = "tapestry:parameter">

   <div> Hello, ${result} </div>

</html>
package com.example.MyFirstApplication.pages;

import org.apache.tapestry5.annotations.*;
public class TestHello {
   public String getUsername() {
      return "User1";
   }
}
<html title = "Hello component test page"
   xmlns:t = "https://tapestry.apache.org/schema/tapestry_5_4.xsd"
   xmlns:p = "tapestry:parameter">
   <t:helloWithParameter name = "username" />

</html>
The result will be as follows −
<div> Hello, User1 </div>
Advanced Parameter
In the previous chapters, we analyzed how to create and use a simple parameter in a custom component. An advanced parameter may contain complete markup as well. In this case, the markup should be specified inside the component tag such as the sub-section in the page template. The built-in if component have markup for both success and failure condition. The markup for success is specified as the body of the component tag and the markup of failure is specified using an elseparameter.
Let us see how to use the if component. The if component has two parameters −
test − Simple property based parameter.
Else − Advanced parameter used to specify alternative markup, if the condition fails
Tapestry will check the value of the test property using the following logic and return true or false. This is called Type Coercion, a way to convert an object of one type to another type with the same content.
If the data type is String, True if non-blank and not the literal string False (case insensitive).
If the data type is Number, True if non-zero.
If the data type is Collection, True if non-empty.
If the data type is Object, True (as long as its not null).
If the condition passes, the component renders its body; otherwise, it renders the body of the else parameter.
The complete listing is as follows −
package com.example.MyFirstApplication.pages;
public class TestIf {
   public String getUser() {
      return "User1";
   }
}
<html title = "If Test Page"
   xmlns:t = "http://tapestry.apache.org/schema/tapestry_5_4.xsd"
   xmlns:p = "tapestry:parameter">

   <body>
      <h1>Welcome!</h1>
      <t:if test = "user">
         Welcome back, ${user}
         <p:else>
            Please <t:pagelink page = "login">Login</t:pagelink>
         </p:else>
      </t:if>
   </body>

</html>
Component Events / Page Navigation
Tapestry application is a collection of Pages interacting with each other. Till now, we have learned how to create individual pages without any communication between them. A Component event's primary purpose is to provide interaction between pages (within pages as well) using server-side events. Most of the component events originate from client-side events.
For example, when a user clicks a link in a page, Tapestry will call the same page itself with target information instead of calling the target page and raises a server side event. Tapestry page will capture the event, process the target information and do a server side redirection to the target page.
Tapestry follows a Post/Redirect/Get (RPG) design pattern for page navigation. In RPG, when a user does a post request by submitting a form, the server will process the posted data, but does not return the response directly. Instead, it will do a client-side redirection to another page, which will output the result. An RPG pattern is used to prevent duplicate form submissions through browser back button, browser refresh button, etc., Tapestry provides an RPG pattern by providing the following two types of request.
Component Event Request − This type of request targets a particular component in a page and raises events within the component. This request only does a redirection and does not output the response.
Render Request − These types of requests target a page and stream the response back to the client.
To understand the component events and page navigation, we need to know the URL pattern of the tapestry request. The URL pattern for both types of request is as follows −
Component Event Requests −
/<<page_name_with_path>>.<<component_id|event_id>>/<<context_information>>
Render Request −
/<<page_name_with_path>>/<<context_information>>
Some of the examples of the URL patterns are −
Index page can be requested by https://«domain»/«app»/index.
If the Index page is available under a sub-folder admin, then it can be requested by https://«domain»/«app»/admin/index.
If the user clicks on the ActionLink component with id test in the index page, then the URL will be https://«domain»/«app»/index.test.
Events
By default, Tapestry raises OnPassivate and OnActivate events for all requests. For Component event request type, tapestry raises additional one or more events depending on the component. The ActionLink component raises an Action event, while a Form component raises multiple events such as Validate, Success, etc.,
The events can be handled in the page class using the corresponding method handler. The method handler is created either through a method naming convention or through the @OnEvent annotation. The format of the method naming convention is On«EventName»From«ComponentId».
An action event of the ActionLink component with id test can be handled by either one of the following methods −
void OnActionFromTest() {
}
@OnEvent(component = "test", name = "action")
void CustomFunctionName() {
}
If the method name does not have any particular component, then the method will be called for all component with matching events.
void OnAction() {
}
OnPassivate and OnActivate Event
OnPassivate is used to provide context information for an OnActivate event handler. In general, Tapestry provides the context information and it can be used as an argument in the OnActivateevent handler.
For example, if the context information is 3 of type int, then the OnActivate event can be called as −
void OnActivate(int id) {
}
In some scenario, the context information may not be available. In this situation, we can provide the context information to OnActivate event handler through OnPassivate event handler. The return type of the OnPassivate event handler should be used as argument of OnActivate event handler.
int OnPassivate() {
   int id = 3;
   return id;
}
void OnActivate(int id) {
}
Event Handler Return Values
Tapestry issues page redirection based on the return values of the event handler. Event handler should return any one of the following values.
Null Response − Returns null value. Tapestry will construct the current page URL and send to the client as redirect.
public Object onAction() {
   return null;
}
String Response − Returns the string value. Tapestry will construct the URL of the page matching the value and send to the client as redirect.
public String onAction() {
   return "Index";
}
Class Response − Returns a page class. Tapestry will construct the URL of the returned page class and send to the client as redirect.
public Object onAction() {
   return Index.class
}
Page Response − Returns a field annotated with @InjectPage. Tapestry will construct the URL of the injected page and send to the client as redirect.
@InjectPage
private Index index;

public Object onAction(){
   return index;
}
HttpError − Returns the HTTPError object. Tapestry will issue a client side HTTP error.
public Object onAction(){
   return new HttpError(302, "The Error message);
}
Link Response − Returns a link instance directly. Tapestry will construct the URL from Link object and send to the client as redirect.
Stream Response − Returns the StreamResponse object. Tapestry will send the stream as response directly to the client browser. It is used to generate reports and images directly and send it to the client.
Url Response − Returns the java.net.URL object. Tapestry will get the corresponding URL from the object and send to the client as redirect.
Object Response − Returns any values other than above specified values. Tapestry will raise an error.
Event Context
In general, event handler can get the context information using arguments. For example, if the context information is 3 of type int, then the event handler will be −
Object onActionFromTest(int id) {
}
Tapestry properly handles the context information and provides it to methods through arguments. Sometimes, Tapestry may not be able to properly handle it due to complexity of the programming. At that time, we may get the complete context information and process ourselves.
Object onActionFromEdit(EventContext context) {
   if (context.getCount() > 0) {
      this.selectedId = context.get(0);
   } else {
      alertManager.warn("Please select a document.");
      return null;
   }
}
Apache Tapestry - Built-In Components
This chapter explains about the built-in components that Tapestry has with suitable examples. Tapestry supports more than 65 built-in components. You can also create custom components. Let us cover some of the notable components in detail.
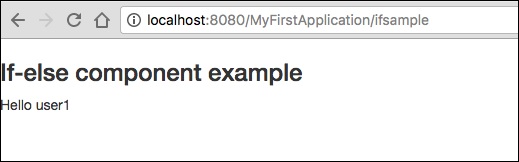
If Component
The if component is used to render a block conditionally. The condition is checked by a test parameter.
Create a page IfSample.java as shown below −
package com.example.MyFirstApplication.pages;

public class Ifsample {
   public String getUser() {
      return "user1";
   }
}
Now, create a corresponding template file as follows −
<html t:type = "newlayout" title = "About MyFirstApplication"
   xmlns:t = "http://tapestry.apache.org/schema/tapestry_5_4.xsd"
   xmlns:p = "tapestry:parameter">

   <h3>If-else component example </h3>
   <t:if test = "user">
      Hello ${user}
      <p:else>
         <h4> You are not a Tapestry user </h4>
      </p:else>
   </t:if>
</html>
Requesting the page will render the result as shown below.
Result − http://localhost:8080/MyFirstApplication/ifsample
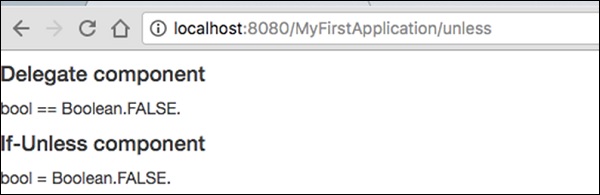
Unless and Delegate Component
The unless component is just the opposite of the if component that was discussed above. While, the delegate component does not do any rendering on its own. Instead, it normally delegates the markup to block element. Unless and if components can use delegate and block to conditionally swap the dynamic content.
Create a page Unless.java as follows.
package com.example.MyFirstApplication.pages;

import org.apache.tapestry5.Block;
import org.apache.tapestry5.annotations.Property;
import org.apache.tapestry5.ioc.annotations.Inject;
import org.apache.tapestry5.PersistenceConstants;
import org.apache.tapestry5.annotations.Persist;

public class Unless {
   @Property
   @Persist(PersistenceConstants.FLASH)
   private String value;
   @Property
   private Boolean bool;
   @Inject
   Block t, f, n;

   public Block getCase() {
      if (bool == Boolean.TRUE ) {
         return t;
      } else {
         return f;
      }
   }
}
Now, create a corresponding template file as follows −
<html t:type = "newlayout" title = "About MyFirstApplication"
   xmlns:t = "http://tapestry.apache.org/schema/tapestry_5_4.xsd"
   xmlns:p = "tapestry:parameter">

   <h4> Delegate component </h4>
   <div class = "div1">
      <t:delegate to = "case"/>
   </div>
   <h4> If-Unless component </h4>

   <div class = "div1">
      <t:if test = "bool">
         <t:delegate to = "block:t"/>
      </t:if>
      <t:unless test = "bool">
         <t:delegate to = "block:notT"/>
      </t:unless>
   </div>

   <t:block id = "t">
      bool == Boolean.TRUE.
   </t:block>

   <t:block id = "notT">
      bool = Boolean.FALSE.
   </t:block>

   <t:block id = "f">
      bool == Boolean.FALSE.
   </t:block>
</html>
Requesting the page will render the result as shown below.
Result − http://localhost:8080/MyFirstApplication/unless
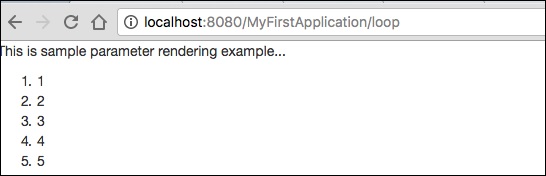
Loop Component
The loop component is the basic component to loop over a collection items and render the body for every value / iteration.
Create a Loop page as shown below −
Loop.java
package com.example.MyFirstApplication.pages;

import org.apache.tapestry5.annotations.Property;
public class Loop {
   @Property
   private int i;
}
Then, create the corresponding template Loop.tml
Loop.tml
<html t:type = "newlayout" title = "About MyFirstApplication"
   xmlns:t = "http://tapestry.apache.org/schema/tapestry_5_4.xsd"
   xmlns:p = "tapestry:parameter">

   <p>This is sample parameter rendering example...</p>
   <ol>
      <li t:type = "loop" source = "1..5" value = "var:i">${var:i}</li>
   </ol>
</html>
Loop component has the following two parameters −
source − Collection source. 15 is a property expansion used to create an array with a specified range.
var − Render variable. Used to render the current value in the body of the template.
Requesting the page will render the result as shown below −
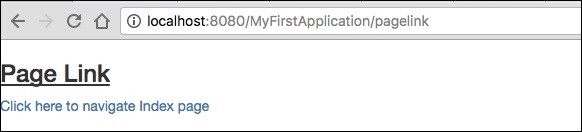
PageLink Component
A PageLink component is used to link a page from one page to another page. Create a PageLink test page as below − PageLink.java.
package com.example.MyFirstApplication.pages;
   public class PageLink {
}
Then, create a corresponding template file as shown below −
PageLink.tml
<html t:type = "newlayout" title = "About MyFirstApplication"
   xmlns:t = "http://tapestry.apache.org/schema/tapestry_5_4.xsd"
   xmlns:p = "tapestry:parameter">

   <body>
      <h3><u>Page Link</u> </h3>
      <div class = "page">
         <t:pagelink page = "Index">Click here to navigate Index page</t:pagelink>
         <br/>
      </div>
   </body>

</html>
The PageLink component has a page parameter which should refer the target tapestry page.
Result − http://localhost:8080/myFirstApplication/pagelink
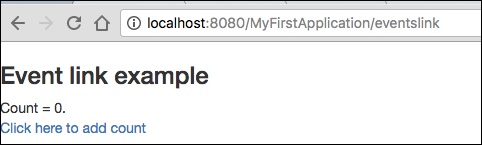
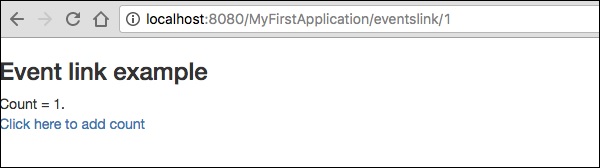
EventLink Component
The EventLink component sends the event name and the corresponding parameter through the URL. Create an EventsLink page class as shown below.
EventsLink.java
package com.example.MyFirstApplication.pages;

import org.apache.tapestry5.annotations.Property;
public class EventsLink {
   @Property
   private int x;
   void onActivate(int count) {
      this.x = x;
   }
   int onPassivate() {
      return x;
   }
   void onAdd(int value) {
      x += value;
   }
}
Then, create a corresponding EventsLink template file as follows −
EventsLink.tml
<html t:type = "newlayout" title = "About MyFirstApplication"
   xmlns:t = "http://tapestry.apache.org/schema/tapestry_5_4.xsd"
   xmlns:p = "tapestry:parameter">

   <h3> Event link example </h3>
   AddedCount = ${x}. <br/>
   <t:eventlink t:event = "add" t:context = "literal:1">
      Click here to add count
   </t:eventlink><br/>
</html>
EventLink has the following two parameters −
Event − The name of the event to be triggered in the EventLink component. By default, it points to the id of the component.
Context − It is an optional parameter. It defines the context for the link.
Result − http://localhost:8080/myFirstApplication/EventsLink
After clicking the count value, the page will display the event name in the URL as shown in the following output screenshot.
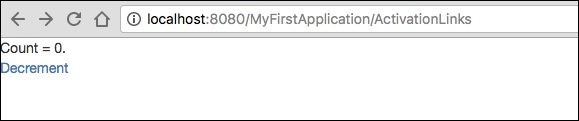
ActionLink Component
The ActionLink component is similar to the EventLink component, but it only sends the target component id. The default event name is action.
Create a page ActivationLinks.java as shown below,
ActivationLinks.java
package com.example.MyFirstApplication.pages;

import org.apache.tapestry5.annotations.Property;
public class ActivationLinks {
   @Property
   private int x;
   void onActivate(int count) {
      this.x = x;
   }
   int onPassivate() {
      return x;
   }
   void onActionFromsub(int value) {
      x -= value;
   }
}
Now, create a corresponding template file as shown below −
ActivationLinks.tml
<html t:type = "Newlayout" title = "About MyFirstApplication"
   xmlns:t = "http://tapestry.apache.org/schema/tapestry_5_4.xsd"
   xmlns:p = "tapestry:parameter">

   <div class = "div1">
      Count = ${count}. <br/>
      <t:actionlink t:id = "sub" t:context = "literal:1">
         Decrement
      </t:actionlink><br/>
   </div>

</html>
Here, the OnActionFromSub method will be called when clicking the ActionLink component.
Result − http://localhost:8080/myFirstApplication/ActivationsLink
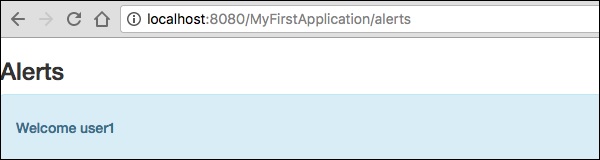
Alert Component
An alert dialog box is mostly used to give a warning message to the users. For example, if the input field requires some mandatory text but the user does not provide any input, then as a part of validation, you can use an alert box to give a warning message.
Create a page Alerts as shown in the following program.
Alerts.java
package com.example.MyFirstApplication.pages;

public class Alerts {
   public String getUser() {
      return "user1";
   }
}
Then, create a corresponding template file as follows −
Alerts.tml
<html t:type = "Newlayout" title = "About MyFirstApplication"
   xmlns:t = "http://tapestry.apache.org/schema/tapestry_5_4.xsd"
   xmlns:p = "tapestry:parameter">

   <h3>Alerts</h3>
   <div class = "alert alert-info">
      <h5> Welcome ${user} </h5>
   </div>

</html>
An Alert has three severity levels, which are −
- Info
- Warn
- Error
The above template is created using an info alert. It is defined as alert-info. You can create other severities depending on the need.
Requesting the page will produce the following result −
http://localhost:8080/myFirstApplication/Alerts
Forms & Validation Components
The Form Component is used to create a form in the tapestry page for user input. A form can contain text fields, date fields, checkbox fields, select options, submit button and more.
This chapter explains about some of the notable form components in detail.
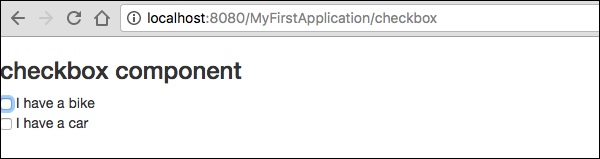
Checkbox Component
A Checkbox Component is used to take a choice between two mutually exclusive options. Create a page using the Checkbox as shown below −
Checkbox.java
package com.example.MyFirstApplication.pages;

import org.apache.tapestry5.annotations.Property;

public class Checkbox {
   @Property
   private boolean check1;

   @Property
   private boolean check2;
}
Now, create a corresponding template Checkbox.tml as shown below −
<html t:type = "newlayout" title = "About MyFirstApplication"
   xmlns:t = "http://tapestry.apache.org/schema/tapestry_5_4.xsd"
   xmlns:p = "tapestry:parameter">

   <h3> checkbox component</h3>
   <t:form>
      <t:checkbox t:id = "check1"/> I have a bike <br/>
      <t:checkbox t:id = "check2"/> I have a car
   </t:form>

</html>
Here, the checkbox parameter id matches to the corresponding Boolean value.
Result − After requesting the page,http://localhost:8080/myFirstApplication/checkbox it produces the following result.
TextField Component
The TextField component allows the user to edit a single line of text. Create a page Text as shown below.
Text.java
package com.example.MyFirstApplication.pages;

import org.apache.tapestry5.annotations.Property;
import org.apache.tapestry5.corelib.components.TextField;public class Text {
   @Property
   private String fname;
   @Property
   private String lname;
}
Then, create a corresponding template as shown below Text.tml
<html t:type = "newlayout" title = "About MyFirstApplication"
   xmlns:t = "http://tapestry.apache.org/schema/tapestry_5_4.xsd"
   xmlns:p = "tapestry:parameter">
   <p> Form application </p>

   <body>
      <h3> Text field created from Tapestry component </h3>
      <t:form>
         <table>
            <tr>
               <td>
                  Firstname: </td> <td><t:textfield t:id = "fname" />
               </td>
               <td>Lastname: </td> <td> <t:textfield t:id = "lname" /> </td>
            </tr>
         </table>
      </t:form>
   </body>

</html>
Here, the Text page includes a property named fname and lname. The component id's are accessed by the properties.
Requesting the page will produce the following result −
http://localhost:8080/myFirstApplication/Text
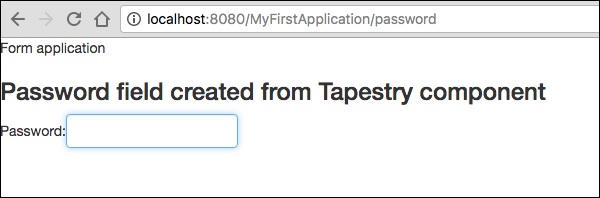
PasswordField Component
The PasswordField is a specialized text field entry for password. Create a page Password as shown below −
Password.java
package com.example.MyFirstApplication.pages;

import org.apache.tapestry5.annotations.Property;
import org.apache.tapestry5.corelib.components.PasswordField;

public class Password {
   @Property
   private String pwd;
}
Now, create a corresponding template file is as shown below −
Password.tml
<html t:type = "newlayout" title = "About MyFirstApplication"
   xmlns:t = "http://tapestry.apache.org/schema/tapestry_5_4.xsd"
   xmlns:p = "tapestry:parameter">
   <p> Form application </p>
   <h3> Password field created from Tapestry component </h3>

   <t:form>
      <table>
         <tr>
            <td> Password: </td>
            <td><t:passwordfield t:id = "pwd"/> </td>
         </tr>
      </table>
   </t:form>

</html>
Here, the PasswordField component has the parameter id, which points to the property pwd. Requesting the page will produce the following result −
http://localhost:8080/myFirstApplication/Password
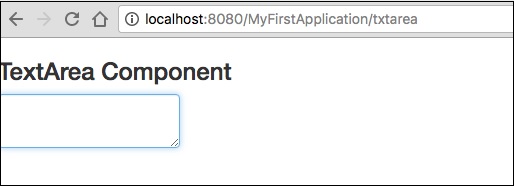
TextArea Component
The TextArea component is a multi-line input text control. Create a page TxtArea as shown below.
TxtArea.java
package com.example.MyFirstApplication.pages;

import org.apache.tapestry5.annotations.Property;
import org.apache.tapestry5.corelib.components.TextArea;

public class TxtArea {
   @Property
   private String str;
}
Then, create a corresponding template file is as shown below.
TxtArea.tml
<html t:type = "newlayout" title = "About MyFirstApplication"
   xmlns:t = "http://tapestry.apache.org/schema/tapestry_5_4.xsd"
   xmlns:p = "tapestry:parameter">
   <h3>TextArea component </h3>

   <t:form>
      <table>
         <tr>
            <td><t:textarea t:id = "str"/>
            </td>
         </tr>
      </table>
   </t:form>

</html>
Here, the TextArea component parameter id points to the property str. Requesting the page will produce the following result −
http://localhost:8080/myFirstApplication/TxtArea**
Select Component
The Select component contains a drop-down list of choices. Create a page SelectOption as shown below.
SelectOption.java
package com.example.MyFirstApplication.pages;

import org.apache.tapestry5.annotations.Property;
import org.apache.tapestry5.corelib.components.Select;

public class SelectOption {
   @Property
   private String color0;

   @Property

   private Color1 color1;
   public enum Color1 {
      YELLOW, RED, GREEN, BLUE, ORANGE
   }
}
Then, create a corresponding template is as follows −
SelectOption.tml
<html t:type = "newlayout" title = "About MyFirstApplication"
   xmlns:t = "http://tapestry.apache.org/schema/tapestry_5_4.xsd"
   xmlns:p = "tapestry:parameter">
   <p> Form application </p>
   <h3> select component </h3>

   <t:form>
      <table>
         <tr>
            <td> Select your color here: </td>
            <td> <select t:type = "select" t:id = "color1"></select></td>
         </tr>
      </table>
   </t:form>

</html>
Here, the Select component has two parameters −
Type − Type of the property is an enum.
Id − Id points to the Tapestry property color1.
Requesting the page will produce the following result −
http://localhost:8080/myFirstApplication/SelectOption

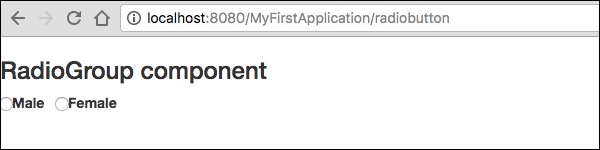
RadioGroup Component
The RadioGroup component provides a container group for Radio components. The Radio and RadioGroup components work together to update a property of an object. This component should wrap around other Radio components. Create a new page Radiobutton.java as shown below −
Radiobutton.java
package com.example.MyFirstApplication.pages;

import org.apache.tapestry5.PersistenceConstants;
import org.apache.tapestry5.annotations.Persist;
import org.apache.tapestry5.annotations.Property;

public class Radiobutton {
   @Property
   @Persist(PersistenceConstants.FLASH)
   private String value;
}
Then, create a corresponding template file is as shown below −
Radiobutton.tml
<html t:type = "Newlayout" title = "About MyFirstApplication"
   xmlns:t = "http://tapestry.apache.org/schema/tapestry_5_4.xsd"
   xmlns:p = "tapestry:parameter">
   <h3>RadioGroup component </h3>

   <t:form>
      <t:radiogroup t:id = "value">
         <t:radio t:id = "radioT" value = "literal:T" label = "Male" />
         <t:label for = "radioT"/>
         <t:radio t:id = "radioF" value = "literal:F" label = "Female"/>
         <t:label for = "radioF"/>
      </t:radiogroup>
   </t:form>

</html>
Here, the RadioGroup component id is binding with property value. Requesting the page will produce the following result.
http://localhost:8080/myFirstApplication/Radiobutton
Submit Component
When a user clicks a submit button, the form is sent to the address specified in the action setting of the tag. Create a page SubmitComponent as shown below.
package com.example.MyFirstApplication.pages;
import org.apache.tapestry5.annotations.InjectPage;

public class SubmitComponent {
   @InjectPage
   private Index page1;
   Object onSuccess() {
      return page1;
   }
}
Now, create a corresponding template file as shown below.
SubmitComponent.tml
<html t:type = "newlayout" title = "About MyFirstApplication"
   xmlns:t = "http://tapestry.apache.org/schema/tapestry_5_4.xsd"
   xmlns:p = "tapestry:parameter">
   <h3>Tapestry Submit component </h3>

   <body>
      <t:form>
         <t:submit t:id = "submit1" value = "Click to go Index"/>
      </t:form>
   </body>

</html>
Here, the Submit component submits the value to the Index page. Requesting the page will produce the following result −
http://localhost:8080/myFirstApplication/SubmitComponent

Form Validation
Form validation normally occurs at the server after the client has entered all the necessary data and then submitted the form. If the data entered by a client was incorrect or simply missing, the server would have to send all the data back to the client and request that the form be resubmitted with correct information.
Let us consider the following simple example to understand the process of validation.
Create a page Validate as shown below.
Validate.java
package com.example.MyFirstApplication.pages;

import org.apache.tapestry5.annotations.Property;
import org.apache.tapestry5.PersistenceConstants;
import org.apache.tapestry5.annotations.Persist;

public class Validate {
   @Property
   @Persist(PersistenceConstants.FLASH)
   private String firstName;

   @Property
   @Persist(PersistenceConstants.FLASH)
   private String lastName;
}
Now, create a corresponding template file as shown below.
Validate.tml
<html t:type = "newlayout" title = "About MyFirstApplication"
   xmlns:t = "http://tapestry.apache.org/schema/tapestry_5_4.xsd"
   xmlns:p = "tapestry:parameter">

   <t:form>
      <table>
         <tr>
            <td><t:label for = "firstName"/>:</td>
            <td><input t:type = "TextField" t:id = "firstName"
            t:validate = "required, maxlength = 7" size = "10"/></td>
         </tr>
         <tr>
            <td><t:label for = "lastName"/>:</td>
            <td><input t:type = "TextField" t:id = "lastName"
            t:validate = "required, maxLength = 5" size = "10"/></td>
         </tr>
      </table>
      <t:submit t:id = "sub" value =" Form validation"/>
   </t:form>

</html>
Form Validation has the following significant parameters −
Max − defines the maximum value, for e.g. = «maximum value, 20».
MaxDate − defines the maxDate, for e.g. = «maximum date, 06/09/2013». Similarly, you can assign MinDate as well.
MaxLength − maxLength for e.g. = «maximum length, 80».
Min − minimum.
MinLength − minimum Length for e.g. = «minmum length, 2».
Email − Email validation which uses either standard email regexp ^\w[._\w]*\w@\w[-._\w]*\w\.\w2,6$ or none.
Requesting the page will produce the following result −
http://localhost:8080/myFirstApplication/Validate
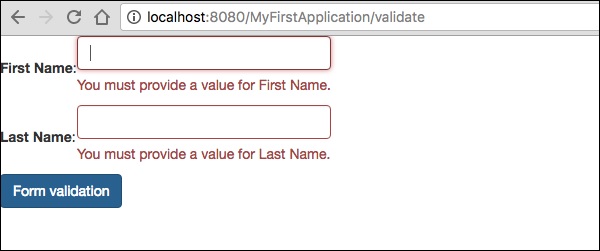
Apache Tapestry - Ajax Component
AJAX stands for Asynchronous JavaScript and XML. It is a technique for creating better, faster and more interactive web applications with the help of XML, JSON, HTML, CSS, and JavaScript. AJAX allows you to send and receive data asynchronously without reloading the web page, so it is fast.
Zone Component
A Zone Component is used to provide the content (markup) as well as the position of the content itself. The body of the Zone Component is used internally by Tapestry to generate the content. Once the dynamic content is generated, Tapestry will send it to the client, rerender the data in the correct place, trigger and animate the HTML to draw the attention of the user.
This Zone component is used along with an EventLink component. An EventLink has option to tie it to a particular zone using the t:zone attributes. Once the zone is configured in EventLink, clicking the EventLink will trigger the zone update. In addition, the EventLink events (refreshZone) can be used to control the generation of dynamic data.
A simple example of AJAX is as follows −
AjaxZone.tml
<html t:type = "Newlayout" title = "About MyFirstApplication"
   xmlns:t = "http://tapestry.apache.org/schema/tapestry_5_4.xsd"
   xmlns:p = "tapestry:parameter">

   <body>
      <h1>Ajax time zone example</h1>
      <div class = "div1">
         <a t:type = "eventlink" t:event = "refreshZone" href = "#"
            t:zone = "timeZone">Ajax Link </a><br/><br/>
         <t:zone t:id = "timeZone" id = "timeZone">Time zone: ${serverTime}</t:zone>
      </div>
   </body>

</html>
AjaxZone.java
package com.example.MyFirstApplication.pages;

import java.util.Date;
import org.apache.tapestry5.annotations.InjectComponent;
import org.apache.tapestry5.corelib.components.Zone;
import org.apache.tapestry5.ioc.annotations.Inject;
import org.apache.tapestry5.services.Request;

public class AjaxZone {
   @Inject
   private Request request;

   @InjectComponent
   private Zone timeZone;

   void onRefreshPage() {
   }

   Object onRefreshZone() {
      return request.isXHR() ? timeZone.getBody() : null;
   }

   public Date getServerTime() {
      return new Date();
   }
}
The result will show at: http://localhost:8080/MyFirstApplication/AjaxZone
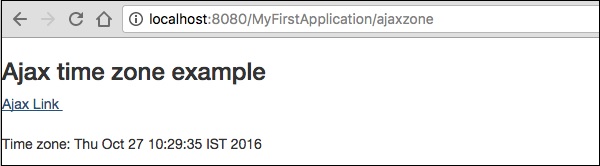
Apache Tapestry - Hibernate
In this chapter, we will discuss about the integration of BeanEditForm and Grid component with Hibernate. Hibernate is integrated into the tapestry through the hibernate module. To enable hibernate module, add tapestry-hibernate dependency and optionally hsqldb in the pom.xml file. Now, configure hibernate through the hibernate.cfg.xml file placed at the root of the resource folder.
pom.xml (partial)
<dependency>
   <groupId>org.apache.tapestry</groupId>
   <artifactId>tapestry-hibernate</artifactId>
   <version>${tapestry-release-version}</version>
</dependency>

<dependency>
   <groupId>org.hsqldb</groupId>
   <artifactId>hsqldb</artifactId>
   <version>2.3.2</version>
</dependency>
Hibernate.cfg.xml
<!DOCTYPE hibernate-configuration PUBLIC
   "-//Hibernate/Hibernate Configuration DTD 3.0//EN"
   "http://hibernate.sourceforge.net/hibernate-configuration-3.0.dtd">

<hibernate-configuration>
   <session-factory>
      <property name = "hibernate.connection.driver_class">
         org.hsqldb.jdbcDriver
      </property>
      <property name = "hibernate.connection.url">
         jdbc:hsqldb:./target/work/sampleapp;shutdown = true
      </property>
      <property name = "hibernate.dialect">
         org.hibernate.dialect.HSQLDialect
      </property>

      <property name = "hibernate.connection.username">sa</property>
      <property name = "hibernate.connection.password"></property>
      <property name = "hbm2ddl.auto">update</property>
      <property name = "hibernate.show_sql">true</property>
      <property name = "hibernate.format_sql">true</property>
   </session-factory>
</hibernate-configuration>
Let us see how to create the employee add page using the BeanEditForm component and the employee list page using the Grid component. The persistence layer is handled by Hibernate module.
Create an employee class and decorate it with @Entity annotation. Then, add validation annotation for relevant fields and hibernate related annotation @Id and @GeneratedValue for id field. Also, create gender as enum type.
Employee.java
package com.example.MyFirstApplication.entities;

import javax.persistence.Entity;
import javax.persistence.GeneratedValue;
import javax.persistence.GenerationType;
import javax.persistence.Id;
import org.apache.tapestry5.beaneditor.NonVisual;
import org.apache.tapestry5.beaneditor.Validate;

@Entity
public class Employee {
   @Id
   @GeneratedValue(strategy = GenerationType.IDENTITY)
   @NonVisual
   public Long id;

   @Validate("required")
   public String firstName;

   @Validate("required")
   public String lastName;

   @Validate("required")
   public String userName;

   @Validate("required")
   public String password;

   @Validate("required")
   public String email;
   public String phone;

   @Validate("required")
   public String Street;

   @Validate("required")
   public String city;

   @Validate("required")
   public String state;

   @Validate("required,regexp=^\\d{5}(-\\d{4})?$")
   public String zip;
}
Gender.java (enum)
package com.example.MyFirstApplication.data;

public enum Gender {
   Male, Female
}
Create the employee list page, ListEmployee.java in the new folder employee under pages and corresponding template file ListEmployee.tml at /src/main/resources/pages/employee folder. Tapestry provides a short URL for sub folders by removing repeated data.
For example, the ListEmployee page can be accessed by a normal URL (/employee/listemployee) and by the short URL (/employee/list).
Inject the Hibernate session into the list page using @Inject annotation. Define a property getEmployees in the list page and populate it with employees using injected session object. Complete the code for employee class as shown below.
ListEmployee.java
package com.example.MyFirstApplication.pages.employee;

import java.util.List;
import org.apache.tapestry5.annotations.Import;
import org.apache.tapestry5.ioc.annotations.Inject;
import org.hibernate.Session;
import com.example.MyFirstApplication.entities.Employee;
import org.apache.tapestry5.annotations.Import;
@Import(stylesheet="context:mybootstrap/css/bootstrap.css")

public class ListEmployee {
   @Inject
   private Session session;

   public List<Employee> getEmployees() {
      return session.createCriteria(Employee.class).list();
   }
}
Create the template file for ListEmployee class. The template will have two main components, which are −
PageLink − Create employee link page.
Grid − Used to render the employee details. The grid component has sources attributes to inject employee list and include attributes to include the fields to be rendered.
ListEmployee.tml (list all employees)
<html t:type = "simplelayout" title = "List Employee"
   xmlns:t = "http://tapestry.apache.org/schema/tapestry_5_4.xsd">
   <h1>Employees</h1>

   <ul>
      <li><t:pagelink page = "employee/create">Create new employee</t:pagelink></li>
   </ul>
   <t:grid source = "employees"
      include = "userName,firstName,lastName,gender,dateOfBirth,phone,city,state"/>
</html>
Create employee creation template file and include BeanEditForm component. The component has the following attributes −
object − Includes source.
reorder − Defines the order of the fields to be rendered.
submitlabel − The message of the form submission button
The complete coding is as follows −
<html t:type = "simplelayout" title = "Create New Address"
   xmlns:t = "http://tapestry.apache.org/schema/tapestry_5_4.xsd">
   <t:beaneditform
      object = "employee"
      submitlabel = "message:submit-label"
      reorder = "userName,password,firstName,lastName,
      dateOfBirth,gender,email,phone,s treet,city,state,zip" />
</html>
Create employee creation class and include session, employee property, list page (navigation link) and define the OnSuccess event (place to update the data) of the component. The session data is persisted into the database using the hibernate session.
The complete coding is as follows −
package com.example.MyFirstApplication.pages.employee;

import com.example.MyFirstApplication.entities.Employee;
import com.example.MyFirstApplication.pages.employee.ListEmployee;
import org.apache.tapestry5.annotations.InjectPage;
import org.apache.tapestry5.annotations.Property;
import org.apache.tapestry5.hibernate.annotations.CommitAfter;
import org.apache.tapestry5.ioc.annotations.Inject;
import org.hibernate.Session;

public class CreateEmployee {
   @Property
   private Employee employee;
   @Inject
   private Session session;
   @InjectPage
   private ListEmployee listPage;
   @CommitAfter
   Object onSuccess() {
      session.persist(employee);
      return listPage;
   }
}
Add the CreateEmployee.properties file and include the message to be used in form validations. The complete code is as follows −
zip-regexp=^\\d{5}(-\\d{4})?$
zip-regexp-message = Zip Codes are five or nine digits. Example: 02134 or 901251655.
submit-label = Create Employee
The screenshot of the employee creation page and listing page are shown below −

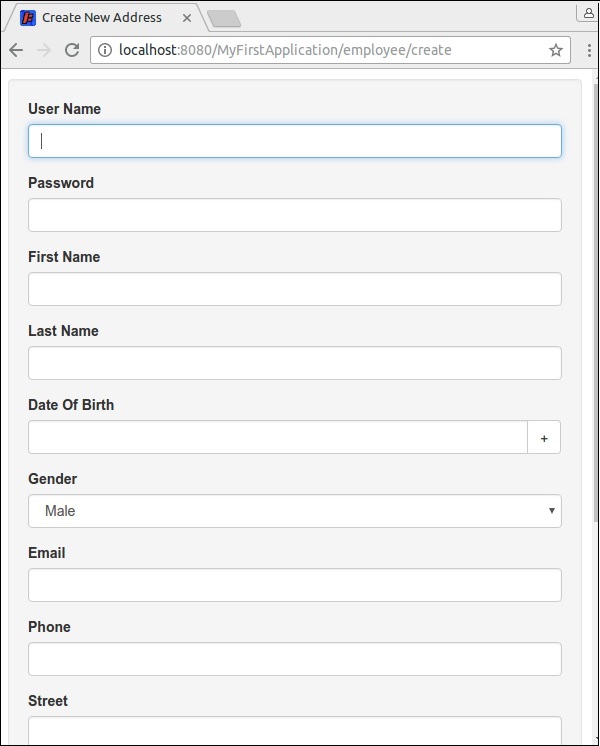
Apache Tapestry - Storage
Every web application should have some way to store certain user data like user object, user preferences, etc. For example, in a shopping cart application, the user's selected items / products should be saved in a temporary bucket (cart) until the user prefers to buy the products. We can save the items in a database, but it will be too expensive since all users are not going to buy the selected items. So, we need a temporary arrangement to store / persist the items. Apache Tapestry Provides two ways to persist the data and they are −
- Persistence page data
- Session Storage
Both has its own advantages and limitations. We will check it in the following sections.
Persistence Page Data
The Persistence Page Data is a simple concept to persist data in a single page between requests and it is also called as Page Level Persistence. It can be done using the @Persist annotation.
@Persist
public int age;
Once a field is annotated with @Persist, the field's value will be persisted across request and if the value is changed during request, it will be reflected when it is accessed next time. Apache Tapestry provides five types of strategy to implement the @Persist concept. They are as follows −
Session Strategy − The data is persisted using the Session and it is a default strategy.
Flash Strategy − The data is persisted using Session as well, but it is a very short lived one. The data will be available in only one subsequent request.
@Persist(PersistenceConstants.FLASH)
private int age;
Client Strategy − The data is persisted in the client side such as URL query string, hidden field in the form, etc.
@Persist(PersistenceConstants.FLASH)
private int age;
Hibernate Entity Strategy − The data is persisted using the Hibernate module as Entity. The entity will be stored in Hibernate and its reference (Java class name and its primary key) will be saved as token in HttpSession. The entity will be restored by using the token available in HttpSession.
@Persist(HibernatePersistenceConstants.ENTITY)
private Category category;
JPA Entity Strategy − The data is persisted using a JPA module. It will only able to store Entity.
@Persist(JpaPersistenceConstants.ENTITY)
private User user;
Session Storage
Session storage is an advanced concept used to store data which needs to be available across pages like data in multiple page wizard, logged in user details, etc. The Session Storage provides two options, one to store complex object and another to store simple values
Session Store Object − Used to store complex object.
Session Attributes − Used to store simple values.
Session Store Object (SSO)
An SSO can be created using @SessionStore annotation. The SSO will store the object using type of the object. For example, the Cart Object will be stored using a Cart class name as token. So, any complex object can be stored once in an application (one per user).
public class MySSOPage {
   @SessionState
   private ShoppingCart cart;
}
An SSO is a specialized store and should be used to store only complex / special object. Simple data types can also be stored using an SSO, but storing simple data types like String makes it only store one String value in the application. Using a single String value in the application is simply not possible. You can use simple data types as Apache Tapestry provides Session Attributes.
Session Attributes
Session Attributes enable the data to be stored by name instead of its type.
public class MyPage {
   @SessionAttribute
   private String loggedInUsername;
}
By default, Session Attributes uses the field name to refer the data in session. We can change the reference name by annotation parameter as shown below −
public class MyPage {
   @SessionAttribute("loggedInUserName")
   private String userName;
}
One of the main issues in using name as session reference is that we may accidentally use the same name in more than one class / page. In this case, the data stored maybe changed unexpectedly. To fix this issue, it will be better to use the name along with class / page name and package name like com.myapp.pages.register.email, where com.myapp.pages is the package name, register is the page / class name and finally email is variable (to be stored) name.
Apache Tapestry - Advanced Features
In this chapter, we will discuss a few advanced features of Apache Tapestry in detail.
Inversion of Control
Tapestry provides built-in Inversion of Control library. Tapestry is deeply integrated into IoC and uses IoC for all its features. Tapestry IoC configuration is based on Java itself instead of XML like many other IoC containers. Tapestry IoC based modules are packaged into JAR file and just dropped into the classpath with zero configuration. Tapestry IoC usage is based on lightness, which means −
Small interfaces of two or three methods.
Small methods with two or three parameters.
Anonymous communication via events, rather than explicit method invocations.
Modules
Module is a way to extend the functionality of the Tapestry application. Tapestry has both built-in modules and large number of third-party modules. Hibernate is one of the hot and very useful module provided by Tapestry. It also has modules integrating JMX, JPA, Spring Framework, JSR 303 Bean Validation, JSON, etc. Some of the notable third-party modules are −
- Tapestry-Cayenne
- Tapestry5-googleanalytics
- Gang of tapestry 5 - Tapestry5-HighCharts
- Gang of tapestry 5 - Tapestry5-jqPlot
- Gang of tapestry 5 - Tapestry5-Jquery
- Gang of tapestry 5 - Tapestry5-Jquery-mobile
- Gang of tapestry 5 - Tapestry5-Portlet
Runtime Exceptions
One of the best feature of the tapestry is Detailed Error Reporting. Tapestry helps a developer by providing the state of art exception reporting. Tapestry exception report is simple HTML with detailed information. Anyone can easily understand the report. Tapestry shows the error in HTML as well as save the exception in a plain text with date and time of the exception occurred. This will help developer to check the exception in production environment as well. The developer can remain confident of fixing any issues like broken templates, unexpected null values, unmatched request, etc.,
Live Class and Template Reloading
Tapestry will reload the templates and classes automatically when modified. This feature enables the immediate reflection of application changes without going through build and test cycle. Also, this feature greatly improves the productivity of the application development.
Consider the root package of the application is org.example.myfirstapp. Then, the classes in the following paths are scanned for reloading.
- org.example.myfirstapp.pages
- org.example.myfirstapp.components
- org.example.myfirstapp.mixins
- org.example.myfirstapp.base
- org.example.myfirstapp.services
The live class reloading can be disabled by setting the production mode to true in AppModule.java.
configuration.add(SymbolicConstants.PRODUCTION_MODE,false);
Unit Testing
Unit testing is a technique by which individual pages and components are tested. Tapestry provides easy options to unit test pages and components.
Unit testing a page: Tapestry provide a class PageTester to test the application. This acts as both the browser and servlet container. It renders the page without the browser in the server-side itself and the resulting document can be checked for correct rendering. Consider a simple page Hello, which renders hello and the hello text is enclosed inside a html element with id hello_id. To test this feature, we can use PageTester as shown below −
public class PageTest extends Assert {
   @Test
   public void test1() {
      Sring appPackage = "org.example.myfirstapp"; // package name
      String appName = "App1"; // app name
      PageTester tester = new PageTester(appPackage, appName, "src/main/webapp");
      Document doc = tester.renderPage("Hello");
      assertEquals(doc.getElementById("hello_id").getChildText(), "hello");
   }
}
The PageTester also provides option to include context information, form submission, link navigation etc., in addition to rendering the page.
Integrated Testing
Integrated testing helps to test the application as a module instead of checking the individual pages as in unit testing. In Integrated testing, multiple modules can be tested together as a unit. Tapestry provides a small library called Tapestry Test Utilities to do integrated testing. This library integrates with Selenium testing tool to perform the testing. The library provides a base class SeleniumTestCase, which starts and manages the Selenium server, Selenium client and Jetty Instance.
One of the example of integrated testing is as follows −
import org.apache.tapestry5.test.SeleniumTestCase;
import org.testng.annotations.Test;

public class IntegrationTest extends SeleniumTestCase {
   @Test
   public void persist_entities() {
      open("/persistitem");
      assertEquals(getText("//span[@id='name']").length(), 0);
      clickAndWait("link = create item");
      assertText("//span[@id = 'name']", "name");
   }
}
Development Dashboard
The Development dashboard is the default page which is used to identify / resolve the problems in your application. The Dashboard is accessed by the URL http://localhost:8080/myfirstapp/core/t5dashboard. The dashboard shows all the pages, services and component libraries available in the application.
Response Compression
Tapestry automatically compress the response using GZIP compression and stream it to the client. This feature will reduce the network traffic and aids faster delivery of the page. The compression can be configured using the symbol tapestry.min-gzip-size in AppModule.java. The default value is 100 bytes. Tapestry will compress the response once the size of the response crosses 100 bytes.
Security
Tapestry provides many options to secure the application against known security vulnerabilities in web application. Some of these options are listed below −
HTTPS − Tapestry pages can be annotated with @Secure to make it a secure page and accessible by the https protocol only.
Page access control − Controlling the page to be accessed by a certain user only.
White-Listed Page − Tapestry pages can be annotated with a @WhitelistAccessOnly to make it accessible only through the localhost.
Asset Security − Under tapestry, only certain types of files are accessible. Others can be accessed only when the MD5 hash of the file is provided.
Serialized Object Date − Tapestry integrates a HMAC into serialized Java object data and sends it to the client to avoid message tampering.
Cross Site Request Forgery − Tapestry provides a 3rd party module called tapestry-csrf-protection to prevent any CSRF attacks.
Security Framework integration − Tapestry does not lock into a single authentication / authorization implementation. Tapestry can be integrated with any popular authentication framework.
Logging
Tapestry provides extensive support for logging, the automatic recording of the progress of the application as it runs. Tapestry uses the de-facto Java logging library, SLF4J. The annotation @Log can be in any component method to emit the entry and exit of the method and the possible exception as well. Also, the Tapestry provided logger object can be injected into any component using the @Inject annotation as shown below −
public class MyPage {
   @Inject
   private Logger logger;

   // . . .

   void onSuccessFromForm() {
      logger.info("Changes saved successfully");
   }

   @Log
   void onValidateFromForm() {
      // logic
   }
}
Finally, we can now say that Apache Tapestry brings best ways to build concise, scalable, maintainable, robust and Ajax-enabled applications. Tapestry can be integrated with any third-party Java application. It can also help in creating a large web application as it is quite easy and fast.