- Apache NiFi - Home
- Apache NiFi - Introduction
- Apache NiFi - Basic Concepts
- Apache NiFi - Environment Setup
- Apache NiFi - User Interface
- Apache NiFi - Processors
- Apache NiFi - Processors Categorization
- Apache NiFi - Processors Relationship
- Apache NiFi - FlowFile
- Apache NiFi - Queues
- Apache NiFi - Process Groups
- Apache NiFi - Labels
- Apache NiFi - Configuration
- Apache NiFi - Administration
- Apache NiFi - Creating Flows
- Apache NiFi - Templates
- Apache NiFi - API
- Apache NiFi - Data Provenance
- Apache NiFi - Monitoring
- Apache NiFi - Upgrade
- Apache NiFi - Remote Process Group
- Apache NiFi - Controller Settings
- Apache NiFi - Reporting Task
- Apache NiFi - Custom Processor
- Apache NiFi - Custom Controllers Service
- Apache NiFi - Logging
- Apache NiFi Useful Resources
- Apache NiFi - Quick Guide
- Apache NiFi - Useful Resources
- Apache NiFi - Discussion
Apache NiFi - Quick Guide
Apache NiFi - Introduction
Apache NiFi is a powerful, easy to use and reliable system to process and distribute data between disparate systems. It is based on Niagara Files technology developed by NSA and then after 8 years donated to Apache Software foundation. It is distributed under Apache License Version 2.0, January 2004. The latest version for Apache NiFi is 2.5.0
Apache NiFi is a real time data ingestion platform, which can transfer and manage data transfer between different sources and destination systems. It supports a wide variety of data formats like logs, geo location data, social feeds, etc. It also supports many protocols like SFTP, HDFS, and KAFKA, etc. This support to wide variety of data sources and protocols making this platform popular in many IT organizations.
Apache NiFi- General Features
The general features of Apache NiFi are as follows −
Apache NiFi provides a web-based user interface, which provides seamless experience between design, control, feedback, and monitoring.
It is highly configurable. This helps users with guaranteed delivery, low latency, high throughput, dynamic prioritization, back pressure and modify flows on runtime.
It also provides data provenance module to track and monitor data from the start to the end of the flow.
Developers can create their own custom processors and reporting tasks according to their needs.
NiFi also provides support to secure protocols like SSL, HTTPS, SSH and other encryptions.
It also supports user and role management and also can be configured with LDAP for authorization.
Apache NiFi -Key Concepts
The key concepts of Apache NiFi are as follows −
Process Group − It is a group of NiFi flows, which helps a userto manage and keep flows in hierarchical manner.
Flow − It is created connecting different processors to transfer and modify data if required from one data source or sources to another destination data sources.
Processor − A processor is a java module responsible for either fetching data from sourcing system or storing it in destination system. Other processors are also used to add attributes or change content in flowfile.
Flowfile − It is the basic usage of NiFi, which represents the single object of the data picked from source system in NiFi. NiFiprocessormakes changes to flowfile while it moves from the source processor to the destination. Different events like CREATE, CLONE, RECEIVE, etc. are performed on flowfile by different processors in a flow.
Event − Events represent the change in flowfile while traversing through a NiFi Flow. These events are tracked in data provenance.
Data provenance − It is a repository.It also has a UI, which enables users to check the information about a flowfile and helps in troubleshooting if any issues that arise during the processing of a flowfile.
Apache NiFi Advantages
Apache NiFi enables data fetching from remote machines by using SFTP and guarantees data lineage.
Apache NiFi supports clustering, so it can work on multiple nodes with same flow processing different data, which increase the performance of data processing.
It also provides security policies on user level, process group level and other modules too.
Its UI can also run on HTTPS, which makes the interaction of users with NiFi secure.
NiFi supports around 188 processors and a user can also create custom plugins to support a wide variety of data systems.
Apache NiFi Disadvantages
When node gets disconnected from NiFi cluster while a user is making any changes in it, then the flow.xml becomes invalid.Anode cannot connect back to the cluster unless admin manually copies flow.xml from the connected node.
Apache NiFi have state persistence issue in case of primary node switch, which sometimes makes processors not able to fetch data from sourcing systems.
Apache NiFi - Basic Concepts
Apache NiFi consist of a web server, flow controller and a processor, which runs on Java Virtual Machine. It also has 3 repositories Flowfile Repository, Content Repository, and Provenance Repository as shown in the figure below.
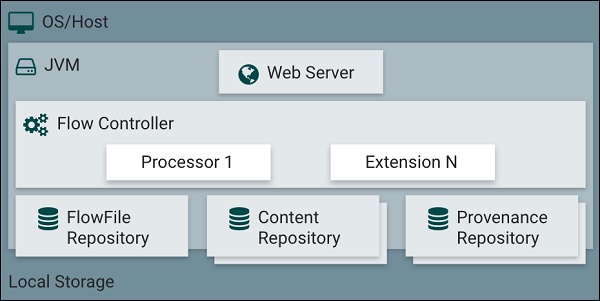
Flowfile Repository
This repository stores the current state and attributes of every flowfile that goes through the data flows of apache NiFi. The default location of this repository is in the root directory of apache NiFi. The location of this repository can be changed by changing the property named "nifi.flowfile.repository.directory".
Content Repository
This repository contains all the content present in all the flowfiles of NiFi. Its default directory is also in the root directory of NiFi and it can be changed using "org.apache.nifi.controller.repository.FileSystemRepository" property. This directory uses large space in disk so it is advisable to have enough space in the installation disk.
Provenance Repository
The repository tracks and stores all the events of all the flowfiles that flow in NiFi. There are two provenance repositories - volatile provenance repository (in this repository all the provenance data get lost after restart) and persistent provenance repository. Its default directory is also in the root directory of NiFi and it can be changed using "org.apache.nifi.provenance.PersistentProvenanceRepository" and "org.apache.nifi.provenance.VolatileProvenanceRepositor" property for the respective repositories.
Apache NiFi - Environment Setup
In this chapter, we will learn about the environment setup of Apache NiFi. The steps for installation of Apache NiFi are as follows −
Setup Java Development Kit (JDK)
You can download the latest version of SDK from Oracle's Java site − Java SE Downloads. You will find instructions for installing JDK in downloaded files, follow the given instructions to install and configure the setup. Finally set PATH and JAVA_HOME environment variables to refer to the directory that contains java and javac, typically java_install_dir/bin and java_install_dir respectively.
If you are running Windows and have installed the JDK in C:\jdk-24, you would have to put the following line in your C:\autoexec.bat file.
set PATH=C:\jdk-24;%PATH%
set JAVA_HOME=C:\jdk-24
Alternatively, on Windows NT/2000/XP, you will have to right-click on My Computer, select Properties → Advanced → Environment Variables. Then, you will have to update the PATH value and click the OK button.
On Unix (Solaris, Linux, etc.), if the SDK is installed in /usr/local/jdk-24 and you use the C shell, you will have to put the following into your .cshrc file.
setenv PATH /usr/local/jdk-24/bin:$PATH
setenv JAVA_HOME /usr/local/jdk-24
Download and Install Apache NiFi
Download Apache NiFi from https://nifi.apache.org/download.html
For windows OS download ZIP file.
For UNIX OS download TAR file.
For docker images,go to the following link https://hub.docker.com/r/apache/nifi/.
Install Apache NiFi
The installation process for Apache NiFi is very easy. The process differs with the OS −
Windows OS − Unzip the zip package and the Apache NiFi is installed.
UNIX OS − Extract tar file in any location and the Apache NiFi is installed.
$tar -xvf nifi-2.5.0-bin.tar.gz
Run Apache NiFi
Open command prompt, go to the bin directory of NiFi. For example, D:\Projects\nifi-2.5.0\bin, and execute nifi.bat file.
D:\Projects\nifi-2.5.0\bin>nifi start
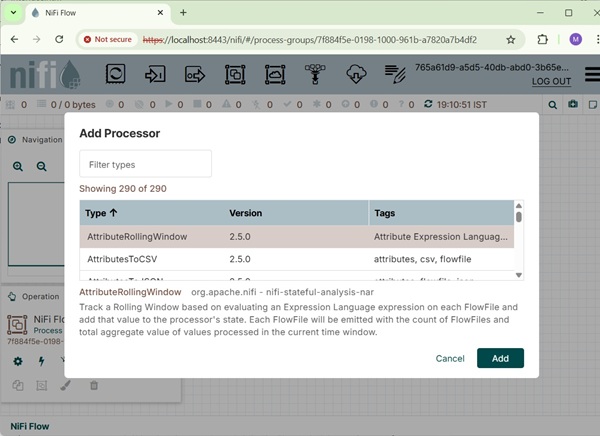
It will take a few minutes to get the NiFi UI up. A user can check nifi-app.log, once NiFi UI is up then, a user can enter http://localhost:8443/nifi/ to access UI.
When NiFi starts, it generates username and password which can be located in nifi-app.log similar to following lines −
Generated Username [765a61d9-a5d5-40db-abd0-3b65ebe953b8]
Generated Password [TkerHbRLjBlrv33/JalB5iDSBpwln4CR]
We've logged in using the generated username/password and following UI comes up. −

Apache NiFi - User Interface
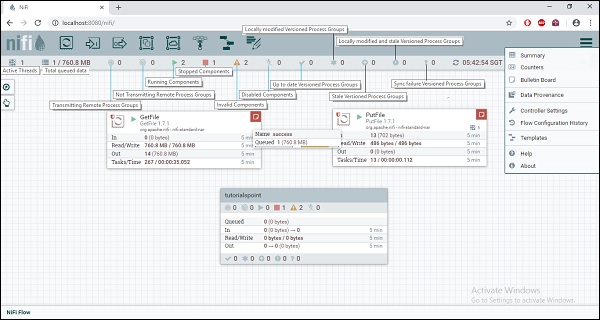
Apache is a web-based platform that can be accessed by a user using web UI. The NiFi UI is very interactive and provides a wide variety of information about NiFi. As shown in the image below, a user can access information about the following attributes −
- Active Threads
- Total queued data
- Transmitting Remote Process Groups
- Not Transmitting Remote Process Groups
- Running Components
- Stopped Components
- Invalid Components
- Disabled Components
- Up to date Versioned Process Groups
- Locally modified Versioned Process Groups
- Stale Versioned Process Groups
- Locally modified and Stale Versioned Process Groups
- Sync failure Versioned Process Groups
Components of Apache NiFi
Apache NiFi UI has the following components −
Processors
User can drag the process icon on the canvas and select the desired processor for the data flow in NiFi.
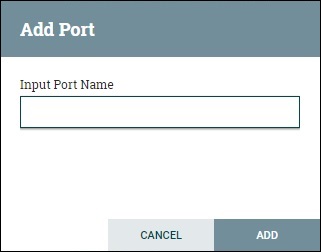
Input port
Below icon is dragged to canvas to add the input port into any data flow.
Input port is used to get data from the processor, which is not present in that process group.

After dragging this icon, NiFi asks to enter the name of the Input port and then it is added to the NiFi canvas.
Output port
The below icon is dragged to canvas to add the output port into any data flow.
The output port is used to transfer data to the processor, which is not present in that process group.

After dragging this icon, NiFi asks to enter the name of the Output port and then it is added to the NiFi canvas.

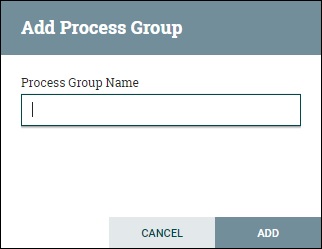
Process Group
A user uses below icon to add process group in the NiFi canvas.
After dragging this icon, NiFi asks to enter the name of the Process Group and then it is added to the NiFi canvas.
Remote Process Group
This is used to add Remote process group in NiFi canvas.

Funnel
Funnel is used to transfer the output of a processor to multiple processors. User can use the below icon to add the funnel in a NiFi data flow.
Template
This icon is used to add a data flow template to NiFi canvas. This helps to reuse the data flow in the same or different NiFi instances.
After dragging, a user can select the templates already added in the NiFi.
Label
These are used to add text on NiFi canvas about any component present in NiFi. It offers a range of colors used by a user to add aesthetic sense.
Apache NiFi - Processors
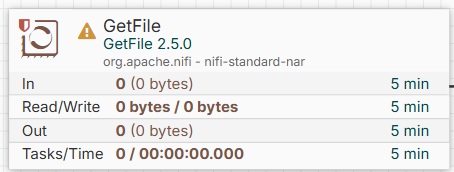
Apache NiFi processors are the basic blocks of creating a data flow. Every processor has different functionality, which contributes to the creation of output flowfile. Dataflow shown in the image below is fetching file from one directory using GetFile processor and storing it in another directory using PutFile processor.

GetFile
GetFile process is used to fetch files of a specific format from a specific directory. It also provides other options to user for more control on fetching. We will discuss it in properties section below.
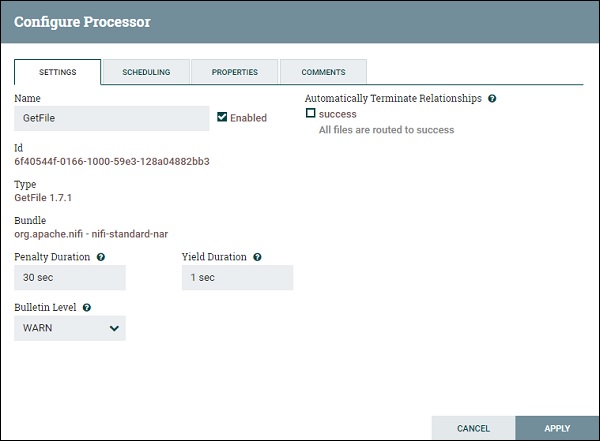
GetFile Settings
Following are the different settings of GetFile processor −
Name
In the Name setting, a user can define any name for the processors either according to the project or by that, which makes the name more meaningful.
Enable
A user can enable or disable the processor using this setting.
Penalty Duration
This setting lets a user to add the penalty time duration, in the event of flowfile failure.
Yield Duration
This setting is used to specify the yield time for processor. In this duration, the process is not scheduled again.
Bulletin Level
This setting is used to specify the log level of that processor.
Automatically Terminate Relationships
This has a list of check of all the available relationship of that particular process. By checking the boxes, a user can program processor to terminate the flowfile on that event and do not send it further in the flow.
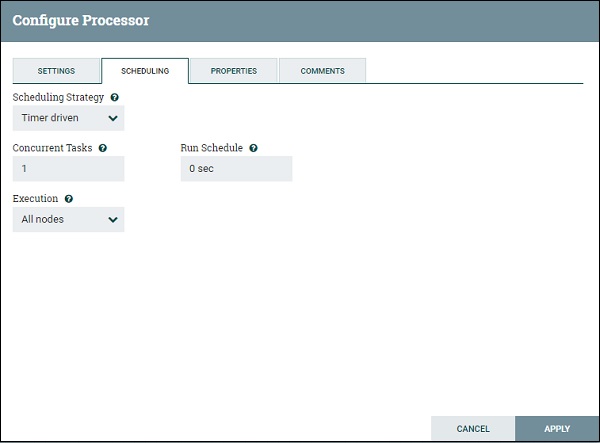
GetFile Scheduling
These are the following scheduling options offered by the GetFile processor −
Schedule Strategy
You can either schedule the process on time basis by selecting time driven or a specified CRON string by selecting a CRON driver option.
Concurrent Tasks
This option is used to define the concurrent task schedule for this processor.
Execution
A user can define whether to run the processor in all nodes or only in Primary node by using this option.
Run Schedule
It is used to define the time for time driven strategy or CRON expression for CRON driven strategy.
GetFile Properties
GetFile offers multiple properties as shown in the image below raging compulsory properties like Input directory and file filter to optional properties like Path Filter and Maximum file Size. A user can manage file fetching process using these properties.

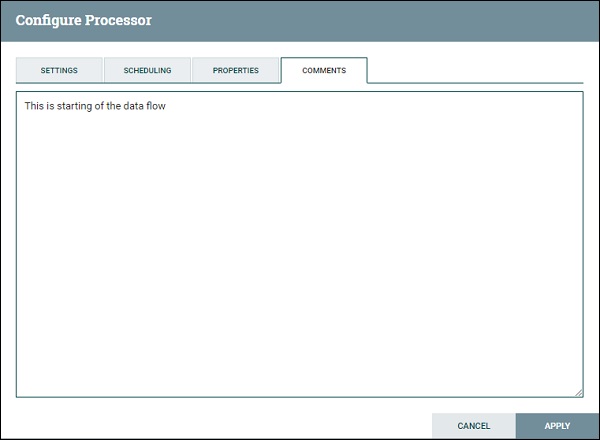
GetFile Comments
This Section is used to specify any information about processor.
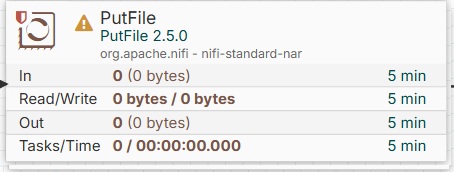
PutFile
The PutFile processor is used to store the file from the data flow to a specific location.
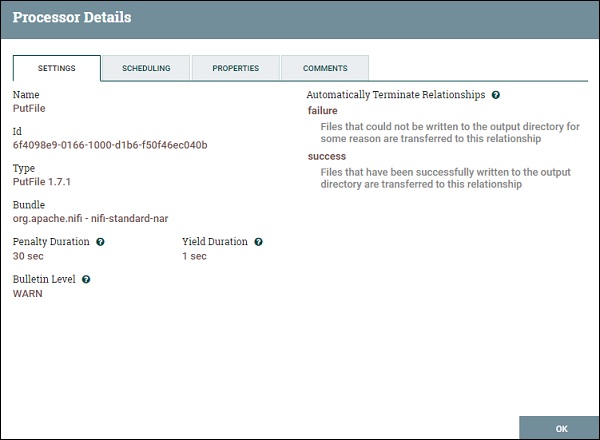
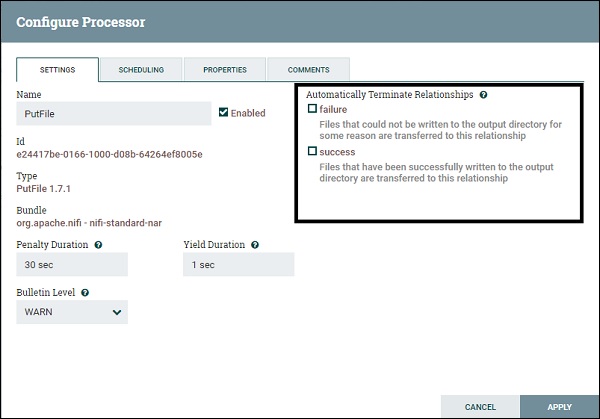
PutFile Settings
The PutFile processor has the following settings −
Name
In the Name setting, a user can define any name for the processors either according to the project or by that which makes the name more meaningful.
Enable
A user can enable or disable the processor using this setting.
Penalty Duration
This setting lets a user add the penalty time duration, in the event of flowfile failure.
Yield Duration
This setting is used to specify the yield time for processor. In this duration, the process does not get scheduled again.
Bulletin Level
This setting is used to specify the log level of that processor.
Automatically Terminate Relationships
This settings has a list of check of all the available relationship of that particular process. By checking the boxes, user can program processor to terminate the flowfile on that event and do not send it further in the flow.
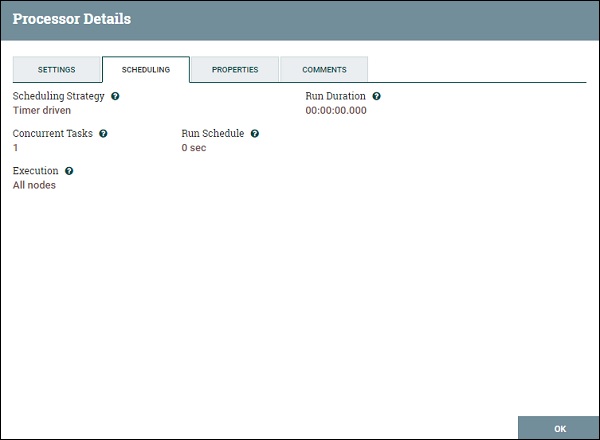
PutFile Scheduling
These are the following scheduling options offered by the PutFile processor −
Schedule Strategy
You can schedule the process on time basis either by selecting timer driven or a specified CRON string by selecting CRON driver option. There is also an Experimental strategy Event Driven, which will trigger the processor on a specific event.
Concurrent Tasks
This option is used to define the concurrent task schedule for this processor.
Execution
A user can define whether to run the processor in all nodes or only in primary node by using this option.
Run Schedule
It is used to define the time for timer driven strategy or CRON expression for CRON driven strategy.
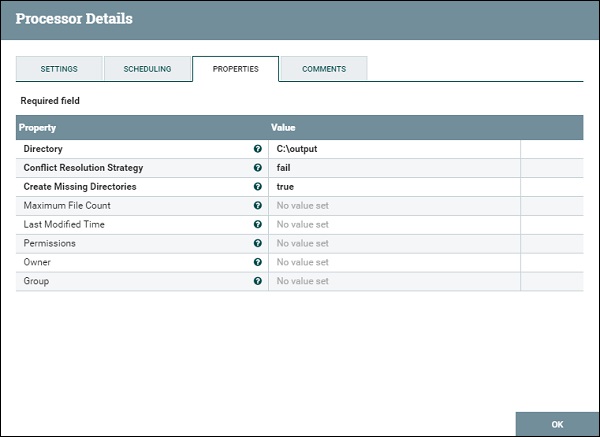
PutFile Properties
The PutFile processor provides properties like Directory to specify the output directory for the purpose of file transfer and others to manage the transfer as shown in the image below.
PutFile Comments
This Section is used to specify any information about processor.

Apache NiFi - Processors Categorization
In this chapter, we will discuss process categorization in Apache NiFi.
Data Ingestion Processors
The processors under Data Ingestion category are used to ingest data into the NiFi data flow. These are mainly the starting point of any data flow in apache NiFi. Some of the processors that belong to these categories are GetFile, GetHTTP, GetFTP, GetKAFKA, etc.
Routing and Mediation Processors
Routing and Mediation processors are used to route the flowfiles to different processors or data flows according to the information in attributes or content of those flowfiles. These processors are also responsible to control the NiFi data flows. Some of the processors that belong to this category are RouteOnAttribute, RouteOnContent, ControlRate, RouteText, etc.
Database Access Processors
The processors of this Database Access category are capable of selecting or inserting data or executing and preparing other SQL statements from database. These processors mainly use data connection pool controller setting of Apache NiFi. Some of the processors that belong to this category are ExecuteSQL, PutSQL, PutDatabaseRecord, ListDatabaseTables, etc.
Attribute Extraction Processors
Attribute Extraction Processors are responsible to extract, analyze, change flowfile attributes processing in the NiFi data flow. Some of the processors that belong to this category are UpdateAttribute, EvaluateJSONPath, ExtractText, AttributesToJSON, etc.
System Interaction Processors
System Interaction processors are used to run processes or commands in any operating system. These processors also run scripts in many languages to interact with a variety of systems. Some of the processors that belong to this category are ExecuteScript, ExecuteProcess, ExecuteGroovyScript, ExecuteStreamCommand, etc.
Data Transformation Processors
Processors that belong to Data Transformation are capable of altering content of the flowfiles. These can be used to fully replace the data of a flowfile normally used when a user has to send flowfile as an HTTP body to invokeHTTP processor. Some of the processors that belong to this category are ReplaceText, JoltTransformJSON, etc.
Sending Data Processors
Sending Data Processors are generally the end processor in a data flow. These processors are responsible to store or send data to the destination server. After successful storing or sending the data, these processors DROP the flowfile with success relationship. Some of the processors that belong to this category are PutEmail, PutKafka, PutSFTP, PutFile, PutFTP, etc.
Splitting and Aggregation Processors
These processors are used to split and merge the content present in a flowfile. Some of the processors that belong to this category are SplitText, SplitJson, SplitXml, MergeContent, SplitContent, etc.
HTTP Processors
These processors deal with the HTTP and HTTPS calls. Some of the processors that belong to this category are InvokeHTTP, PostHTTP, ListenHTTP, etc.
AWS Processors
AWS processors are responsible to interaction with Amazon web services system. Some of the processors that belong to this category are GetSQS, PutSNS, PutS3Object, FetchS3Object, etc.
Apache NiFi - Processors Relationship
In an Apache NiFi data flow, flowfiles move from one to another processor through connection that gets validated using a relationship between processors. Whenever a connection is created, a developer selects one or more relationships between those processors.
As you can see in the above image, the check boxes in black rectangle are relationships. If a developer selects these check boxes then, the flowfile will terminate in that particular processor, when the relationship is success or failure or both.
Success
When a processor successfully processes a flowfile like store or fetch data from any datasource without getting any connection, authentication or any other error, then the flowfile goes to success relationship.
Failure
When a processor is not able to process a flowfile without errors like authentication error or connection problem, etc. then the flowfile goes to a failure relationship.
A developer can also transfer the flowfiles to other processors using connections. The developer can select and also load balance it, but load balancing is just released in version 1.8, which will not be covered in this tutorial.
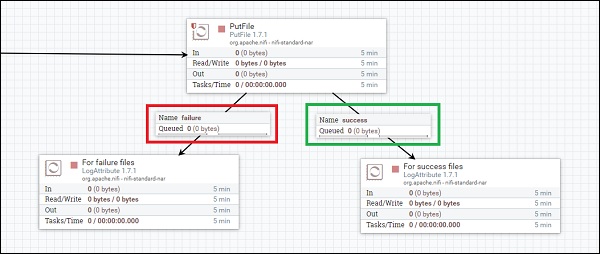
As you can see in the above image the connection marked in red have failure relationship, which means all flowfiles with errors will go to the processor in left and respectively all the flowfiles without errors will be transferred to the connection marked in green.
Let us now proceed with the other relationships.
comms.failure
This relationship is met, when a Flowfile could not be fetched from the remote server due to a communications failure.
not.found
Any Flowfile for which we receive a Not Found message from the remote server will move to not.found relationship.
permission.denied
When NiFi unable to fetch a flowfile from the remote server due to insufficient permission, it will move through this relationship.
Apache NiFi - FlowFile
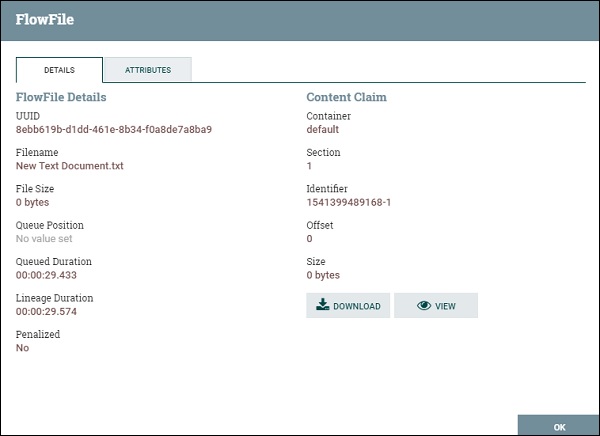
A flowfile is a basic processing entity in Apache NiFi. It contains data contents and attributes, which are used by NiFi processors to process data. The file content normally contains the data fetched from source systems. The most common attributes of an Apache NiFi FlowFile are −
UUID
This stands for Universally Unique Identifier, which is a unique identity of a flowfile generated by NiFi.
Filename
This attribute contains the filename of that flowfile and it should not contain any directory structure.
File Size
It contains the size of an Apache NiFi FlowFile.
mime.type
It specifies the MIME Type of this FlowFile.
path
This attribute contains the relative path of a file to which a flowfile belongs and does not contain the file name.
Apache NiFi - Queues
The Apache NiFi data flow connection has a queuing system to handle the large amount of data inflow. These queues can handle very large amount of FlowFiles to let the processor process them serially.
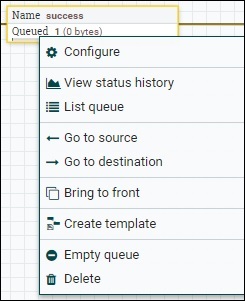
The queue in the above image has 1 flowfile transferred through success relationship. A user can check the flowfile by selecting the List queue option in the drop down list. In case of any overload or error, a user can also clear the queue by selecting the empty queue option and then the user can restart the flow to get those files again in the data flow.

The list of flowfiles in a queue, consist of position, UUID, Filename, File size, Queue Duration, and Lineage Duration. A user can see all the attributes and content of a flowfile by clicking the info icon present at the first column of the flowfile list.

Apache NiFi - Process Groups
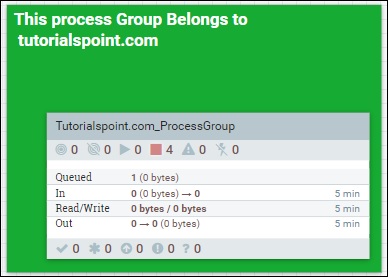
In Apache NiFi, a user can maintain different data flows in different process groups. These groups can be based on different projects or the organizations, which Apache NiFi instance supports.
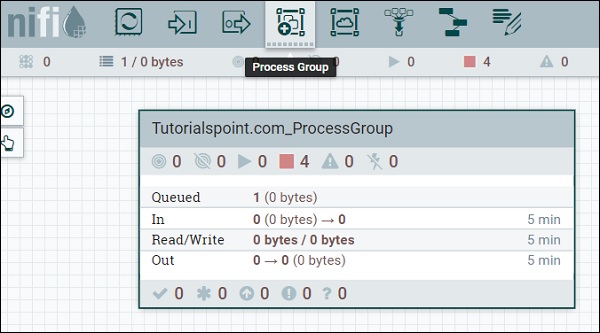
The fourth symbol in the menu at the top of the NiFi UI as shown in the above picture is used to add a process group in the NiFi canvas. The process group named Tutorialspoint.com_ProcessGroup contains a data flow with four processors currently in stop stage as you can see in the above picture. Process groups can be created in hierarchical manner to manage the data flows in better structure, which is easy to understand.

In the footer of NiFi UI, you can see the process groups and can go back to the top of the process group a user is currently present in.
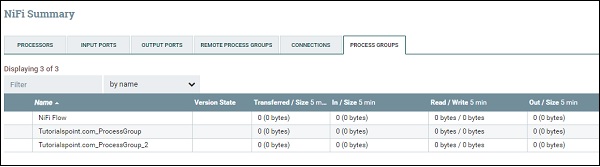
To see the full list of process groups present in NiFi, a user can go to the summary by using the menu present in the left top side of the NiFi UI. In summary, there is process groups tab where all the process groups are listed with parameters like Version State, Transferred/Size, In/Size, Read/Write, Out/Size, etc. as shown in the below picture.
Apache NiFi - Labels
Apache NiFi offers labels to enable a developer to write information about the components present in the NiFI canvas. The leftmost icon in the top menu of NiFi UI is used to add the label in NiFi canvas.

A developer can change the color of the label and the size of the text with a right-click on the label and choose the appropriate option from the menu.
Apache NiFi - Configuration
Apache NiFi is highly configurable platform. The nifi.properties file in conf directory
contains most of the configuration.
The commonly used properties of Apache NiFi are as follows −
Core properties
This section contains the properties, which are compulsory to run a NiFi instance.
| S.No. | Property name | Default Value | description |
|---|---|---|---|
| 1 | nifi.flow.configuration.file | ./conf/flow.xml.gz | This property contains the path to flow.xml file. This file contains all the data flows created in NiFi. |
| 2 | nifi.flow.configuration.archive.enabled | true | This property is used to enable or disable archiving in NiFi. |
| 3 | nifi.flow.configuration.archive.dir | ./conf/archive/ | This property is used to specify the archive directory. |
| 4 | nifi.flow.configuration.archive.max.time | 30 days | This is used to specify the retention time for archiving content. |
| 5 | nifi.flow.configuration.archive.max.storage | 500 MB | it contains the maximum size of archiving directory can grow. |
| 6 | nifi.authorizer.configuration.file | ./conf/authorizers.xml | To specify the authorizer configuration file, which is used for user authorization. |
| 7 | nifi.login.identity.provider.configuration.file | ./conf/login-identity-providers.xml | This property contains the configuration of login identity providers, |
| 8 | nifi.templates.directory | ./conf/templates | This property is used to specify the directory, where NiFi templates will be stored. |
| 9 | nifi.nar.library.directory | ./lib | This property contains the path to library, which NiFi will use to load all the components using NAR files present in this lib folder. |
| 10 | nifi.nar.working.directory | ./work/nar/ | This directory will be storing the unpacked nar files, once NiFi processes them. |
| 11 | nifi.documentation.working.directory | ./work/docs/components | This directory contains the documentation of all components. |
State Management
These properties are used to store the state of the components helpful to start the processing, where components left after a restart and in the next schedule running.
| S.No. | Property name | Default Value | description |
|---|---|---|---|
| 1 | nifi.state.management.configuration.file | ./conf/state-management.xml | This property contains the path to state-management.xml file. This file contains all component state present in the data flows of that NiFi instance. |
| 2 | nifi.state.management.provider.local | local-provider | It contains the ID of the local state provider. |
| 3 | nifi.state.management.provider.cluster | zk-provider | This property contains the ID of the cluster-wide state provider. This will be ignored if NiFi is not clustered but must be populated if running in a cluster. |
| 4 | nifi.state.management. embedded. zookeeper. start | false | This property specifies whether or not this instance of NiFi should run an embedded ZooKeeper server. |
| 5 | nifi.state.management. embedded. zookeeper.properties | ./conf/zookeeper.properties | This property contains the path of the properties file that provides the ZooKeeper properties to use if <nifi.state.management. embedded. zookeeper. start> is set to true. |
FlowFile Repository
Let us now look into the important details of the FlowFile repository −
| S.No. | Property name | Default Value | description |
|---|---|---|---|
| 1 | nifi.flowfile.repository. implementation | org.apache.nifi. controller. repository. WriteAhead FlowFileRepository | This property is used to specify either to store the flowfiles in memory or disk. If a user want to stores the flowfiles in memory then change to "org.apache.nifi.controller. repository.VolatileFlowFileRepository". |
| 2 | nifi.flowfile.repository.directory | ./flowfile_repository | To specify the directory for flowfile repository. |
Apache NiFi - Administration
Apache NiFi offers support to multiple tools like ambari, zookeeper for administration purposes. NiFi also provides configuration in nifi.properties file to set up HTTPS and other things for administrators.
zookeeper
NiFi itself does not handle voting process in cluster. This means when a cluster is created, all the nodes are primary and coordinator. So, zookeeper is configured to manage the voting of primary node and coordinator. The nifi.properties file contains some properties to setup zookeeper.
| S.No. | Property name | Default Value | description |
|---|---|---|---|
| 1 | nifi.state.management.embedded.zookeeper. properties | ./conf/zookeeper.properties | To specify the path and name of zookeeper property file. |
| 2 | nifi.zookeeper.connect.string | empty | To specify the connection string of zookeeper. |
| 3 | nifi.zookeeper.connect.timeout | 3 secs | To specify the connection timeout of zookeeper with NiFi. |
| 4 | nifi.zookeeper.session.timeout | 3 secs | To specify the session timeout of zookeeper with NiFi. |
| 5 | nifi.zookeeper.root.node | /nifi | To specify root node for zookeeper. |
| 6 | nifi.zookeeper.auth.type | empty | To specify authentication type for zookeeper. |
Enable HTTPS
To use NiFi over HTTPS, administrators have to generate keystore and truststore and set some properties in the nifi.properties file. The TLS toolkit can be used to generate all the necessary keys to enable HTTPS in apache NiFi.
| S.No. | Property name | Default Value | description |
|---|---|---|---|
| 1 | nifi.web.https.port | empty | To specify https port number. |
| 2 | nifi.web.https.network.interface.default | empty | Default interface for https in NiFi. |
| 3 | nifi.security.keystore | empty | To specify the path and file name of keystore. |
| 4 | nifi.security.keystoreType | empty | To specify the type of keystore type like JKS. |
| 5 | nifi.security.keystorePasswd | empty | To specify keystore password. |
| 6 | nifi.security.truststore | empty | To specify the path and file name of truststore. |
| 7 | nifi.security.truststoreType | empty | To specify the type of truststore type like JKS. |
| 8 | nifi.security.truststorePasswd | empty | To specify truststore password. |
Other properties for administration
There are some other properties, which are used by administrators to manage the NiFi and for its service continuity.
| S.No. | Property name | Default Value | description |
|---|---|---|---|
| 1 | nifi.flowcontroller.graceful.shutdown.period | 10 sec | To specify the time to gracefully shutdown the NiFi flowcontroller. |
| 2 | nifi.administrative.yield.duration | 30 sec | To specify the administrative yield duration for NiFi. |
| 3 | nifi.authorizer.configuration.file | ./conf/authorizers.xml | To specify the path and file name of authorizer configuration file. |
| 4 | nifi.login.identity.provider.configuration.file | ./conf/login-identity-providers.xml | To specify the path and file name of login identity provider configuration file. |
Apache NiFi - Creating Flows
Apache NiFi offers a large number of components to help developers to create data flows for any type of protocols or data sources. To create a flow, a developer drags the components from menu bar to canvas and connects them by clicking and dragging the mouse from one component to other.
Generally, a NiFi has a listener component at the starting of the flow like getfile, which gets the data from source system. On the other end of there is a transmitter component like putfile and there are components in between, which process the data.
For example, let create a flow, which takes an empty file from one directory and add some text in that file and put it in another directory.

To begin with, drag the processor icon to the NiFi canvas and select GetFile processor from the list.
Create an input directory like c:\inputdir.
Right-click on the processor and select configure and in properties tab add Input Directory (c:\inputdir) and click apply and go back to canvas.
Drag the processor icon to the canvas and select the ReplaceText processor from the list.
Right-click on the processor and select configure. In the properties tab, add some text like Hello tutorialspoint.com in the textbox of Replacement Value and click apply.
Go to settings tab, check the failure checkbox at right hand side, and then go back to the canvas.
Connect GetFIle processor to ReplaceText on success relationship.
Drag the processor icon to the canvas and select the PutFile processor from the list.
Create an output directory like c:\outputdir.
Right-click on the processor and select configure. In the properties tab, add Directory (c:\outputdir) and click apply and go back to canvas.
Go to settings tab and check the failure and success checkbox at right hand side and then go back to the canvas.
Connect the ReplaceText processor to PutFile on success relationship.
Now start the flow and add an empty file in input directory and you will see that, it will move to output directory and the text will be added to the file.
By following the above steps, developers can choose any processor and other NiFi component to create suitable flow for their organisation or client.
Apache NiFi - Templates
Apache NiFi offers the concept of Templates, which makes it easier to reuse and distribute the NiFi flows. The flows can be used by other developers or in other NiFi clusters. It also helps NiFi developers to share their work in repositories like GitHub.
Create Template
Let us create a template for the flow, which we created in chapter no 15 Apache NiFi - Creating Flows.
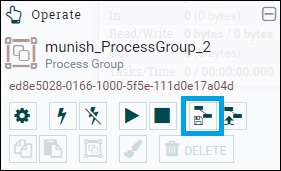
Select all the components of the flow using shift key and then click on the create template icon at the left hand side of the NiFi canvas. You can also see a tool box as shown in the above image. Click on the icon create template marked in blue as in the above picture. Enter the name for the template. A developer can also add description, which is optional.
Download Template
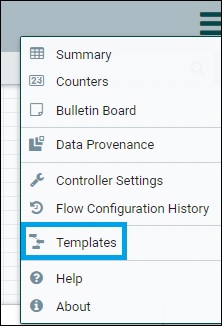
Then go to the NiFi templates option in the menu present at the top right hand corner of NiFi UI as show in the picture below.
Now click the download icon (present at the right hand side in the list) of the template, you want to download. An XML file with the template name will get downloaded.
Upload Template
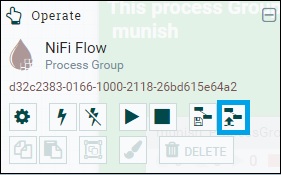
To use a template in NiFi, a developer will have to upload its xml file to NiFi using UI. There is an Upload Template icon (marked with blue in below image) beside Create Template icon click on that and browse the xml.
Add Template
In the top toolbar of NiFi UI, the template icon is before the label icon. The icon is marked in blue as shown in the picture below.

Drag the template icon and choose the template from the drop down list and click add. It will add the template to NiFi canvas.
Apache NiFi - API
NiFi offers a large number of API, which helps developers to make changes and get information of NiFi from any other tool or custom developed applications. In this tutorial, we will use postman app in google chrome to explain some examples.
To add postmantoyour Google Chrome, go to the below mentioned URL and click add to chrome button. You will now see a new app added toyour Google Chrome.
The current version of NiFi rest API is 1.28.0 and the documentation is present in the below mentioned URL.
https://nifi.apache.org/docs/nifi-docs/rest-api/index.html
Following are the most used NiFi rest API Modules −
http://<nifi url>:<nifi port>/nifi-api/<api-path>
In case HTTPS is enabled https://<nifi url>:<nifi port>/nifi-api/<api-path>
| S.No. | API module Name | api-path | Description |
|---|---|---|---|
| 1 | Access | /access | To authenticate user and get access token from NiFi. |
| 2 | Controller | /controller | To manage the cluster and create reporting task. |
| 3 | Controller Services | /controller-services | It is used to manage controller services and update controller service references. |
| 4 | Reporting Tasks | /reporting-tasks | To manage reporting tasks. |
| 5 | Flow | /flow | To get the data flow metadata and component status and query history |
| 6 | Process Groups | /process-groups | To upload and instantiate a template and create components. |
| 7 | Processors | /processors | To create and schedule a processor and set its properties. |
| 8 | Connections | /connections | To create a connection, set queue priority and update connection destination |
| 9 | FlowFile Queues | /flowfile-queues | To view queue contents, download flowfile content, and empty queue. |
| 10 | Remote Process Groups | /remote-process-groups | To create a remote group and enable transmission. |
| 11 | Provenance | /provenance | To query provenance, and search event lineage. |
Let us now consider an example and run on postman to get the details about the running NiFi instance.
Request
GET https://localhost:8443/nifi-api/flow/about
Response
{
   "about": {
      "title": "NiFi",
      "version": "2.5.0",
      "uri": "https://localhost:8443/nifi-api/",
      "contentViewerUrl": "https://localhost:8443/nifi/#/content-viewer",
      "timezone": "IST",
      "buildTag": "rel/nifi-2.5.0"
   }
}
Apache NiFi - Data Provenance
Apache NiFi logs and store every information about the events occur on the ingested data in the flow. Data provenance repository stores this information and provides UI to search this event information. Data provenance can be accessed for full NiFi level and processor level also.
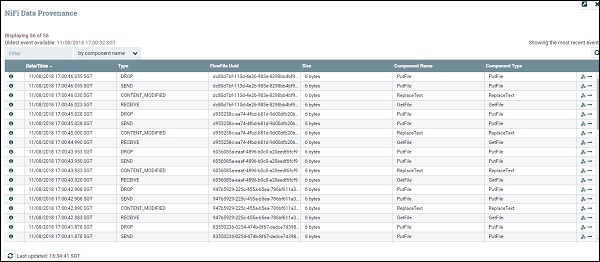
The following table lists down the different fields in the NiFi Data Provenance event list have following fields −
| S.No. | Field Name | Description |
|---|---|---|
| 1 | Date/Time | Date and time of event. |
| 2 | Type | Type of Event like âCREATEâ. |
| 3 | FlowFileUuid | UUID of the flowfile on which the event is performed. |
| 4 | Size | Size of the flowfile. |
| 5 | Component Name | Name of the component which performed the event. |
| 6 | Component Type | Type of the component. |
| 7 | Show lineage | Last column has the show lineage icon, which is used to see the flowfile lineage as shown in the below image. |
To get more information about the event, a user can click on the information icon present in the first column of the NiFi Data Provenance UI.
There are some properties in nifi.properties file, which are used to manage NiFi Data Provenance repository.
| S.No. | Property Name | Default Value | Description |
|---|---|---|---|
| 1 | nifi.provenance.repository.directory.default | ./provenance_repository | To specify the default path of NiFi data provenance . |
| 2 | nifi.provenance.repository.max.storage.time | 24 hours | To specify the maximum retention time of NiFi data provenance. |
| 3 | nifi.provenance.repository.max.storage.size | 1 GB | To specify the maximum storage of NiFi data provenance. |
| 4 | nifi.provenance.repository.rollover.time | 30 secs | To specify the rollover time of NiFi data provenance. |
| 5 | nifi.provenance.repository.rollover.size | 100 MB | To specify the rollover size of NiFi data provenance. |
| 6 | nifi.provenance.repository.indexed.fields | EventType, FlowFileUUID, Filename, ProcessorID, Relationship | To specify the fields used to search and index NiFi data provenance. |
Apache NiFi - Monitoring
In Apache NiFi, there are multiple ways to monitor the different statistics of the system like errors, memory usage, CPU usage, Data Flow statistics, etc. We will discuss the most popular ones in this tutorial.
In built Monitoring
In this section, we will learn more about in built monitoring in Apache NiFi.
Bulletin Board
The bulletin board shows the latest ERROR and WARNING getting generated by NiFi processors in real time. To access the bulletin board, a user will have to go the right hand drop down menu and select the Bulletin Board option. It refreshes automatically and a user can disable it also. A user can also navigate to the actual processor by double-clicking the error. A user can also filter the bulletins by working out with the following −
- by message
- by name
- by id
- by group id
Data provenance UI
To monitor the Events occurring on any specific processor or throughout NiFi, a user can access the Data provenance from the same menu as the bulletin board. A user can also filter the events in data provenance repository by working out with the following fields −
- by component name
- by component type
- by type
NiFi Summary UI
Apache NiFi summary also can be accessed from the same menu as the bulletin board. This UI contains information about all the components of that particular NiFi instance or cluster. They can be filtered by name, by type or by URI. There are different tabs for different component types. Following are the components, which can be monitored in the NiFi summary UI −
- Processors
- Input ports
- Output ports
- Remote process groups
- Connections
- Process groups
In this UI, there is a link at the bottom right hand side named system diagnostics to check the JVM statistics.
Reporting Tasks
Apache NiFi provides multiple reporting tasks to support external monitoring systems like Ambari, Grafana, etc. A developer can create a custom reporting task or can configure the inbuilt ones to send the metrics of NiFi to the externals monitoring systems. The following table lists down the reporting tasks offered by NiFi 1.7.1.
| S.No. | Reporting Task Name | Description |
|---|---|---|
| 1 | AmbariReportingTask | To setup Ambari Metrics Service for NiFi. |
| 2 | ControllerStatusReportingTask | To report the information from the NiFi summary UI for the last 5 minute. |
| 3 | MonitorDiskUsage | To report and warn about the disk usage of a specific directory. |
| 4 | MonitorMemory | To monitor the amount of Java Heap used in a Java Memory pool of JVM. |
| 5 | SiteToSiteBulletinReportingTask | To report the errors and warning in bulletins using Site to Site protocol. |
| 6 | SiteToSiteProvenanceReportingTask | To report the NiFi Data Provenance events using Site to Site protocol. |
NiFi API
There is an API named system diagnostics, which can be used to monitor the NiFI stats in any custom developed application. Let us check the API in postman.
Request
https://localhost:8443/nifi-api/system-diagnostics
Response
{
  "systemDiagnostics": {
    "aggregateSnapshot": {
      "totalNonHeap": "180.88 MB",
      "totalNonHeapBytes": 189661184,
      "usedNonHeap": "177.54 MB",
      "usedNonHeapBytes": 186167184,
      "freeNonHeap": "3.33 MB",
      "freeNonHeapBytes": 3494000,
      "maxNonHeap": "-1 bytes",
      "maxNonHeapBytes": -1,
      "totalHeap": "1,024 MB",
      "totalHeapBytes": 1073741824,
      "usedHeap": "391.02 MB",
      "usedHeapBytes": 410012632,
      "freeHeap": "632.98 MB",
      "freeHeapBytes": 663729192,
      "maxHeap": "1,024 MB",
      "maxHeapBytes": 1073741824,
      "heapUtilization": "38.0%",
      "availableProcessors": 12,
      "processorLoadAverage": -1,
      "totalThreads": 95,
      "daemonThreads": 43,
      "uptime": "02:28:44.089",
      "flowFileRepositoryStorageUsage": {
        "freeSpace": "189.04 GB",
        "totalSpace": "200 GB",
        "usedSpace": "10.96 GB",
        "freeSpaceBytes": 202983182336,
        "totalSpaceBytes": 214747312128,
        "usedSpaceBytes": 11764129792,
        "utilization": "5.0%"
      },
      "contentRepositoryStorageUsage": [
        {
          "identifier": "default",
          "freeSpace": "189.04 GB",
          "totalSpace": "200 GB",
          "usedSpace": "10.96 GB",
          "freeSpaceBytes": 202983182336,
          "totalSpaceBytes": 214747312128,
          "usedSpaceBytes": 11764129792,
          "utilization": "5.0%"
        }
      ],
      "provenanceRepositoryStorageUsage": [
        {
          "identifier": "default",
          "freeSpace": "189.04 GB",
          "totalSpace": "200 GB",
          "usedSpace": "10.96 GB",
          "freeSpaceBytes": 202983182336,
          "totalSpaceBytes": 214747312128,
          "usedSpaceBytes": 11764129792,
          "utilization": "5.0%"
        }
      ],
      "garbageCollection": [
        {
          "name": "G1 Young Generation",
          "collectionCount": 13,
          "collectionTime": "00:00:00.278",
          "collectionMillis": 278
        },
        {
          "name": "G1 Concurrent GC",
          "collectionCount": 8,
          "collectionTime": "00:00:00.015",
          "collectionMillis": 15
        },
        {
          "name": "G1 Old Generation",
          "collectionCount": 0,
          "collectionTime": "00:00:00.000",
          "collectionMillis": 0
        }
      ],
      "statsLastRefreshed": "21:15:57 IST",
      "versionInfo": {
        "niFiVersion": "2.5.0",
        "javaVendor": "Oracle Corporation",
        "javaVersion": "24.0.1",
        "osName": "Windows 11",
        "osVersion": "10.0",
        "osArchitecture": "amd64",
        "buildTag": "rel/nifi-2.5.0"
      }
    }
  }
}
Apache NiFi - Upgrade
Before starting the upgrade of Apache NiFi, read the release notes to know about the changes and additions. A user needs to evaluate the impact of these additions and changes in his/her current NiFi installation. Below is the link to get the release notes for the new releases of Apache NiFi.
https://cwiki.apache.org/confluence/display/NIFI/Release+Notes
In a cluster setup, a user needs to upgrade NiFi installation of every Node in a cluster. Follow the steps given below to upgrade the Apache NiFi.
Backup all the custom NARs present in your current NiFi or lib or any other folder.
-
Download the new version of Apache NiFi. Below is the link to download the source and binaries of latest NiFi version.
Create a new directory in the same installation directory of current NiFi and extract the new version of Apache NiFi.
Stop the NiFi gracefully. First stop all the processors and let all the flowfiles present in the flow get processed. Once, no more flowfile is there, stop the NiFi.
Copy the configuration of authorizers.xml from current NiFi installation to the new version.
Update the values in bootstrap-notification-services.xml, and bootstrap.conf of new NiFi version from the current one.
Add the custom logging from logback.xml to the new NiFi installation.
Configure the login identity provider in login-identity-providers.xml from the current version.
Update all the properties in nifi.properties of the new NiFi installation from current version.
Please make sure that the group and user of new version is same as the current version, to avoid any permission denied errors.
Copy the configuration from state-management.xml of current version to the new version.
-
Copy the contents of the following directories from current version of NiFi installation to the same directories in the new version.
./conf/flow.xml.gz
Also flow.xml.gz from the archive directory.
For provenance and content repositories change the values in nifi. properties file to the current repositories.
copy state from ./state/local or change in nifi.properties if any other external directory is specified.
Recheck all the changes performed and check if they have an impact on any new changes added in the new NiFi version. If there is any impact, check for the solutions.
Start all the NiFi nodes and verify if all the flows are working correctly and repositories are storing data and Ui is retrieving it with any errors.
Monitor bulletins for some time to check for any new errors.
If the new version is working correctly, then the current version can be archived and deleted from the directories.
Apache NiFi - Remote Process Group
Apache NiFi Remote Process Group or RPG enables flow to direct the FlowFiles in a flow to different NiFi instances using Site-to-Site protocol. As of version 1.7.1, NiFi does not offer balanced relationships, so RPG is used for load balancing in a NiFi data flow.

A developer can add the RPG from the top toolbar of NiFi UI by dragging the icon as shown in the above picture to canvas. To configure an RPG, a Developer has to add the following fields −
| S.No. | Field Name | Description |
|---|---|---|
| 1 | URLs | To specify comma separated remote target NiFi URLs. |
| 2 | Transport Protocol | To specify the transport protocol for remote NiFi instances. It's either RAW or HTTP. |
| 3 | Local Network Interface | To specify the local network interface to send/receive data. |
| 4 | HTTP Proxy Server Hostname | To specify the proxy server's hostname for the purpose of transport in RPG. |
| 5 | HTTP Proxy Server Port | To specify the proxy server's port for the purpose of transport in RPG. |
| 6 | HTTP Proxy User | It is an optional field to specify the username for HTTP proxy. |
| 7 | HTTP Proxy Password | It is an optional field to specify the password for above username. |
A developer needs to enable it, before using it like we start processors before using them.
Apache NiFi - Controller Settings
Apache NiFi offers shared services, which can be shared by processors and reporting task is called controller settings. These are like Database connection pool, which can be used by processors accessing same database.
To access the controller settings, use the drop down menu at the right top corner of NiFi UI as shown in the below image.
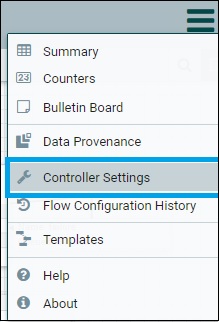
There are many controller settings offered by Apache NiFi, we will discuss a commonly used one and how we set it up in NiFi.
DBCPConnectionPool
Add the plus sign in the Nifi Settings page after clicking the Controller settings option. Then select the DBCPConnectionPool from the list of controller settings. DBCPConnectionPool will be added in the main NiFi settings page as shown in the below image.

It contains the following information about the controller setting:Name
- Type
- Bundle
- State
- Scope
- Configure and delete icon
Click on the configure icon and fill the required fields. The fields are listed down in the table below −
| S.No. | Field Name | Default value | description |
|---|---|---|---|
| 1 | Database Connection URL | empty | To specify the connection URL to database. |
| 2 | Database Driver Class Name | empty | To specify the driver class name for database like com.mysql.jdbc.Driver for mysql. |
| 3 | Max Wait Time | 500 millis | To specify time to wait for the data from a connection to database. |
| 4 | Max Total Connections | 8 | To specify the maximum number of allocated connection in database connection pool. |
To stop or configure a controller setting, first all the attached NiFi components should be stopped. NiFi also adds scope in controller settings to manage the configuration of it. Therefore, only the ones which shared the same settings will not get impacted and will use the same controller settings.
Apache NiFi - Reporting Task
Apache NiFi reporting tasks are similar to the controller services, which run in the background and send or log the statistics of NiFi instance. NiFi reporting task can also be accessed from the same page as controller settings, but in a different tab.

To add a reporting task, a developer needs to click on the plus button present at the top right hand side of the reporting tasks page. These reporting tasks are mainly used for monitoring the activities of a NiFi instance, in either the bulletins or the provenance. Mainly these reporting tasks uses Site-to-Site to transport the NiFi statistics data to other node or external system.
Let us now add a configured reporting task for more understanding.
MonitorMemory
This reporting task is used to generate bulletins, when a memory pool crosses specified percentage. Follow these steps to configure the MonitorMemory reporting task −
Add in the plus sign and search for MonitorMemory in the list.
Select MonitorMemory and click on ADD.
Once it is added in the main page of reporting tasks main page, click on the configure icon.
In the properties tab, select the memory pool, which you want to monitor.
Select the percentage after which you want bulletins to alert the users.
Start the reporting task.
Apache NiFi - Custom Processor
Apache NiFi is an open source platform and gives developers the options to add their custom processor in the NiFi library. Follow these steps to create a custom processor.
-
Download Maven latest version from the link given below.
Add an environment variable named M2_HOME and set value as the installation directory of maven.
-
Download Eclipse IDE from the below link.
Open command prompt and execute Maven Archetype command.
> mvn archetype:generate
Search for the nifi type in the archetype projects.
Select org.apache.nifi:nifi-processor-bundle-archetype project.
Then from the list of versions select the latest version i.e. 1.7.1 for this tutorial.
Enter the groupId, artifactId, version, package, and artifactBaseName etc.
-
Then a maven project will be created having to directories.
nifi-<artifactBaseName>-processors
nifi-<artifactBaseName>-nar
Run the below command in nifi-<artifactBaseName>-processors directory to add the project in the eclipse.
mvn install eclipse:eclipse
Open eclipse and select import from the file menu.
Then select Existing Projects into workspace and add the project from nifi-<artifactBaseName>-processors directory in eclipse.
Add your code in public void onTrigger(ProcessContext context, ProcessSession session) function, which runs when ever a processor is scheduled to run.
Then package the code to a NAR file by running the below mentioned command.
mvn clean install
A NAR file will be created at nifi-
-nar/target directory. Copy the NAR file to the lib folder of Apache NiFi and restart the NiFi.
After successful restart of NiFi, check the processor list for the new custom processor.
For any errors, check ./logs/nifi.log file.
Apache NiFi - Custom Controllers Service
Apache NiFi is an open source platform and gives developers the options to add their custom controllers service in Apache NiFi. The steps and tools are almost the same as used to create a custom processor.
Open command prompt and execute Maven Archetype command.
> mvn archetype:generate
Search for the nifi type in the archetype projects.
Select org.apache.nifi:nifi-service-bundle-archetype project.
Then from the list of versions, select the latest version 1.7.1 for this tutorial.
Enter the groupId, artifactId, version, package, and artifactBaseName, etc.
-
A maven project will be created having directories.
nifi-<artifactBaseName>
nifi-<artifactBaseName>-nar
nifi-<artifactBaseName>-api
nifi-<artifactBaseName>-api-nar
-
Run the below command in nifi-<artifactBaseName> and nifi-<artifactBaseName>-api directories to add these two projects in the eclipse.
mvn install eclipse:eclipse
Open eclipse and select import from the file menu.
Then select Existing Projects into workspace and add the project from nifi-<artifactBaseName> and nifi-<artifactBaseName>-api directories in eclipse.
Add your code in the source files.
-
Then package the code to a NAR file by running the below mentioned command.
mvn clean install
Two NAR files will be created in each nifi-<artifactBaseName>/target and nifi-<artifactBaseName>-api/target directory.
Copy these NAR files to the lib folder of Apache NiFi and restart the NiFi.
After successful restart of NiFi, check the processor list for the new custom processor.
For any errors, check ./logs/nifi.log file.
Apache NiFi - Logging
Apache NiFi uses logback library to handle its logging. There is a file logback.xml present in the conf directory of NiFi, which is used to configure the logging in NiFi. The logs are generated in logs folder of NiFi and the log files are as described below.
nifi-app.log
This is the main log file of nifi, which logs all the activities of apache NiFi application ranging from NAR files loading to the run time errors or bulletins encountered by NiFi components. Below is the default appender in logback.xml file for nifi-app.log file.
<appender name="APP_FILE"
class="ch.qos.logback.core.rolling.RollingFileAppender">
   <file>${org.apache.nifi.bootstrap.config.log.dir}/nifi-app.log</file>
   <rollingPolicy
      class="ch.qos.logback.core.rolling.SizeAndTimeBasedRollingPolicy">
      <fileNamePattern>
         ${org.apache.nifi.bootstrap.config.log.dir}/
	      nifi-app_%d{yyyy-MM-dd_HH}.%i.log
      </fileNamePattern>
      <maxFileSize>100MB</maxFileSize>
      <maxHistory>30</maxHistory>
   </rollingPolicy>
   <immediateFlush>true</immediateFlush>
   <encoder class="ch.qos.logback.classic.encoder.PatternLayoutEncoder">
      <pattern>%date %level [%thread] %logger{40} %msg%n</pattern>
   </encoder>
</appender>
The appender name is APP_FILE, and the class is RollingFileAppender, which means logger is using rollback policy. By default, the max file size is 100 MB and can be changed to the required size. The maximum retention for APP_FILE is 30 log files and can be changed as per the user requirement.
nifi-user.log
This log contains the user events like web security, web api config, user authorization, etc. Below is the appender for nifi-user.log in logback.xml file.
<appender name="USER_FILE"
   class="ch.qos.logback.core.rolling.RollingFileAppender">
   <file>${org.apache.nifi.bootstrap.config.log.dir}/nifi-user.log</file>
   <rollingPolicy class="ch.qos.logback.core.rolling.TimeBasedRollingPolicy">
      <fileNamePattern>
         ${org.apache.nifi.bootstrap.config.log.dir}/
	      nifi-user_%d.log
      </fileNamePattern>
      <maxHistory>30</maxHistory>
   </rollingPolicy>
   <encoder class="ch.qos.logback.classic.encoder.PatternLayoutEncoder">
      <pattern>%date %level [%thread] %logger{40} %msg%n</pattern>
   </encoder>
</appender>
The appender name is USER_FILE. It follows the rollover policy. The maximum retention period for USER_FILE is 30 log files. Below is the default loggers for USER_FILE appender present in nifi-user.log.
<logger name="org.apache.nifi.web.security" level="INFO" additivity="false">
   <appender-ref ref="USER_FILE"/>
</logger>
<logger name="org.apache.nifi.web.api.config" level="INFO" additivity="false">
   <appender-ref ref="USER_FILE"/>
</logger>
<logger name="org.apache.nifi.authorization" level="INFO" additivity="false">
   <appender-ref ref="USER_FILE"/>
</logger>
<logger name="org.apache.nifi.cluster.authorization" level="INFO" additivity="false">
   <appender-ref ref="USER_FILE"/>
</logger>
<logger name="org.apache.nifi.web.filter.RequestLogger" level="INFO" additivity="false">
   <appender-ref ref="USER_FILE"/>
</logger>
nifi-bootstrap.log
This log contains the bootstrap logs, apache NiFis standard output (all system.out written in the code mainly for debugging), and standard error (all system.err written in the code). Below is the default appender for the nifi-bootstrap.log in logback.log.
<appender name="BOOTSTRAP_FILE" class="ch.qos.logback.core.rolling.RollingFileAppender">
   <file>${org.apache.nifi.bootstrap.config.log.dir}/nifi-bootstrap.log</file>
   <rollingPolicy class="ch.qos.logback.core.rolling.TimeBasedRollingPolicy">
      <fileNamePattern>
         ${org.apache.nifi.bootstrap.config.log.dir}/nifi-bootstrap_%d.log
      </fileNamePattern>
      <maxHistory>5</maxHistory>
   </rollingPolicy>
   <encoder class="ch.qos.logback.classic.encoder.PatternLayoutEncoder">
      <pattern>%date %level [%thread] %logger{40} %msg%n</pattern>
   </encoder>
</appender>
nifi-bootstrap.log file,s appender name is BOOTSTRAP_FILE, which also follows rollback policy. The maximum retention for BOOTSTRAP_FILE appender is 5 log files. Below is the default loggers for nifi-bootstrap.log file.
<logger name="org.apache.nifi.bootstrap" level="INFO" additivity="false">
   <appender-ref ref="BOOTSTRAP_FILE" />
</logger>
<logger name="org.apache.nifi.bootstrap.Command" level="INFO" additivity="false">
   <appender-ref ref="CONSOLE" />
   <appender-ref ref="BOOTSTRAP_FILE" />
</logger>
<logger name="org.apache.nifi.StdOut" level="INFO" additivity="false">
   <appender-ref ref="BOOTSTRAP_FILE" />
</logger>
<logger name="org.apache.nifi.StdErr" level="ERROR" additivity="false">
   <appender-ref ref="BOOTSTRAP_FILE" />
</logger>