mkswap Command in Linux
The mkswap command in Linux sets up swap space on a disk partition or file. Swap space acts as virtual memory, providing extra capacity when physical RAM is full by moving inactive data to storage. This helps the system handle more workloads and manage resource-intensive tasks efficiently.
Understanding how to create and manage swap space is an important Linux skill for optimizing performance.
Table of Contents
Here is a comprehensive guide to the options available with the mkswap command −
- What is the mkswap Command?
- Syntax of the mkswap Command
- mkswap Command Options
- Creating a Swap Partition
- Creating a Swap File
- Verifying Swap Space
- Common Issues and Solutions
What is the mkswap Command?
The mkswap command is used to set up a file or partition as extra memory when your computer's RAM is full. It creates swap space, which temporarily holds data from RAM that's not being used, so there's more room for active tasks. However, swap space is slower than RAM, and relying on it too much can slow down your system.
The mkswap command sets up a partition or file to be used as swap space. It marks the space with a special label that the Linux kernel recognizes. However, this command doesn't turn on the swap space; that is done with the swapon command.
Key Features of mkswap
The mkswap command helps set up and manage swap space on your system. Here are the key features of mkswap −
- It sets up swap space by preparing a partition or file to be used as extra memory.
- It creates metadata, which includes important information that helps the system manage the swap space.
- It works with both files and partitions, so you can use it with a disk partition or a dedicated swap file.
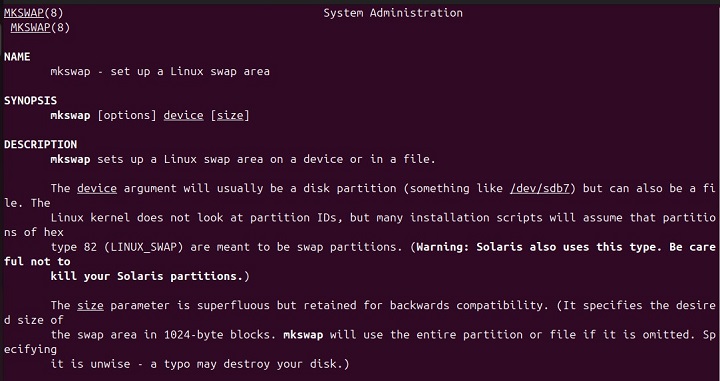
Syntax of mkswap Command
The basic syntax to use this command in Linux is shown below −
mkswap [options] <device|file>
Here, <device|file> is the partition or file you want to set up for swap, and [options] are optional flags to change how the command works.
mkswap Command Options
Some commonly used options are listed in the following table −
| Options | Description |
|---|---|
| -c | Check the device or file for bad blocks before setting up swap space. |
| -f | Force the setup, even if the device or file already has a swap signature. |
| -L <label> | Assign a label to the swap space. |
| -p <pages> | Specifies the page size (default is system-dependent) |
| -U <uuid> | Assign a specific UUID to the swap space. |
| -v | Displays the version of the mkswap command. |
To learn more about the mkswap command usage, execute the following command −
man mkswap
Creating a Swap Partition
Let's go through the following steps to set up a partition for swap −
Step 1: Creating a Partition
Let's create a partition with tools like fdisk, parted, or gparted and set the partition type to Linux swap (type 82) −
sudo fdisk /dev/sdX
Make sure to replace the /dev/sdX with your targeted disk.
Step 2: Set Up the Swap Partition
Now run the mkswap command with sudo privileges to set up a swap partition −
sudo mkswap /dev/sdX1
Here, sdX1 represents a partition to be created.
Step 3: Enable the Swap Space
Now use the swapon command to activate the swap space −
sudo swapon /dev/sdX1
Step 4: Make the Swap Permanent
To make sure the swap is activated when the system starts, add an entry to the /etc/fstab file −
/dev/sdX1 none swap sw 0 0
It will set up a swap partition in the /etc/fstab file to activate swap space at boot.
Creating a Swap File
If there's no free partition, you can create a swap file instead. For this purpose, you can go through the following steps −
Step 1: Create the Swap File
You can use the dd or fallocate command to create a file with the size you need −
sudo dd if=/dev/zero of=/swapfile bs=1M count=1024
This command creates a 1GB file called swapfile in the root directory. Alternatively, you can use the fallocate command as follows to achieve a similar functionality −
sudo fallocate -l 1G /swapfile
Step 2: Change Permissions for the Swap File
Let's secure the swap file by specifying the appropriate permissions −
sudo chmod 600 /swapfile
Now only the root user can read and write to the swapfile.
Step 3: Set Up the Swap File
Use the mkswap command to configure the file for use as swap space −
sudo mkswap /swapfile
Step 4: Enable the Swap File
Now you can activate the swap file with swapon command −
sudo swapon /swapfile
Step 5: Make the Swap Permanent
To make the swap permanent, add an entry to the /etc/fstab file. This will activate the swap file when the system boots −
/swapfile none swap sw 0 0
Verifying Swap Space
After setting up and enabling swap space, you can verify it using different commands. For instance, the following command shows the active swap space −
sudo swapon --show
You can also use the following command to view system memory, including swap −
free -h
Common Issues and Solutions
Here are some common issues you might face while working with the mkswap command −
- If you get "Permission Denied", make sure to run mkswap with sudo privileges.
- If there is an "Existing Swap Signature", use the -f option to overwrite it.
- If there's "Insufficient Space," check that the file or partition has enough room for the swap size you need.
That's all about mkswap command in Linux.
Conclusion
The mkswap command helps create and manage swap space in Linux. It allows the system to extend its memory capacity when RAM is full. By setting up a swap partition or swap file, you can ensure your system handles demanding tasks more efficiently.
Configuring swap space properly is key to optimizing system performance. In this article, we demonstrated how to set up swap space, troubleshoot common issues, and keep your system running smoothly.
