- PHP ImageMagick - Home
- PHP ImageMagick - Introduction
- Background Color
- Image Reflections
- Image Cropping
- Image Bordering
- Image Resizing
- Composite Images
- Contrast & Brightness
- Enhancing &Equalizing
- Sharpening & Blurring
- Image Tiling
- Image Threshold
- Modifying Colors
- Different effects
- Securing The Images
- Simulation Of Sketches
- Editing TheAppearance
- Rotation and Rolling
- Splicing & Spreading
- Miscellaneous Functions
- PHP ImageMagick Useful Resources
- PHP ImageMagick - Quick Guide
- PHP ImageMagick - Resources
- PHP ImageMagick - Discussion
PHP ImageMagick - Quick Guide
PHP ImageMagick - Introduction
We know that images are an easy way to improve the user experience of any website. Many experiments proved that our brain could interpret images much quicker than text. They also help in attracting attention and triggering emotions. When it comes to presenting important information, images can be of great value.
How can we create or edit images dynamically, making them suitable for web applications? 'ImageMagick' does that!
What is ImageMagick?
ImageMagick is a freely available robust collection of tools and libraries to perform many operations on digital images.
It is a software suite to read, create, edit, compose, convert, and write images in a variety of formats.
These formats include DPX, EXR, GIF, JPG, JPEG, PNG, TIFF, etc. (over 200 formats).
These operations are available from the command line, or C, C++, Perl, Java, PHP, or Python programming languages. In this tutorial, we will be learning about ImageMagick in PHP.
What is PHP?
PHP stands for Hypertext pre-processor. It is a server-side scripting language that is embedded in HTML. It contains various built-in functions which allow for fast development. These scripts are executed on the server and the software is free to download and use.
What is ImageMagick in PHP?
ImageMagick in PHP is a native extension that does all the operations on images. Operations also include resizing, flipping, mirroring, rotating, distorting, transforming images, adjusting image colors, or even drawing text, lines, polygons, ellipses, and curves.
It is free software delivered as a ready-to-run binary distribution or as source code that you may use, copy, modify, and distribute in both open and proprietary applications.
It utilizes multiple computational threads to increase performance and can read, process, or write mega-, giga-, or tera-pixel image sizes.
It runs on Linux, Windows, Mac OS X, iOS, Android OS, and others.
Installation and Configuring
As we know that PHP is a server-side scripting language, using any web servers like Apache, Nginx, etc. to run PHP scripts would be preferable. This allows you to run the PHP scripts from your browser.
There is also another way to execute the PHP scripts which is using the command line. This doesnt require any web server to be installed. In this tutorial, you will be learning to implement ImageMagick features using the Apache server. For this, we install XAMPP.
XAMPP stands for cross-platform, Apache, Maria DB, PHP, Perl. It is a free and open-source cross-platform web server solution stack package developed by Apache Friends, consisting mainly of the Apache HTTP server, Maria DB, and interpreters for scripts written in PHP and Perl programming languages.
Installing XAMPP:
In this section, you will be able to learn the step-by-step process of installing XAMPP.
Step 1 − Open this website − https://www.apachefriends.org
Step 2 − Install the latest version of XAMPP available there which is suitable for your operating system (Windows/Linux/IOS).
Step 3 − The file downloaded will be something like 'xampp-windows-x64-7.4.27-2-VC15-installer.
Step 4 − Run the downloaded file. You get some warning, click 'OK'.
Step 5 − The below screen appears, click 'Next'.

Step 6 − Select Apache, MySQL, PHP, and phpMyAdmin. and click 'Next'.

Step 7 − In this step, select any specific folder, or else, you can leave it as it is(default). Click 'Next'.

Step 8 − In the next step, the files will be unpacked automatically. After the process completes, click 'Next'.
Step 9 − After it completes 100%, click 'Next'.
Step 10 − Now, there appears a dialog box which contains 'Completing the XAMPP setup wizard', then click 'Finish'.
Installing ImageMagick
In this section, you will learn to install the ImageMagick extension and installer in PHP.
Step 1 − Open the website https://mlocati.github.io
Step 2 − Download both the ImageMagick extension and installer according to your PHP configuration, architecture, and thread-safety of your XAMPP version.
Downloaded installer file will be in the form 'ImageMagick-7.1.0-18-vc15-x64.zip'
Downloaded ImageMagick extension is in the form 'php-imagick-3.7.0-7.4-ts-vc15-x64.zip'.


Step 3 − Extract all the files from the extension file downloaded (from (b)). And from those files, copy the php_imagemagick.dll file.
Step 4 − Paste the file into the ext directory of your PHP installation.

Step 5 − Extract all files from the installer file downloaded (from (a)). From that, copy all files starting with CORE_DL / IM_MOP_RL/FILTER which are DLL files. The files start from CORE_RL_bzlib_.dll as shown in the below image. Choose the files until where they end with IM_MOD_RL_yuv_.dll.

Step 6 − Paste those files to the PHP root directory where there is 'php.exe'.

Step 7 − Now, go to XAMPP Control Panel. Stop Apache.
Step 8 − Click 'Config' and select PHP (php.ini) file.

Step 9 − In that file, find 'extensions' in that code. After 'extension=php_ftp.dll' line, type 'extension=php_imagick.dll'. Save the file.

Step 10 − Restart Apache.
Step 11 − Installation completed.
Verification
Before directly jumping to the execution part, let us first check whether Imagemagick is properly installed in PHP on your system. For this, follow the below steps.
Step 1 − Go to the browser and click 'localhost'.
Step 2 − Go to 'phpinfo' which is in the top right corner.
Step 3 − Search for Imagick. The screen must appear as shown below.

Step 4 − If it appears, the Imagick setup is successfully done. This package contains the Imagick module version, Imagick classes, release dates, and all the supported formats.
PHP ImageMagick - Background Color
The background color of a text of an image refers to the color of its background. Using a suitable color that complements the context of the image or text helps in increasing the readability and even makes easier to scan.
For example, in the image below, we can see that "TUTORIALS POINT" is written on a plain background and is not very readable. Selecting an appropriate background color for this element could improve its visibility.

If we look at the below image, we can observe that this is more readable than the previous image, the main reason for this is its background color.

In the following sections, we will be learning how to identify the background color of an image, and how to set the background color for an image.
Identifying the Background-color
To identify the background color of an image using ImageMagick, we have a method named getImageBackgroundColor(). If nothing is specified or found in the image, then the default background color is white.
Syntax
public Imagick :: getImageBackgroundColor() : ImagickPixel
This method doesnt take any parameters. The return value is in the form of an RGB triplet which is a three-element row vector. Each element specifies the red, green, and blue components of the selected color. So based on that triplet, the user will be able to identify the color that is present in the background.
Example
The following example shows how to use the `getImageBackgroundColor()` method in PHP to get the background color of an image. To execute the code, you'll need a local server environment such as XAMPP.
The code starts by creating an Imagick object and then retrieves the background color with this function. Finally, it prints out an RGB triplet representation of that color on your server.
<?php
   //creating a new imagick object //
   $img=new Imagick($_SERVER['DOCUMENT_ROOT'].'/test/image.jpg');
   $color=new ImagickPixel($img->getImageBackgroundColor) ;//Get the Background Color
   $colorInfo = $color->getColorAsString (); //Get the Color from ImagickPixel
   echo $colorInfo; //display colorinfo as output
?>
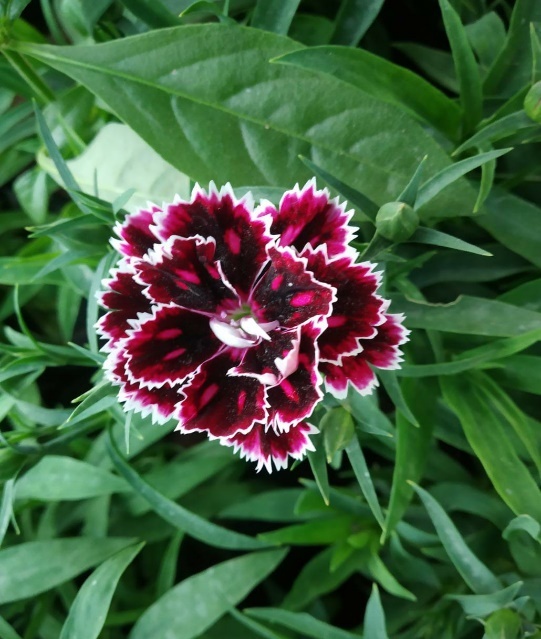
Assume that the following is the input image (image.jpg) in the program −

Output
srgb(0, 0, 0)
The output obtained is srgb (0,0,0) which is black.
Setting a Background color
There are a few cases where we need to set the background colors for the images, especially the images having text to increase their readability. To set the background color of an image in PHP, we use the method setImageBackgroundColor().
Syntax
The syntax for this method is shown below −
public Imagick::setImageBackgroundColor(mixed $background): bool
This method accepts 'background' as an argument, which holds the desired background color. Upon successful execution, it returns true and generates an image with the specified background color.
Example
This PHP code snippet shows how to use the `setImageBackgroundColor()` function to set the background color of an image.
First, a new Imagick object is created and the image is read in as input. Then, the background color is set with the built-in function setImageBackgroundColor().
The output can either be displayed on the server by using `echo`, or it can be saved locally with `writeImage()`.
<?php
   $image=new Imagick($_SERVER['DOCUMENT_ROOT']."/test/image.png");
   $image->setImageBackgroundColor('black');
   $image->setImageAlphaChannel(100);
   $image->writeImage($_SERVER['DOCUMENT_ROOT']."/test/newimage.png");
?>
Assume that the following is the input image (image.png) in the program −

Output

PHP ImageMagick - Image Reflections
Image reflections are a type of image manipulation technique used to create mirror images or symmetrical patterns. This effect is achieved by copying and flipping an image horizontally or vertically, creating a mirrored version of the original.
In this chapter we will explore how to use the PHP Imagemagick library to create image reflections with ease. We'll cover basic concepts such as reflection types, size adjustments, and color manipulations to give you a comprehensive understanding of the process and help you create beautiful reflective effects quickly and easily.
Image Flipping
Flipping an image is the process of making a reflected duplication of that image vertically. So, for flipping an image, we have a method flipImage() in Imagemagick. This function helps to display the vertical mirror image of the input.
Syntax
bool Imagick::flipImage(void)
This function does not accept any parameters.
Example
In this example, you'll learn how to use the 'flipImage()' function in PHP. To get started, create a new Imagick object and read the input image. Then, use the flipImage() method to flip it vertically. You can either display the flipped image directly on the server or save it to your system using writeImage().
<?php
   $image=new Imagick($_SERVER['DOCUMENT_ROOT']."/test/image.jpg");
   $image->flipImage();
   $image->writeImage($_SERVER['DOCUMENT_ROOT']."/test/flipImage.png");
?>
Assume that the following is the input image (image.jpg) in the program −

Output

Image Flopping
Flopping an image is the process of making a reflected duplication of that image horizontally. So, for flopping an image, we have a method flopImage() in Imagemagick. This function helps to display the horizontal mirror image of the input.
Syntax
bool Imagick::flopImage(void)
This function does not accept any parameters.
Example
In this example, you'll learn how flop an image using the 'flopImage()' function in PHP. To start, create a new Imagick object and read the input image. Next, use the 'flopImage()' function to flip it horizontally. The flipped image will return as output.
<?php
   $image=new Imagick($_SERVER['DOCUMENT_ROOT']."/test/image.jpg");
   $image->flopImage();
   $image->writeImage($_SERVER['DOCUMENT_ROOT']."/test/flopImage.png");
?>
Assume that the following is the input image (image.jpg) in the program −

Output

PHP ImageMagick - Image Cropping
Image cropping involves cutting out portions of an image or reducing its size by trimming away parts that are not essential. This allows you to focus on just the important elements in the image while discarding any unnecessary elements.
Using ImageMagick for image cropping is a great way to quickly edit your images without needing any special software or knowledge of complicated graphic design techniques.
In this chapter, you will be learning to crop the images using the inbuilt functions provided by the ImageMagick library.
Image-cropping
Extracting a region from an image is called cropping. It is nothing but removing the unwanted edges of an image or obtaining a particular part of an image. This can be done in PHP using a method called cropImage() in Imagemagick.
Syntax
public Imagick::cropImage(int $width, int $height, int $x, int $y) : bool
Parameters
This method takes in 4 parameters which are width, height, x, and y.
Width − width of the crop,
Height − height of the crop,
x − X-coordinate of the cropped regions top left corner.
y − Y-coordinate of the cropped regions top left corner.
The output obtained will be the cropped image according to the measurements given as the arguments in that method.
Example
In the following example an Imagick object is created and the input image is read. Subsequently, using 'cropImage()' function, the image is cropped as per arguments provided within the function. The output i.e., cropped image can either be directly displayed on the server or saved to your system with any desired name and format using the 'writeImage()' function.
<?php
   $image=new Imagick($_SERVER['DOCUMENT_ROOT']."/test/image.jpg");
   $image->cropImage(800, 750, 200, 100);
   $image->writeImage($_SERVER['DOCUMENT_ROOT']."/test/newimage.png");
?>
Assume that the following is the input image (image.jpg) in the program −

Output

Creating a Cropped Thumbnail
Thumbnail is a representation of the larger image in the form of a smaller image. It intends to make it easier and faster to look at or manage a group of larger images. ImageMagick helps us to create a cropped thumbnail by providing a method cropThumbnailImage().
Syntax
public Imagick::cropThumbnailImage(int $width, int $height, bool $legacy = false): bool
This method helps to create a fixed-size thumbnail by first scaling the image up or down and cropping a specified area from the center.
This method takes 2 parameters, width, and height. They specify the width and height of the thumbnail respectively.
Example
In the below example, the imagick object is created. Then, the fixed size thumbnail is obtained using the cropThumbnailImage() function and output is obtained using writeImage() function.
<?php
   $image=new Imagick($_SERVER['DOCUMENT_ROOT']."/test/image.jpg");
   $image->cropThumbnailImage(100, 100);
   $image->writeImage($_SERVER['DOCUMENT_ROOT']."/test/newimage.png");
?>
Assume that the following is the input image (image.jpg) in the program −

Output

Chopping Images
Sometimes, during the selection of images, the whole image is not needed. In those situations where you want an extract of an image or only a particular region of the image, the chopImage() function helps us. This function helps us to remove a region of an image and trims the image according to the users specifications.
Syntax
public Imagick::chopImage (int $width, int $height,int $x,int $y): bool
This function takes 4 parameters namely,
width − width is also an integer value that stores the width of the chopped area.
height − Height is an integer value that stores the height of the chopped area
x − x coordinate of the chopped area.
Y − y coordinate of the chopped area.
Example
In the following example, you will learn how to use the 'chopImage()' function. First, an Imagick object is created and given an image as input.
Then, 'chopImage()' is applied on the image with parameters such as width, height, x-coordinate, and y-coordinate.
<?php
   $image=new Imagick($_SERVER['DOCUMENT_ROOT']."/test/image.jpeg");
   $image->chopImage (400, 40, 2, 2);
   $image->writeImage($_SERVER['DOCUMENT_ROOT']."/test/chopImage.png");
?>
Assume that the following is the input image (image.jpeg) in the program −

Output

PHP ImageMagick - Image Bordering
Every picture that is displayed on a digital display has black or white, or colored backgrounds. So, making a separation between the background and the photo is essential to define the visual limits of the image.
This necessity of making separation is even more in black or white backgrounds. So, to serve this purpose, borders must be added to photos. In this chapter, you will learn to add borders to images in PHP using a few inbuilt functions of Imagemagick.
Adding 3D Border
A 3D border can be added to an image using an inbuilt function frameImage() provided by Imagemagick.
Syntax
public Imagick::frameImage(mixed $matte_color, int $width, int $height, int $inner_bevel, int $outer_bevel): bool
This method takes 5 parameters
matte-color − It is a string representing matte color.
width − represents the width of the border.
height − represents the height of the border.
inner_bevel − represents the width of inner bevel.
outer_bevel − represents the width of outer bevel.
The output obtained is an image with a border frame with the specified measurements and color.
Example
The following program shows how to use the Imagick library in PHP to create a new image file. It creates an object of the Imagick class using an existing image, adds a frame around it with specific parameters (in this case pink and 100x100 pixels with 10px border), then writes the modified image as a PNG file.
<?php
   $image=new Imagick($_SERVER['DOCUMENT_ROOT']."/test/image.jpg");
   $image->frameImage('pink', 100, 100, 10, 10);
   $image->writeImage($_SERVER['DOCUMENT_ROOT']."/test/newimage.png");
?>
Assume that the following is the input image (image.jpg) in the program −

Output

Adding a Normal Border
Imagemagick has provided a method borderImage() which adds a border to an image. It takes an image as input and produces an image with a border, as output.
Syntax
public Imagick::borderImage(mixed $bordercolor, int $width, int $height): bool
This function has 3 parameters which are border-color, width, and height.
The bordercolor is an imagickpixel object or a string containing border color.
The width and height are integer values holding the width and height of the border.
Example
The following program shows how to use the Imagick library in PHP to create an image with a 25px yellow border. It reads the image from the 'test/image.png' file and writes it out as 'test/borderImage.png' with the added border.
<?php
   $image=new Imagick($_SERVER['DOCUMENT_ROOT']."/test/image.png");
   $image->borderImage('yellow', 25, 25);
   $image->writeImage($_SERVER['DOCUMENT_ROOT']."/test/borderImage.png");
?>
Assume that the following is the input image (image.png) in the program −

Output

PHP ImageMagick - Image Resizing
In this chapter, you will be learning to resize images adaptively and scale the images for certain dimensions using various inbuilt functions that are provided by Imagemagick.
While resizing an image using ImageMagick, you can achieve it in two different ways scaling or, cropping. Scaling will result in a proportional increase or decrease in size while cropping will cut off portions of the original image based on specific parameters set by the user.
Resizing Images Adaptively
There are many situations where we want to shrink images slightly to a smaller web size. For this, there is a method provided by Imagemagick which is adaptiveResizeImage(), which helps to resize the image adaptively. This also avoids blurring across sharp coloring changes.
Syntax
public Imagick::adaptiveResizeImage(int $columns, int $rows, bool $bestfit = false, bool $legacy = false): bool
The parameters of this method are columns, rows, and bestfit.
columns specify the number of columns in the scaled image.
rows represent the number of rows in the scaled image
bestfit specifies whether to fit the image inside a bounding box.
Example
The following example is used to demonstrate how to implement this function in PHP. Start by creating a new Imagick object and taking an input image. Then, apply the 'adaptiveResizeImage()' method on that input image. Finally, save the output image as 'adaptiveResizeImage.png'.
<?php
   $image=new Imagick($_SERVER['DOCUMENT_ROOT']."/test/image.jpg");
   $image->adaptiveResizeImage(2000, 1000);
   $image->writeImage($_SERVER['DOCUMENT_ROOT']."/test/adaptiveResizeImage.png");
?>
Assume that the following is the input image (image.jpg) in the program −

Output

Scaling Images to Desired Dimensions
For the images to fit into the websites, there must be some desired dimensions. Scaling the images to those dimensions will either remove the unnecessary pixels or create or add new pixel details. ImageMagick allows us to resize the images in PHP using the method resizeImage(). It takes the image as input and resizes it according to the desired dimensions and gives the output.
To ensure the images fit into websites, they must be scaled to specific dimensions. The ImageMagick's 'resizeImage()' method allows us to do this in PHP, it takes an image as input and resizes it according to the desired dimensions and returns the resultant image.
Syntax
public Imagick::resizeImage(int $columns, int $rows, int $filter, float $blur, bool $bestfit=false, bool $legacy=false):bool
The parameters of the resizeImage() method are columns, rows, filter, blur, and bestfit.
columns and rows are integer values that specify the width and height of the images respectively.
filter is an integer value that refers to the list of filter constants like filter_point, filter_box, filter_triangle, etc.
The blur factor is the float value. If the blur factor is greater than 1, it is blurry and if it is less than 1, it is sharp.
bestfit is an optional fit parameter.
Example
Following is an example of to resize the image using PHP. In here we arw creating a new Imagick object and an empty image (for input). Then, invokes the 'resizeImage()' method on the image created. The output will be in PNG format and named 'resizeImage'.
<?php
   $img=new Imagick($_SERVER['DOCUMENT_ROOT']."/test/image.jpg");
   $img->resizeImage(200, 300, null, null, null, null);
   $img->writeImage($_SERVER['DOCUMENT_ROOT']."/test/newimage.png");
?>
Assume that the following is the input image (image.jpg) in the program −

Output

PHP ImageMagick - Composite Images
The combination of two or more images to create a new one is called composite photography. And the combined photo is called a composite image. Combining visual elements from separate sources into a single image is often done to create the illusion that all those elements are parts of the same image.
Doing this manually becomes a very complex task and it takes hours. To make this process easy and fast, Imagemagick has provided a method named compositeImage() which takes two images as input and provides the combined image as output.
Syntax
public Imagick::compositeImage(Imagick $composite_object, int $composite, int $x, int $y, int $channel = Imagick::CHANNEL_DEFAULT): bool
The parameters of this method are composite_object, x, y, and channel. Composite_object is an Imagick object which holds the composite image.
x is the column offset of the composited image and y is the row offset of the composited image. Channel provides any channel constant that is valid for your channel mode.
Example
This example is a PHP code snippet which implements compositeImage() function. Firstly, two imagick objects are created and two images are taken as inputs. Both the images are composited with the help of compositeImage() function, and the output image is in the format compositeImage.png.
<?php
   $image1=new Imagick($_SERVER['DOCUMENT_ROOT']."/test/image1.jpg");
   $image2=new Imagick($_SERVER['DOCUMENT_ROOT']."/test/image2.jpg");
   $image1->setImageVirtualPixelMethod(Imagick::VIRTUALPIXELMETHOD_TRANSPARENT);
   $image1->setImageArtifact('compose:args', "1,0,-0.5,0.5");
   $image1->compositeImage($image2, Imagick::COMPOSITE_MATHEMATICS, 0, 0);
   $image1->writeImage($_SERVER['DOCUMENT_ROOT']."/test/compositeImage.png");
?>
Assume that the following is the input image (image1.jpg) in the program −
Assume that the following is the input image (image2.jpg) in the program −

Output
PHP ImageMagick - Contrast & Brightness
Different types of moods can be conveyed in images with the help of contrast. The term contrast refers to the amount of color or grayscale differentiation. Images with higher contrast levels generally display a greater degree of color or grayscale variation than those of lower contrast. In this chapter, you will be learning about changing and adjusting the contrast and brightness.
Changing the Contrast
In this section, you will be learning about the process of changing the contrast. This can be done using a method called contrastImage() which is provided by Imagemagick. It helps to enhance the differences between lighter and darker elements of the image.
Syntax
public Imagick::contrastImage(bool $sharpen): bool
This method contains a single parameter which is sharpen. It is a boolean value that specifies the sharpen value. This method takes an image as an input and gives out the image after changing its contrast as output.
Example
In the below example, new imagick object is created and the input image is taken. Then, the contrastImage() function is applied on that image. Finally, the output image is obtained in the format contrastImage.png.
<?php
   $image=new Imagick($_SERVER['DOCUMENT_ROOT']."/test/image.jpeg");
   $image->contrastImage(true);
   $image->writeImage($_SERVER['DOCUMENT_ROOT']."/test/contrastImage.png");
?>
Assume that the following is the input image (image.jpeg) in the program −
Output

Changing the Brightness
ImageMagick provided a method called brightnessContrastImage() which changes the brightness and contrast of an image. It converts the brightness and contrast parameters into slope and intercept and calls a polynomial function to apply to the image.
Syntax
Public Imagick::brightnessContrastImage(float $brightness, float $contrast, int $channel=Imagick::CHANNEL_DEFAULT):bool
This method contains 3 parameters which are brightness, contrast, and channel. Brightness is used to store the value of brightness, contrast is used to store the value of the contrast of the image, and channel is used to store the value of the channel. The output obtained is an image with added brightness and contrast.
Example
In the below example, a new imagick object is created and the input image is taken. Then, the brightnessContrastImage() function with parameters (brightness=15, contrast=20) is applied on that image. Finally, the output image is obtained in the format brightnessContrastImage.png.
<?php
   $image=new Imagick($_SERVER['DOCUMENT_ROOT']."/test/image5.jpeg");
   $image->brightnessContrastImage(15,50);
   $image->writeImage($_SERVER['DOCUMENT_ROOT']."/test/brightnessContrastImage.png");
?>
Assume that the following is the input image (image5.jpeg) in the program −

Output

Enhance the Contrast
Enhancement is the process of improving quality of an image. To enhance the contrast, Imagemagick has provided a method contrastStretchImage() which enhances the contrast of the color image by adjusting the pixels' color to span the entire range of colors available.
Syntax
public Imagick::contrastStretchImage(float $black_point, float $white_point, int $channel = Imagick::CHANNEL_DEFAULT): bool
This method has three parameters which are black_point, white_point, and channel. Black_point specifies the black point, white_point specifies the white point and channel provides any channel constant that is valid for your channel mode.
Example
In the below example, a new Imagick object is created and the input image is taken. Then, the contrastStretchImage() function with parameters(black_point=1000, white_point=5000) is applied on that image. Finally, the output image is obtained in the format contrastStretchImage.png.
This method has three parameters which are black_point, white_point, and channel. Black_point specifies the black point, white_point specifies the white point and channel provides any channel constant that is valid for your channel mode.
<?php
   $image=new Imagick($_SERVER['DOCUMENT_ROOT']."/test/image.jpeg");
   $image->contrastStretchImage(1000, 5000);
   $image->writeImage($_SERVER['DOCUMENT_ROOT']."/test/contrastStretchImage.png");
?>
Assume that the following is the input image (image.jpeg) in the program −
Output
PHP ImageMagick - Enhancing & Equalizing
Enhancing Images
Image enhancement is the process of improving the visual appearance or quality of an image. This can be achieved through a variety of techniques, such as adjusting brightness and contrast, color balancing, sharpening or blurring edges, changing resolution and noise removal.
There is a function provided by Imagemagick which is enhanceImage(). It takes the image as input and enhances the image by improving its quality and produces the enhanced image as output.
Syntax
public Imagick::enhanceImage(): bool
This function has no parameters.
Example
This example represents the PHP code to implement the function enhanceImage(). The new imagick is created at first, then enhanceImage(), function is applied and output is obtained in the format enhanceImage.png.
<?php
   $image=new Imagick($_SERVER['DOCUMENT_ROOT']."/test/image.jpeg");
   $image->enhanceImage();
   $image->writeImage($_SERVER['DOCUMENT_ROOT']."/test/enhanceImage.png");
?>
Assume that the following is the input image (image.jpg) in the program −

Output

Equalizing images
Equalizing images is a process of adjusting the contrast and brightness in an image to make it look more balanced. Equalizing can help bring out details in shadows and highlights, as well as improve color accuracy and reduce noise.
In this process, the contrast can either be increased or decreased based on the histogram equalization which is a computer image processing technique. In this section, you will be learning to equalize an image using the equalizeImage() function provided by Imagemagick.
Syntax
public Imagick::equalizeImage(): bool
This function has no parameters. It takes an image as input and produces the equalized image as output.
Example
This example shows the implementation of equalizeImage() function in PHP. The input image is read after creation of imagick object and then equalizeImage() function is applied on that input image. The final output image is obtained in the format equalizeImage.png.
<?php
   $image=new Imagick($_SERVER['DOCUMENT_ROOT']."/test/image.jpeg");
   $image->equalizeImage();
   $image->writeImage($_SERVER['DOCUMENT_ROOT']."/test/equalizeImage.png");
?>
Assume that the following is the input image (image.jpeg) in the program −

Output

PHP ImageMagick - Sharpening & Blurring
Sharpening Imaging
To give a sharper appearance to images, Imagemagick provides an inbuilt function adaptiveSharpenImage() which sharpens the images adaptively. It takes an image as input and produces the sharpened image as output.
This method uses algorithms to detect areas in an image where sharpening should be applied, and adjusts the amount of sharpening accordingly. This allows for more natural-looking results than uniform sharpening techniques without sacrificing quality or introducing artifacts into the image.
Syntax
public Imagick::adaptiveSharpenImage(float $radius, float $sigma, int $channel = Imagick::CHANNEL_DEFAULT): bool
This function consists of three parameters which are radius, sigma, and channel.
Radius is a float value that specifies the radius of the Gaussian, in pixels, not counting the center pixel.
Sigma is a float value that specifies the standard deviation of the Gaussian, in pixels.
Channel provides any channel constant that is valid for your channel mode.
Example
To have a clear understanding on how to implement this function, look at the below example. This code creates an imagick object and inputs the image. Then, adaptiveSharpenImage() function is applied with the required parameters (radius=19, sigma=15). The output image is obtained in the form adaptiveSharpenImage.png.
<?php
   $image=new Imagick($_SERVER['DOCUMENT_ROOT']."/test/image.png");
   $image->adaptiveSharpenImage(19,15);
   $image->writeImage($_SERVER['DOCUMENT_ROOT']."/test/adaptiveSharpenImage.png");
?>
Assume that the following is the input image (image.png) in the program −

Output

Blurring Images
Blurring an image makes the color transition smooth. By blurring, the rapid changes in the intensity of pixels are averaged. In this chapter, you will be learning about different ways of blurring images with the help of the inbuilt functions provided by Imagemagick.
PHP Image magick library provides a range of powerful functions using which we can perform a variety of operations including blurring, resizing, cropping, and more. With PHP Imagemagick you can easily blur your images with just a few lines of code.
You can also adjust the intensity of the blur as well as several other settings to achieve the desired effect. Whether you're looking for subtle or dramatic changes in your photos, PHP Imagemagick has everything you need to create stunning results!
Adding Blur Filter
To add a blur filter on an image, Imagemagick provided a method named blurImage(). It takes an image as input and generates/returns the blurred image.
Syntax
public Imagick::blurImage(float $radius, float $sigma, int $channel = ?): bool
This function has 3 parameters: radius, sigma, and channel.
Radius is a float value that specifies the radius that needs to be blurred.
Sigma is a float value that specifies the standard deviation.
channel specifies the channel-type constant. When channel is not specified, all channels are blurred.
Example
In the below example, a new imagick object is created and an image is taken as input. Then, blurImage() function is applied to blur the image. The radius and sigma are the parameters specified inside the function (radius=25, sigma=5). The blurred image is obtained as output in the form blurImage.png.
<?php
   $image=new Imagick($_SERVER['DOCUMENT_ROOT']."/test/image.png");
   $image->blurImage(25, 5);
   $image->writeImage($_SERVER['DOCUMENT_ROOT']."/test/blurImage.png");
?>
Assume that the following is the input image (image.png) in the program −

Output

Applying blur by a certain angle
The 'rotationalImageBlur()' function of Imagemagick can be used for image manipulation, allowing users to apply blurring effects on an image at any angle. It accepts the input image and produces a blurred version of the same with the desired degree of blurriness.
Syntax
public Imagick::rotationalBlurImage(float $angle, int $channel =Imagick::CHANNEL_DEFAULT):bool
This function contains two parameters which are angle and channel.
Angle is a float value that is used to store the angle.
channel is a constant that is valid for your channel mode.
Example
In the below PHP code example, a new imagick object is created and image is taken as input. Then, rotationalBlurImage() function is applied to blur the image on a certain angle (15). The blurred image is obtained as output in the form rotationalBlurImage.png.
<?php
   $image=new Imagick($_SERVER['DOCUMENT_ROOT']."/test/image.png");
   $image->rotationalBlurImage (15);
   $image->writeImage($_SERVER['DOCUMENT_ROOT']."/test/rotationalBlurImage.png");
?>
Assume that the following is the input image (image.png) in the program −

Output

Simulating motion blur
The blur that is seen in moving objects in an image is called motion blur. To simulate motion blur, Imagemagick provided an inbuilt function motionBlurImage(). It takes an image as input and produces the motion-blurred image as output.
Syntax
public Imagick::motionBlurImage(float $radius, float $sigma, float $angle, int $channel =Imagick::CHANNEL_DEFAULT): bool
This function contains 4 parameters which are radius, sigma, angle, and channel.
Radius is a float value that specifies the radius of the Gaussian (in pixels) excluding the center pixel.
sigma is a float value that specifies the standard deviation of the Gaussian (in pixels).
angle is also a float value which specifies the angle of the blurring motion.
Channel is a constant that is valid for your channel mode.
Example
In the example below, a new Imagick object is created and an image is taken as input. The 'motionBlurImage()' function is then applied to blur the image with radius (20), sigma (20) and angle (45) as parameters. As a result, a blurred version of the original image can be obtained in the form of 'motionBlurImage.png'.
<?php
   $image=new Imagick($_SERVER['DOCUMENT_ROOT']."/test/image.png");
   $image->motionBlurImage(20, 20, 45);
   $image->writeImage($_SERVER['DOCUMENT_ROOT']."/test/motionBlurImage.png");
?>
Assume that the following is the input image (image.png) in the program −

Output

PHP ImageMagick - Image Tiling
In this chapter, you will be learning to tile a texture image repeatedly. Tiling a texture image is the process of creating a pattern in which the texture image is repeated which is in the form of tiles.
With ImageMagick, you can easily tile an image into equal-sized pieces. You can also adjust the size and orientation of each piece, allowing you to customize your tiled image however you want. In this tutorial, we'll explain how to use PHP ImageMagick's Image tile to achieve perfect results in creating stunningly beautiful tiled images!
Syntax
Imagick::textureImage(Imagick $texture_wand): Imagick
This function consists of one parameter
texture_wand. It is an Imagick object that is used as a texture image.
New image creation − It involves the creation of a new image using the function newImage() which takes the column size and row size as arguments. Hence, an image with those measurements is created.
Scaling the image − A function scaleImage() is used to scale the image to a particular dimension and the image is shortened with those dimensions and hence can be tiled on the new image that we created.
The below example is a program to tile the images. This program has a few additional are used other than textureImage().
This function takes the image as input and the output obtained is the image that contains the pattern of tiles of texture images.
Example
Below example shows the implementation of the textureImage() function. Here, a new Imagick object is created with the specified measurements and color as parameters.
The image format is also set. Then, an image is taken as input by creating a new Imagick object.
Now, the image is scaled to some specific dimension using the scaleImage() function.
The scaled image is continuously tiled on the new image that is created in the beginning using the textureImage() function.
The final output is obtained in the form textureImage.png.
<?php
   $img=new Imagick();
   $img->newImage(940, 670, new ImagickPixel('red'));
   $img->setImageFormat("jpg");
   $image=new Imagick($_SERVER['DOCUMENT_ROOT']."/test/image.jpeg");
   $image->scaleimage($image->getimagewidth() / 8, $image->getimageheight() / 8);
   $img=$img->textureImage($image);
   $image->writeImage($_SERVER['DOCUMENT_ROOT']."/test/textureImage.png");
?>
Assume that the following is the input image (image.jpeg) in the program −

Output

PHP ImageMagick - Image Threshold
In this chapter, you will be learning to create different types of threshold images using a few inbuilt functions of the ImageMagick library.
PHP Imagemagick offers a wide range of features, including image thresholding. Image thresholding allows you to adjust the contrast of an image by setting a specific limit or 'threshold' that determines how light or dark pixels in the image will appear.
This makes it possible to create high-contrast images with sharp edges between objects and backgrounds, as well as smooth gradients without harsh transitions. By using PHP Imagemagick's image threshold feature, users can easily improve their digital photos and graphics.
Creating a Black Threshold Image
The 'blackThresholdImage()' function is part of the Imagemagick library. It can be used to quickly and easily modify an image by applying a threshold value that will be compared against all pixels in the input image.
Any pixel with a value below the specified threshold will be turned to black, while any pixel above the threshold will remain unchanged.
Syntax
public Imagick::blackThresholdImage(mixed $threshold): bool
This function has only one parameter which is threshold. This specifies the threshold value with which all the pixels of the image are compared.
Example
This example shows the use of the 'blackThresholdImage()' function. An Imagick object is created and an image is taken as input. The 'blackThresholdImage()' function is applied with a threshold value as its parameter, resulting in an output image saved as 'blackThresholdImage.png'.
<?php
   $image=new Imagick($_SERVER['DOCUMENT_ROOT']."/test/image.png");
   $image->blackThresholdImage('rgb(1, 255, 141)');
   $image->writeImage($_SERVER['DOCUMENT_ROOT']."/test/blackThresholdImage.png");
?>
Assume that the following is the input image (image.png) in the program −

Output

Creating a White Threshold Image
The 'whiteThresholdImage()' function enables you to set a specified threshold value, and then apply it against all pixels of an input image. Those values that are below the threshold will be converted to white, while any value that is above the threshold remains unchanged.
This can be highly beneficial for tasks such as image segmentation or noise removal, allowing you to quickly identify portions of an image that need further attention.
Syntax
public Imagick::whiteThresholdImage(mixed $threshold): bool
It has only one parameter - threshold. This specifies the threshold value with which all the pixels of the image are compared.
Example
The following example demonstrates how to use the 'whiteThresholdImage' function. In here, an Imagick object is created and an image is taken as input. The 'whiteThresholdImage' function is then applied with a threshold value as its parameter. The resultant image is saved as 'whiteThresholdImage.png'.
<?php
   $image=new Imagick($_SERVER['DOCUMENT_ROOT']."/test/imagee.png");
   $image->whiteThresholdImage('rgb(1, 255, 141)');
   $image->writeImage($_SERVER['DOCUMENT_ROOT']."/test/whiteThresholdImage.png");
?>
Assume that the following is the input image (image.png) in the program −

Output

PHP ImageMagick - Modifying Colors
In this chapter, you will be learning to modify and replace different colors in an image using a few inbuilt functions provided by Imagemagick.
With Imagemagick, you can adjust brightness, contrast, hue, saturation and other color parameters. You can even create complex effects such as merging multiple layers or adding special filters to your photos. This tutorial will provide an overview of how PHP Imagemagick works and how it can be used to modify the colors in digital images quickly and easily.
Colorize Image
Imagemagick's 'colorizeImage()' function is an efficient way to change the color of any part of an image. This function works by blending the chosen fill color with each pixel in the picture, creating a seamless transition between colors and producing professional-looking results.
The process eliminates much of the manual labor associated with changing colors on an image, such as selecting specific areas or hand-painting sections.
Additionally, it saves time since it allows users to make these changes quickly and easily without sacrificing quality.
Syntax
public Imagick::colorizeImage(mixed $colorize, mixed $opacity, bool $legacy = false): bool
This function takes 2 parameters − colorize and opacity.
Colorize is an Imagick object or a string containing the colorize color,
opacity is an Imagick object or a float value containing the opacity value.
If opacity is 1.0, it is fully opaque and 0.0 means fully transparent.
Example
In this example, you will be able to clearly understand the use of colorizeImage(). An imagick object is created first and the input image is taken. Then, colorizeImage() function is applied taking the required parameters (colorize=red and opacity=1). The image after blending colors is displayed an output using writeImage() function.
<?php
   $image=new Imagick($_SERVER['DOCUMENT_ROOT']."/test/image.png");
   $image->colorizeImage('red', 1, true);
   $image->writeImage($_SERVER['DOCUMENT_ROOT']."/test/colorizeImage.png");
?<
Assume that the following is the input image (image.png) in the program −

Output

Creating a Blue Shift Image
When there is a need to represent the images in moonlight or during night time you can do so using the method blueShiftImage(). This method takes an image as a parameter and mutes the colors of the image to simulate the scene nighttime in the moonlight and produces the output image.
It may also involve adjusting brightness levels, saturation, contrast, and other features to ensure the end result is as close as possible to what one might expect when viewing these images in natural light conditions.
Additionally, this technique can be used for creative purposes; by manipulating color values, interesting effects can be achieved with photos taken during twilight hours or even indoors with artificial lighting.
Syntax
public Imagick::blueShiftImage(float $factor = 1.5): bool
This function takes a factor value as its parameter. It specifies the value to mute the colors of the image.
Example
This example shows the implementation of blueShiftImage() function. A new imagick object is created and image is taken as input. Now, blueShiftImage() function is applied with factor as its parameter and the output image obtained is in the form blueShiftImage.png.
<?php
   $image=new Imagick($_SERVER['DOCUMENT_ROOT']."/test/image.png");
   $image->blueShiftImage(2);
   $image->writeImage($_SERVER['DOCUMENT_ROOT']."/test/blueShiftImage.png");
?>
Assume that the following is the input image (image.png) in the program &Minus;

Output

Replacing Colors in Images
In this section, you will be learning to replace colors in an image. There is an inbuilt function called clutImage() in Imagemagick to perform this task. With the help of this function, all the colors in an image are replaced by the specific color that the user needs. This function takes an image as input and produces the image after replacing the colors as its output.
'clutImage()' function is versatile and can be used to achieve a variety of different effects. For example, you could use it to create a monochromatic image by replacing all colors in the original image with one single color.
You could also use it to add vibrancy and contrast to an existing photo by swapping out duller tones for brighter ones.
Syntax
public Imagick::clutImage(Imagick $lookup_table, int $channel =Imagick::CHANNEL_DEFAULT): bool
This function takes in 2 parameters.
lookup_table which is an Imagick object containing the color lookup table
channel which is a Channeltype constant.
Example
In the following example, an bImagick object is created with an image as its input. A second Imagick object is then created and a new image is generated which selects 'violet' from the lookup table. The `clutImage()` method is used to replace colors, where 'violet' has been specified and no ChannelType constant has been declared; thus, the default channel will be utilized.
<?php
   $image=new Imagick($_SERVER['DOCUMENT_ROOT']."/test/imagee.png");
   $clut = new Imagick();
   $clut->newImage(1, 1, new ImagickPixel('violet'));
   $image->clutImage($clut);
   $image->writeImage($_SERVER['DOCUMENT_ROOT']."/test/clutImage.png");
?>
Assume that the following is the input image (image.png) in the program −

Output

Negation of Images
Negating the colors in images implies the reversing or inverting of the colors. For example, assume an image containing white and black colors. After negating the colors, white changes to black and black changes to white.
The 'negateImage()' function is used to negate/inverse the colors in PHP ImageMagick,
You might also use this effect to create high-contrast images by changing light tones into dark ones or deep hues into bright ones. Additionally, it is possible to achieve more subtle color shifts in your images by applying partial color negation; this means that only certain parts of the image are affected while others remain untouched.
Syntax
public Imagick::negateImage(bool $gray, int $channel =Imagick::CHANNEL_DEFAULT): bool
This function takes in 2 parameters: gray and channel.
Gray is a boolean value that decides whether to negate grayscale pixels within the image.
Channel provides any channel constant that is valid for your channel mode.
To apply more than one channel, you must combine channelType constants using bitwise operators.
Example
In the below example, you can clearly understand the implementation of negateImage() function. Firstly, you create a new imagick object and input an image. Then apply negateImage() function on the image and display the output image with the help of writeImage() function.
<?php
   $image=new Imagick($_SERVER['DOCUMENT_ROOT']."/test/image.png");
   $image->negateImage('true');
   $image->writeImage($_SERVER['DOCUMENT_ROOT']."/test/negateImage.png");
?>
Assume that the following is the input image (image.png) in the program −

Output

PHP ImageMagick - Different effects
Creating a 3D Effect
A picture that appears to be having height, width, and depth is called a 3-dimensional(3D) picture. 3D images provide a realistic replica of the object to the users.
To create this effect directly on the server, Imagemagick offers an inbuilt function called 'shadeImage()'. This is handy and it is capable of transforming standard 2D images into high-quality 3D renderings with ease.
Syntax
public Imagick::shadeImage(bool $gray, float $azimuth, float $elevation): bool
This function takes 3 parameters: gray, azimuth, and elevation.
Gray is a Boolean value that is used to shade the intensity of each pixel.
Azimuth and elevation are float values that define the light source directions off the x-axis and above the z-axis respectively.
For creating a 3D effect, the amount of light and the direction of light is mainly considered. This function the image as input and produces the image with a 3D effect as output.
Example
This example shows the use of the 'shadeImage()' function In here, an Imagick object is created and an image is passed as input. The 'shadeImage()' function is then called with gray value, azimuth value, and elevation supplied as parameters.
<?php
   $image=new Imagick($_SERVER['DOCUMENT_ROOT']."/test/image.png");
   $image->shadeImage(true, 50, 30);
   $image->writeImage($_SERVER['DOCUMENT_ROOT']."/test/shadeImage.png");
?>
Assume that the following is the input image (image.png) in the program −

Output

Creating a Solarizing Effect
The effect that is seen when the photographic film is extremely overexposed is called as the solarize effect. To create that effect in PHP, there is an inbuilt function solarizeImage() provided by Imagemagick.
This effect results in an image with reversed tones, where the highlights become dark and vice versa.
Syntax
public Imagick::solarizeImage(int $threshold): bool
This function takes threshold as a parameter. It is an integer value that is used to measure the extent of the solarizing effect.
Example
This example shows the implementation of solarizeImage() function. A new imagick object is created and image is taken as input. Now,
solarizeImage()
function is applied with a threshold value as its parameter and the output image obtained is in the form solarizeImage.png.<?php $image=new Imagick($_SERVER['DOCUMENT_ROOT']."/test/imagee.png"); $image->solarizeImage(0.3); $image->writeImage($_SERVER['DOCUMENT_ROOT']."/test/solarizeImage.png"); ?>
Assume that the following is the input image (image.png) in the program −

Output

Creating a Wave Filter Effect
Imagemagick has provided an inbuilt function called waveImage() which helps in simulating a wave filter on an image. It takes an image as input and the output obtained is the image with a wave filter.
Syntax
public Imagick::waveImage(float $amplitude, float $length): bool
This function has two parameters: amplitude and length.
Amplitude specifies the amplitude of the wave.
length specifies the length of the wave.
Example
This is an example which shows the implementation of waveImage() function. At first, a new imagick object is created and an image is taken as input. Then, waveImage() function is applied on that image. The required output is obtained in the form of waveImage.png.
<?php
   $image=new Imagick($_SERVER['DOCUMENT_ROOT']."/test/image.png");
   $image->waveImage(2, 4);
   $image->writeImage($_SERVER['DOCUMENT_ROOT']."/test/waveImage.png");
?>
Assume that the following is the input image (image.png) in the program −

Output

Creating a Swirl Effect
In this chapter, you will be learning to swirl an image. Generally, swirling means to move quickly with a twisting or a circular movement. The image that contains this type of effect is called a swirled image. Creating a swirl image manually is difficult. But, to make this easier, Imagemagick has provided an inbuilt function swirlImage() which swirls the pixels about the center of the image.
Syntax
Imagick::swirlImage(float $degrees): bool
This function takes in a single parameter: degrees. Degrees is a float value that indicates the sweep of the arc through which each pixel is moved. By this, you get a more dramatic effect as the degrees move from 1 to 360.
Example
In the below example, you first create a new imagick object and input an image. Then, swirlImage() function is applied by specifying the degrees(degrees=200). And finally, that swirled image is obtained as output.
<?php
   $image=new Imagick($_SERVER['DOCUMENT_ROOT']."/test/imagee.png");
   $image->swirlImage(200);
   $image->writeImage($_SERVER['DOCUMENT_ROOT']."/test/swirlImage.png");
?>
Assume that the following is the input image (image.png) in the program −

Output

PHP ImageMagick - Securing The Images
In this chapter, you will be learning to secure the images so that only the sender and the intended receiver get to see the images on the web pages.
PHP Imagemagick provides image processing and manipulation, allowing you to protect your images from theft or unauthorized use. Now, we will discuss the features of PHP Imagemagick and how they can help you keep your images safe.
Enciphering an Image
The inbuilt function named encipherImage() in Imagemagick, helps in enciphering the images. Converting the plain pixels image to the enciphered pixels is the process that happens in this function. The enciphered image can be viewed only by the viewer who can decipher the image using the key is given (passphrase).
Syntax
public Imagick::encipherImage(string $passphrase): bool
This function takes one parameter passphrase which acts as a key to encrypt and decrypt images. It takes an image as input and enciphers the image using the passphrase and produces the enciphered image as output.
Example
In the below example, the implementation of encipherImage() function is shown. Firstly, a new imagick object must be created and an image is taken as input. Passphrase is defined which is a string that is passed as a parameter. Then, encipherImage() function is applied with the help of the passphrase and the enciphered image is obtained as output.
<?php
   $image=new Imagick($_SERVER['DOCUMENT_ROOT']."/test/image.jpeg");
   $passphrase="Tutorials Point";
   $image->encipherImage($passphrase);
   $image->writeImage($_SERVER['DOCUMENT_ROOT']."/test/encipherImage.png");
?>
Assume that the following is the input image (image.jpeg) in the program −

Output

Deciphering the Image
Imagemagick has provided an inbuilt function decipherImage() which helps to decipher the image. The process of converting the encrypted image to a plain image is called deciphering an image. This function takes the enciphered image as input, converts that image to a plain image using the passphrase, and produces the plain image as output.
Syntax
public Imagick::decipherImage(string $passphrase): bool
This function takes the passphrase as a parameter. It helps to decipher the image.
Example
The following example shows how to implement the 'decipherImage()' function. To begin, create a new Imagick object and pass an image as input. You will also need to define a passphrase string which is passed as a parameter. Finally, use the 'decipherImage()' function with your passphrase to obtain a deciphered image as output.
<?php
   $image=new Imagick($_SERVER['DOCUMENT_ROOT']."/test/encipherImage.png");
   $passphrase="Tutorials Point";
   $image->decipherImage($passphrase);
   $image->writeImage($_SERVER['DOCUMENT_ROOT']."/test/decipherImage.png");
?>
Assume that the following is the input image (encipherImage.png) in the program −

Output

PHP ImageMagick - Simulation Of Sketches
In this chapter, you will be learning to simulate different types of sketches using a few inbuilt functions provided by Imagemagick.
Simulating a Charcoal Drawing
ImageMagick provided a method called charcoalImage() which produces the charcoal drawing of the input image.
Syntax
public Imagick::charcoalImage(float $radius, float $sigma): bool
This function takes 2 parameters: radius and sigma.
Radius is a float value that specifies the radius of the Gaussian (in pixels), not counting the center pixel.
Sigma is also a float value that specifies the standard deviation of the Gaussian, in pixels.
Example
This is an example which shows the implementation of charcoalImage() function. At first, a new imagick object is created and an image is taken as input. Then, charcoalImage() function is applied on that image. The required output is obtained in the form of charcoalImage.png.
<?php
   $image=new Imagick($_SERVER['DOCUMENT_ROOT']."/test/image.png");
   $image->charcoalImage(2, 2);
   $image->writeImage($_SERVER['DOCUMENT_ROOT']."/test/charcoalImage.png");
?>
Assume that the following is the input image (image.png) in the program −

Output

Simulating a Pencil Sketch
There is an inbuilt function called sketchImage() provided by Imagemagick which produces the pencil sketch of the input image.
Syntax
public Imagick::sketchImage(float $radius, float $sigma, float $angle): bool
This function consists of 3 parameters: radius, sigma, and angle. These are float values. Radius specifies the radius of the Gaussian (in pixels), sigma specifies the standard deviation of the Gaussian (in pixels) and angle specifies the angle by which the effect must be applied and specifies the angle of the blurring motion.
Example
This is an example which shows the implementation of sketchImage() function. At first, a new imagick object is created and an image is taken as input. Then, sketchImage() function is applied on that image. The required output is obtained in the form of sketchImage.png.
<?php
   $image=new Imagick($_SERVER['DOCUMENT_ROOT']."/test/image.png");
   $image->sketchImage(11, 11, 30);
   $image->writeImage($_SERVER['DOCUMENT_ROOT']."/test/sketchImage.png");
?>
Assume that the following is the input image (image.png) in the program −

Output

Simulating an Oil Painting
Oil painting is a type of painting produced using oil-based paints. Without using oil paints in real, this oil painting can be simulated using an inbuilt function oilPaintImage() of Imagemagick in PHP.
Syntax
public Imagick::oilPaintImage(float $radius): bool
This function contains only one parameter which is radius which is a float value. It specifies the radius of the circular neighborhood. This function takes an image as input and applies a special effect filter that simulates an oil painting and produces that as output.
Example
This is an example which shows the implementation of oilPaintImage() function. At first, a new imagick object is created and an image is taken as input. Then, oilPaintImage() function is applied on that image. The required output is obtained in the form of oilPaintImage.png.
<?php
   $image=new Imagick($_SERVER['DOCUMENT_ROOT']."/test/image.png");
   $image->oilPaintImage(2);
   $image->writeImage($_SERVER['DOCUMENT_ROOT']."/test/oilPaintImage.png");
   ?>
Assume that the following is the input image (image.png) in the program −

Output

PHP ImageMagick - Editing TheAppearance
In this chapter, you will explore how to use Imagemagick's built-in functions to edit an image. You'll learn how to create a faded and rounded look on the edges of your image, wrap it in a parallelogram shape, and even simulate a polaroid effect.
Vignette Image
The word vignette means a small photograph or image which has a faded appearance with its background and doesnt have a definite border. Having this effect highlights certain aspects of the image. So, to get images in this filter, Imagemagick provided an inbuilt function vignetteImage(). This function takes an image as input, applies a vignette filter, and obtained image has its borders blurred.
Syntax
public Imagick::vignetteImage(float $blackPoint, float $whitePoint, int $x, int $y): bool
This function has 4 parameters: blackpoint, whitepoint, x, and y. Blackpoint and whitepoint are float values. x is an integer value that specifies the x offset of the ellipse and y is an integer value that specifies the y offset of the ellipse.
Example
To have a better understanding of vignetteImage() function, look at the below example. An imagick object is created at first and an image is taken as input. Then, vignetteImage function is applied with all the parameters specified (blackpoint=30, whitepoint=10, x=40, y=20). Finally, the output is obtained using writeImage() function.
<?php
   $image=new Imagick($_SERVER['DOCUMENT_ROOT']."/test/image.png");
   $image->vignetteImage(30, 10, 40, 20);
   $image->writeImage($_SERVER['DOCUMENT_ROOT']."/test/vignetteImage.png");
?>
Assume that the following is the input image (image.png) in the program −

Output
Rounding corners
There is a basic belief that rounded corners are easier on the eyes. That is, they are suitable for the natural movement of the head and eyes respectively. Rounding image corners can also make the image look more organized and neater.
To round the corners of an image, there are an inbuilt function roundCorners() provided by Imagemagick. This function takes an image as input, rounds the corners, and produces that image as output.
Syntax
public Imagick::roundCorners(
   float $x_rounding,
   float $y_rounding,
   float $stroke_width =10,
   float $displace =5,
   float $size_correction =-6
): bool
This function has 5 parameters: x_rounding, y_rounding, strike_width, displace, and size_correction. x_rounding and y_rounding are float values and they control the amount of rounding. stroke_width, displace, and size-correction are also float values which are used to fine-tune the rounding process.
Example
From this example, you will be able to clearly understand the usage of this function. The image is taken as input at first by creating a new Imagick object. roundCorners() function is applied to that image with the help of the parameters specified (x_rounding=20, y_rounding=20, stroke-width=5, displace=5, size-correction=-10). Then, the output image is obtained using the function writeImage().
<?php
   $image=new Imagick($_SERVER['DOCUMENT_ROOT']."/test/imagee.png");
   $image->roundCorners(20, 20, 5, 5, -10);
   $image->writeImage($_SERVER['DOCUMENT_ROOT']."/test/roundCornerImage.png");
?>
Assume that the following is the input image (image.png) in the program −

Output

Polaroid Image
In this chapter, you will be learning to simulate the polaroid picture. A polaroid picture is a picture that is taken by a polaroid camera. It is a type of camera that takes a picture and prints it after a few seconds. It is a type of instant print and has a special type of film holder. For simulating a polaroid image, Imagemagick has provided an inbuilt function polaroidImage().
Syntax
public Imagick::polaroidImage(ImagickDraw $properties, float $angle): bool
This function takes in 2 parameters: properties and angle. Properties specifies the polaroid properties and angle specifies the polaroid angle in float value.
Example
In this example, you create a new imagick object and takes an image as input. Then, apply polaroidImage() function on that image by specifying the parameters. The polaroid image is obtained as output.
<?php
   $image=new Imagick($_SERVER['DOCUMENT_ROOT']."/test/imagee.png");
   $image->polaroidImage(new ImagickDraw(), 30);
   $image->writeImage($_SERVER['DOCUMENT_ROOT']."/test/polaroidImage.png");
?>
Assume that the following is the input image (image.png) in the program −

Output

Creation of Parallelogram
In this section, you will be learning about the function shearImage(). It is an inbuilt function provided by Imagemagick. The functionality of this is to create a parallelogram. This function takes an image as input and shears the image on the X and Y axis to create a parallelogram and adds a background color.
Syntax
public Imagick::shearImage(mixed $background, float $x_shear, float $y_shear): bool
This function takes in 3 parameters: background, x_shear, and y_shear. Background specifies the background color, x_shear specifies the number of degrees to shear on the X-axis, and y_shear specifies the number of degrees to shear on the Y-axis.
Example
In the below example, the image is taken as input, and shearImage () function is applied on that image. It takes in 3 parameters (background color= rgb (100, 200, 150), x_shear=10 and y_shear=10). The obtained output is displayed using the function writeImage ().
<?php
   $image=new Imagick($_SERVER['DOCUMENT_ROOT']."/test/image.png");
   $image->shearImage('rgb(100, 200, 150)', 10, 10);
   $image->writeImage($_SERVER['DOCUMENT_ROOT']."/test/shearImage.png");
?>
Assume that the following is the input image (image.png) in the program −

Output

PHP ImageMagick - Rotation and Rolling
In this chapter, you will be learning to rotate and roll images using the inbuilt functions of Imagemagick.
Rotating an image
Imagemagick has provided an inbuilt function rotateImage() which is used to rotate the images according to the angle specified. This function takes an image as input, applied this function, and rotates the image and the rotated image is obtained as output.
Syntax
public Imagick::rotateImage(mixed $background, float $degrees): bool
This function has 2 parameters: background and degrees. Background specifies the background color and degrees is a float value that specifies the rotation angle, in degrees. The image is rotated clockwise at the specified angle.
Example
In the below example, a new imagick object is created at first and an image is taken as input. rotateImage() function is applied on that image and the image is rotated to that specified angle. The rotated image is obtained as output with the help of writeImage() function.
<?php
   $image=new Imagick($_SERVER['DOCUMENT_ROOT']."/test/image.png");
   $image->rotateImage('black', 40);
   $image->writeImage($_SERVER['DOCUMENT_ROOT']."/test/rotateImage.png");
?>
Assume that the following is the input image (image.png) in the program −

Output
Rolling an image
Did you ever observe the process of rolling something? That thing that you are rolling is moved by revolving or turning it over and over. Rolling an image also means the same. It is nothing but offsetting an image.
For this purpose, ImageMagick has provided an inbuilt function rollImage() which takes an image as input, rolls the image and the rolled image is obtained as output.
Syntax
public Imagick::rollImage(int $x, int $y): bool
This function takes 2 parameters: x and y. x and y are integer values, and they specify the x offset and y offset respectively.
Example
In this example, an image is taken as input by creating a new imagick object. Then, rollImage() function is applied on it with the help of specified a and y offsets (x=30, y=40). The rolled image is obtained as output.
<?php
$image=new Imagick($_SERVER['DOCUMENT_ROOT']."/test/image.png");
$image->rollImage (300, 40);
$image->writeImage($_SERVER['DOCUMENT_ROOT']."/test/rollImage.png");
?>
Assume that the following is the input image (image.png) in the program −

Output

PHP ImageMagick - Splicing & Spreading
In this chapter, you will be learning to spread an image and splice an image using a few inbuilt functions of Imagemagick.
Image Spreading
In this section, you will be learning to spread an image easily using the spreadImage() function provided by Imagemagick. Spreading an image is randomly displacing each pixel in a block.
Syntax
public Imagick::spreadImage(float $radius): bool
This function takes in only one parameter: radius. Radius is a float value that specifies the value to displace each pixel in a block.
Example
In the below example, an imagick object is created and an image is taken as input. Now, spreadImage() function is applied on the image with a single parameter(radius=5). Then, the final image is displayed as output.
<?php
   $image=new Imagick($_SERVER['DOCUMENT_ROOT']."/test/imagee.png");
   $image->spreadImage(5);
   $image->writeImage($_SERVER['DOCUMENT_ROOT']."/test/spreadImage.png");
?>
Assume that the following is the input image (image.png) in the program −

Output

Image Splicing
In this chapter, you will be learning to splice a solid color into the image using an inbuilt function named spliceImage() in Imagemagick. This function takes an image as input, and splices a solid color into the image with the specified parameters (dimensions and positions of the splice).
Syntax
public Imagick::spliceImage(
   int $width,
   int $height,
   int $x,
   int $y
): bool
This function contains 4 parameters: width, height, x, and y. Width and height are integer values that specify the width and height of the splice respectively. x and y are also integer values that specify the position on the X-axis and Y-axis respectively.
Example
In the below example, an imagick object is created and image is taken as input. On that image, spliceImage() function is applied with the parameters (width=50, height=100, x=100, y=50). Then, the image after splicing is obtained as output.
<?php
   $image=new Imagick($_SERVER['DOCUMENT_ROOT']."/test/image.png");
   $image->spliceImage(50, 100, 100, 50);
   $image->writeImage($_SERVER['DOCUMENT_ROOT']."/test/spliceImage.png");
?>
Assume that the following is the input image (image.png) in the program −

Output

PHP ImageMagick - Miscellaneous Functions
Applying Functions
We have seen about predefined constants in ImageMagick in the "Predefined Constants" chapter. To apply these function constants, ImageMagick provides an inbuilt function `functionImage()` with three functions: undefined, polynomial and sinusoid. You can use this function to apply these constants to images.
Syntax
public Imagick::functionImage(int $function, array $arguments, int $channel = Imagick::CHANNEL_DEFAULT): bool
This function mainly contains 2 parameters: function and arguments.
Function refers to the list of function constants (sinusoid or polynomial).
Arguments specifies the arguments to be passed to the function in an array format.
To apply the function, we need to create a new image using the newPseudoImage() function and on that image, this function needs to be applied by specifying the parameters. It doesnt take any input but produces the output after applying the function.
Example
In this example, you can see the implementation of the function functionImage() in Imagemagick. This code consists of the creation of a new Imagick object and taking an image as input.
A new image is created using newPseudoImage() function with the required measurements and then the function is applied. The function to be applied is specified as one of the parameters in the functionImage() function. The output image obtained is displayed using writeImage().
<?php
   $image=new Imagick($_SERVER['DOCUMENT_ROOT']."/test/image5.jpeg");
   $image->newPseudoImage(500, 400, 'gradient:white-brown');
   $image->functionImage(Imagick::FUNCTION_SINUSOID, array(19, 33));
   $image->writeImage($_SERVER['DOCUMENT_ROOT']."/test/functionImage.png");
?>
Output

Image Annotation
To recognize the whole image or meaning of the image, the image must be annotated. Image annotation is a way of explanation in the form of text that is added to an image. For this purpose, there is a function annotateImage() provided in the Imagemagick library.
Syntax
public Imagick::annotateImage(ImagickDraw $draw_settings,float $x, float $y, float $angle, string $text): bool
This function has 5 parameters which are draw-settings, x, y, angle, and text. draw_settings is an ImageMagick object that contains settings for drawing the text.
x is the horizontal offset in pixels to the left of the text.
y is the vertical offset in pixels to the baseline of the text.
angle specifies the angle at which the text must be written
text is the string to draw.
This function takes an image as input and the image with some annotated text is obtained as output.
Example
In the following example, we create a new Imagick object ($img) and pass the image to it. Then, create a new ImagickDraw object ($draw), and set the font size on that draw object.
Finally, use 'annotateImage()' on your created Imagick object ('$img'), passing in your drawobject, x-coordinate, y-coordinate, angle and text as parameters. The output obtained is in the form of 'annotateImage.png'.
<?php
   $draw=new ImagickDraw();
   $img=new Imagick($_SERVER['DOCUMENT_ROOT']."/test/image.jpeg");
   $draw->setFontSize(30);
   $img->annotateImage($draw, 525, 820, 0, 'HAPPY DIWALI');
   $image->writeImage($_SERVER['DOCUMENT_ROOT']."/test/annotateImage.png");
?>
Assume that the following is the input image (image.jpeg) in the program &minnus;

Output

Grouping Images
Appending a set of images is the process of grouping all the images together such that each image is attached to the end of another image and so on. To do this, Imagemagick has provided an inbuilt function appendImages() where you can append a set of images into a larger image.
Syntax
public Imagick::appendImages(bool $stack): Imagick
This function takes in a single Boolean parameter which is stack. This value is used to decide whether to stack the images vertically or horizontally. The default value of stack is false. It means that the images are stacked from left to right. If the stack value is true, then the images are stacked from top to bottom
Example
The below example implements the appendImages() function in PHP. In this example, 5 new images are created with same measurements but different colors. Then, pixel iterator is reset using resetIterator() and then, all the created images are appended using appendImages() function and the output is obtained.
<?php
   $image=new Imagick();
   $image->newImage(100, 100, "black");
   $image->newImage(100, 100, "white");
   $image->newImage(100, 100, "black");
   $image->newImage(100, 100, "white");
   $image->newImage(100, 100, "black");
   $image->resetIterator();
   $combined=$image->appendImages(false);
   $combined->writeImage($_SERVER['DOCUMENT_ROOT']."/test/appendImages.png");
?>
Output
