- Kivy Tutorial
- Kivy - Home
- Kivy Basics
- Kivy - Getting Started
- Kivy - Installation
- Kivy - Architecture
- Kivy - File Syntax
- Kivy - Applications
- Kivy - Hello World
- Kivy - App Life Cycle
- Kivy - Events
- Kivy - Properties
- Kivy - Inputs
- Kivy - Behaviors
- Kivy Buttons
- Kivy - Buttons
- Kivy - Button Events
- Kivy - Button Colors
- Kivy - Button Size
- Kivy - Button Position
- Kivy - Round Buttons
- Kivy - Disabled Buttons
- Kivy - Image Button
- Kivy Widgets
- Kivy - Widgets
- Kivy - Label
- Kivy - Text Input
- Kivy - Canvas
- Kivy - Line
- Kivy - Checkbox
- Kivy - Dropdown List
- Kivy - Windows
- Kivy - ScrollView
- Kivy - Carousel
- Kivy - Slider
- Kivy - Images
- Kivy - Popup
- Kivy - Switch
- Kivy - Spinner
- Kivy - Splitter
- Kivy - Progress Bar
- Kivy - Bubble
- Kivy - Tabbed Panel
- Kivy - Scatter
- Kivy - Accordion
- Kivy - File Chooser
- Kivy - Color Picker
- Kivy - Code Input
- Kivy - Modal View
- Kivy - Toggle Button
- Kivy - Camera
- Kivy - Tree View
- Kivy - reStructuredText
- Kivy - Action Bar
- Kivy - Video Player
- Kivy - Stencil View
- Kivy - VKeyboard
- Kivy - Touch Ripple
- Kivy - Audio
- Kivy - Videos
- Kivy - Spelling
- Kivy - Effects
- Kivy - Input Recorder
- Kivy - OpenGL
- Kivy - Text
- Kivy - Text Markup
- Kivy - Settings
- Kivy Layouts
- Kivy - Layouts
- Kivy - Float Layout
- Kivy - Grid Layouts
- Kivy - Box Layouts
- Kivy - Stack Layout
- Kivy - Anchor Layout
- Kivy - Relative Layout
- Kivy - Page Layout
- Kivy - Recycle Layout
- Kivy - Layouts in Layouts
- Kivy Advanced Concepts
- Kivy - Configuration Object
- Kivy - Atlas
- Kivy - Data Loader
- Kivy - Cache Manager
- Kivy - Console
- Kivy - Animation
- Kivy - Multistroke
- Kivy - Clock
- Kivy - SVGs
- Kivy - UrlRequest
- Kivy - Clipboard
- Kivy - Factory
- Kivy - Gesture
- Kivy - Language
- Kivy - Graphics
- Kivy - Drawing
- Kivy - Packaging
- Kivy - Garden
- Kivy - Storage
- Kivy - Vector
- Kivy - Utils
- Kivy - Inspector
- Kivy - Tools
- Kivy - Logger
- Kivy - Framebuffer
- Kivy Applications and Projects
- Kivy - Drawing App
- Kivy - Calculator App
- Kivy - Stopwatch App
- Kivy - Camera Handling
- Kivy - Image Viewer
- Kivy - Bezier
- Kivy - Canvas Stress
- Kivy - Circle Drawing
- Kivy - Widget Animation
- Kivy - Miscellaneous
- Kivy Useful Resources
- Kivy - Quick Guide
- Kivy - Useful Resources
- Kivy - Discussion
Kivy - Configuration Object
When Kivy software is installed, it creates a configuration file that contains various parameter with their default values. The file, named as "config.ini", is stored in a directory identified by KIVY_HOME environment variable.
On Windows: The file is stored at C:\Users\user\.kivy\config.ini.
On Linux: /home/user/.kivy/config.ini.
On macOS: /Users/user/.kivy/config.ini.
On Android: /data/data/org.kivy.launcher/files/.kivy/config.ini.
On iOS: <HOME_DIRECTORY>/Documents/.kivy/config.ini.
In order to change the default settings, you can alter this file manually or use the Config object. The Config object's read(), set() and write() methods are provided to read the value of a setting, assign a new value and write the changes to the configuration file.
from kivy.config import Config

Config.read(<file>)

Config.write() # set config
You can also assign a value to any configuration parameter (called token) in effect only for the current session, by setting environment variable - either programmatically or from the OS terminal.
To set an environment variable from Python −
import os
os.environ['KIVY_LOG_MODE'] = MIXED'
You can also set an environment variable from OS terminal. In Windows command prompt terminal −
set KIVY_LOG_MODE = MIXED'
On Linux/MacOS −
export KIVY_LOG_MODE = MIXED'
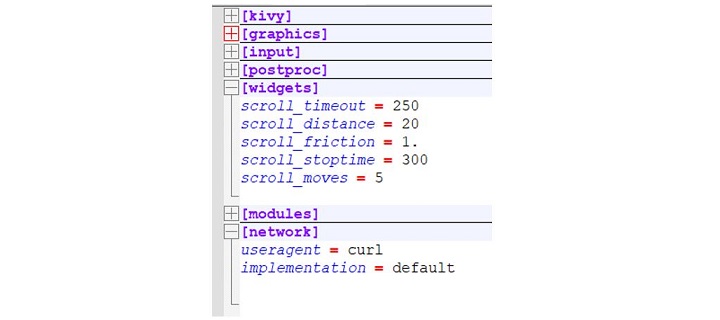
The configuration file config.ini consists of one or more sections, and each section consists of parameters called tokens. A typical "config.ini" file for KIvy installation consists of secions such as Kivy, Graphics, widgets, etc.
To change a certain configuration setting with the environment variable, use the following instruction format −
KCFG_<section>_<key> = <value>
For example, to set the log level −
KCFG_KIVY_LOG_LEVEL= "warning"
The same can be done programmatically with following syntax −
os.environ["KCFG_KIVY_LOG_LEVEL"] = " warning"
Configuration Tokens
The configuration file is divided in several sections, and each section consists of tokens or parameters. Here are some important tokens given in section-wise order −
Section - [Kivy]
default_font − Default fonts used for widgets displaying any text.
desktop − int, 0 or 1. This option controls features, such as enabling or disabling drag-able scroll-bar in scroll views, disabling of bubbles in TextInput, etc.
log_dir − Path of log directory.
log_level − string, one of 'trace', 'debug', 'info', 'warning', 'error' or 'critical'. Set the minimum log level to use.
Section - [postproc]
double_tap_distance − Maximum distance allowed for a double tap, normalized inside the range 0 - 1000.
double_tap_time − Time allowed for the detection of double tap, in milliseconds.
triple_tap_distance − fMaximum distance allowed for a triple tap, normalized inside the range 0 - 1000.
triple_tap_time − Time allowed for the detection of triple tap, in milliseconds.
Section [graphics]
fullscreen − one of 0, 1, 'fake' or 'auto'.
height − Height of the Window, not used if fullscreen is set to auto.
left − Left position of the Window.
top − Top position of the Window.
resizable − one of 0 or 1 - 0 for fixed size and 1 for resizable.
width − Width of the Window, not used if fullscreen is set to auto.
Section [widgets]
scroll_distance − Default value of the scroll_distance property used by the ScrollView widget.
scroll_timeout − Default value of the scroll_timeout property used by the ScrollView widget.
Methods of Config Object
add_section() − Add a section to the configuration if the section is missing. For example −
Config.add_section('newsection')
get() − Get an option value for a given section. For example −
Config.get('graphics', 'width')
set() − assign value to a configuration token. Example −
Config.set('graphics', 'width', 720)
write() − Write the configuration to the last file opened using the read() method. It returns True if the write finished successfully, False otherwise.
To Continue Learning Please Login