- React - Home
- React - Introduction
- React - Roadmap
- React - Installation
- React - Features
- React - Advantages & Disadvantages
- React - Architecture
- React - Creating a React Application
- React - JSX
- React - Components
- React - Nested Components
- React - Using Newly Created Components
- React - Component Collection
- React - Styling
- React - Properties (props)
- React - Creating Components using Properties
- React - props Validation
- React - Constructor
- React - Component Life Cycle
- React - Event management
- React - Creating an Event−Aware Component
- React - Introduce Events in Expense Manager APP
- React - State Management
- React - State Management API
- React - Stateless Component
- React - State Management Using React Hooks
- React - Component Life Cycle Using React Hooks
- React - Layout Component
- React - Pagination
- React - Material UI
- React - Http Server
- React - Http client programming
- React - Form Programming
- React - Forms
- React - Controlled Component
- React - Uncontrolled Component
- React - Formik
- React - Conditional Rendering
- React - Lists
- React - Keys
- React - Routing
- React - Redux
- React - Animation
- React - Bootstrap
- React - Map
- React - Table
- React - Managing State Using Flux
- React - Testing
- React - CLI Commands
- React - Building and Deployment
- React - Example
- Hooks
- React - Introduction to Hooks
- React - Using useState
- React - Using useEffect
- React - Using useContext
- React - Using useRef
- React - Using useReducer
- React - Using useCallback
- React - Using useMemo
- React - Custom Hooks
- React Advanced
- React - Accessibility
- React - Code Splitting
- React - Context
- React - Error Boundaries
- React - Forwarding Refs
- React - Fragments
- React - Higher Order Components
- React - Integrating With Other Libraries
- React - Optimizing Performance
- React - Profiler API
- React - Portals
- React - React Without ES6 ECMAScript
- React - React Without JSX
- React - Reconciliation
- React - Refs and the DOM
- React - Render Props
- React - Static Type Checking
- React - Strict Mode
- React - Web Components
- Additional Concepts
- React - Date Picker
- React - Helmet
- React - Inline Style
- React - PropTypes
- React - BrowserRouter
- React - DOM
- React - Carousel
- React - Icons
- React - Form Components
- React - Reference API
- React Useful Resources
- React - Quick Guide
- React - Cheatsheet
- React - Axios CheatSheet
- React - Useful Resources
- React - Discussion
React - UIEvent Handler
Building websites and apps that are easy to use and can change as we interact with them is a big deal in web development. Imagine when we click on a button, scroll down a webpage, or type something on a keyboard - these actions are what we call user interface events. They are like the building blocks that let us do things on a website. So we will look at the UIEvent handlers in this tutorial.
First, let's define a UIEvent. It is a term used to describe simple user interface events on a web page like clicking a link, scrolling down a page, or moving our mouse. UIEvent is a member of an event type family tree that includes MouseEvent, TouchEvent, FocusEvent, and others. Each of them shows a distinct activity that a user can do on a website.
Syntax
<div
   onScroll={e => console.log('I am in onScroll method')}
/>
Parameters
e − It is a React event object.
UIEvent Properties
| Sr.No | Properties & Description |
|---|---|
| 1 |
UIEvent.detail A number that varies based on the event type, providing specific details about the event. |
| 2 |
UIEvent.sourceCapabilities Provides information about the physical device responsible for generating a touch event. |
| 3 |
UIEvent.view Returns a reference to the browser window or frame that generated the event. |
Example - Usage of onScroll event
We can use the onScroll event on a div element in a React component to determine when the user scrolls inside that div. When a scroll event happens, the event handler becomes active, helping us to do some action. Here is the code for our App.js file −
We have imported React and created the App functional component. We defined the onScroll function, which is the onScroll event handler. When the div is scrolled in this example, it logs 'I am onScroll' to the console.
We insert a div element within the return statement with the onScroll property set to the onScroll method. We also add additional CSS styles to the div to make it scrollable.
App.js
import React from "react";

function App() {
   const onScroll = (e) => {
      console.log("I am onScroll");
   };
   return (
      <div
         onScroll={onScroll}
         style={{
            height: "200px", // Add fixed height to create scrollable div
            overflow: "scroll" // Add scrollbars
         }}
      >
         <div style={{ height: "600px" }}>
            Lorem ipsum dolor sit amet, consectetur adipiscing elit, sed do eiusmod
            tempor incididunt ut labore et dolore magna aliqua. Ut enim ad minim
            veniam, quis nostrud exercitation ullamco laboris nisi ut aliquip ex ea
            commodo consequat. Duis aute irure dolor in reprehenderit in voluptate
            velit esse cillum dolore eu fugiat nulla pariatur. Excepteur sint
            occaecat cupidatat non proident, sunt in culpa qui officia deserunt
            mollit anim id est laborum.
         </div>
      </div>
   );
}

export default App;
Output
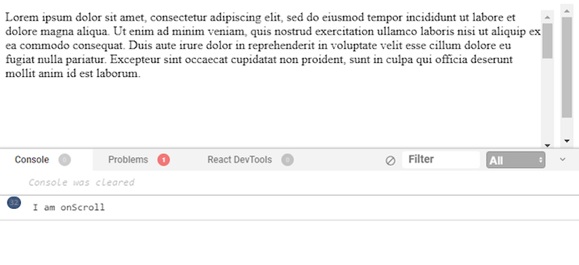
When we start our React application and scroll within the div, the console will display 'I am onScroll' each time the scroll event happens. This is a simple example of how to respond to user scroll actions in a React component with the onScroll event handler.
Example − Scroll Tracker App
This app tracks and displays the current vertical scroll position of the page as we scroll down. It uses the onScroll event to update the scroll position and displays it on the page. The code is given below −
App.js
import React, { useState } from 'react';

function App() {
   const [scrollPosition, setScrollPosition] = useState(0);
   const handleScroll = () => {
      setScrollPosition(window.scrollY);
   };

   window.addEventListener('scroll', handleScroll);
   return (
      <div>
         <h1>Scroll Tracker</h1>
         <p>Scroll Position: {scrollPosition}</p>
         <div style={{ height: '100vh', border: '1px solid #ccc' }}>
            Scroll down to see the position.
         </div>
      </div>
   );
}

export default App;
Output
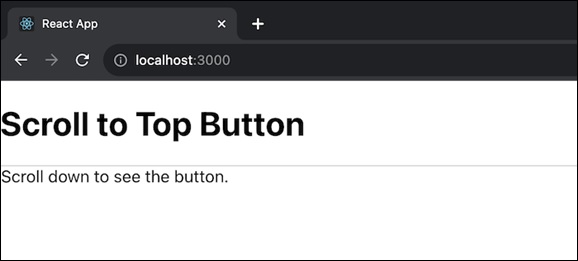
Example − Scroll to Top Button
In this app we will have a "Scroll to Top" button that becomes visible as we scroll down the page. When we click the button smoothly scrolls the page to the top. It utilizes the onScroll event to determine when to show the button, and a scrollTo function is triggered when the button is clicked.
App.js
import React, { useState } from 'react';

function App() {
   const [showButton, setShowButton] = useState(false);
   const handleScroll = () => {
      const scrollY = window.scrollY;
      setShowButton(scrollY > 200); // Show button when scrolled down
   };
   const scrollToTop = () => {
      window.scrollTo({
         top: 0,
         behavior: 'smooth',
      });
   };
   window.addEventListener('scroll', handleScroll);
   return (
      <div>
         <h1>Scroll to Top Button</h1>
         <div style={{ height: '150vh', border: '1px solid #ccc' }}>
            Scroll down to see the button.
         </div>
         {showButton && (
         <button onClick={scrollToTop} style={{ position: 'fixed', bottom: '20px', right: '20px' }}>
            Scroll to Top
         </button>
      )}
      </div>
   );
}

export default App;
Output
Summary
UIEvent handlers allow us to respond to web user activities. These properties describe interactions, like what was clicked or how far someone scrolled. Web developers can create a smooth and engaging user experience using handlers and these characteristics.