- React - Home
- React - Introduction
- React - Roadmap
- React - Installation
- React - Features
- React - Advantages & Disadvantages
- React - Architecture
- React - Creating a React Application
- React - JSX
- React - Components
- React - Nested Components
- React - Using Newly Created Components
- React - Component Collection
- React - Styling
- React - Properties (props)
- React - Creating Components using Properties
- React - props Validation
- React - Constructor
- React - Component Life Cycle
- React - Event management
- React - Creating an Event−Aware Component
- React - Introduce Events in Expense Manager APP
- React - State Management
- React - State Management API
- React - Stateless Component
- React - State Management Using React Hooks
- React - Component Life Cycle Using React Hooks
- React - Layout Component
- React - Pagination
- React - Material UI
- React - Http Server
- React - Http client programming
- React - Form Programming
- React - Forms
- React - Controlled Component
- React - Uncontrolled Component
- React - Formik
- React - Conditional Rendering
- React - Lists
- React - Keys
- React - Routing
- React - Redux
- React - Animation
- React - Bootstrap
- React - Map
- React - Table
- React - Managing State Using Flux
- React - Testing
- React - CLI Commands
- React - Building and Deployment
- React - Example
- Hooks
- React - Introduction to Hooks
- React - Using useState
- React - Using useEffect
- React - Using useContext
- React - Using useRef
- React - Using useReducer
- React - Using useCallback
- React - Using useMemo
- React - Custom Hooks
- React Advanced
- React - Accessibility
- React - Code Splitting
- React - Context
- React - Error Boundaries
- React - Forwarding Refs
- React - Fragments
- React - Higher Order Components
- React - Integrating With Other Libraries
- React - Optimizing Performance
- React - Profiler API
- React - Portals
- React - React Without ES6 ECMAScript
- React - React Without JSX
- React - Reconciliation
- React - Refs and the DOM
- React - Render Props
- React - Static Type Checking
- React - Strict Mode
- React - Web Components
- Additional Concepts
- React - Date Picker
- React - Helmet
- React - Inline Style
- React - PropTypes
- React - BrowserRouter
- React - DOM
- React - Carousel
- React - Icons
- React - Form Components
- React - Reference API
- React Useful Resources
- React - Quick Guide
- React - Cheatsheet
- React - Axios CheatSheet
- React - Useful Resources
- React - Discussion
React - TestInstance.type Property
The React JS library is all about dividing the program into many components. Each component has a unique lifecycle. React provides some built-in methods that we can override at various points of the component's life-cycle.
So in this tutorial we will learn how to use the testInstance.type property. This property is used to get the component type which is related to the test instance.
Syntax
testInstance.type
Let us understand this property by an example. When a developer uses testInstance.type in their code, they are asking the computer to tell them what kind of part they are working with. This is important in making sure the software works easily and performs as expected.
For example, an item of code like button.type shows that the developer wants to know the kind of a button in their programs. The computer will then answer with something like "Button," helping the developer in better understanding and managing their code.
Return Value
The testInstance.type returns the type or kind of a computer program component. In simple terms, it provides the developer with information about an element of the application.
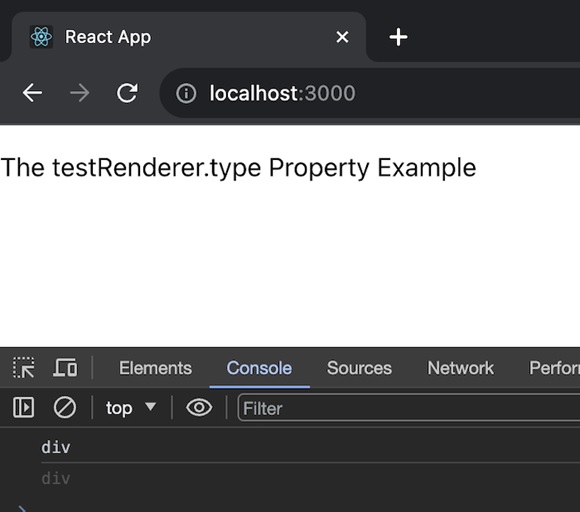
Example − Div Type App
In this app we will use TestRenderer to create a simple React component (a <div> element) and log its type to the console. The JSX return is a basic paragraph element displaying an example of the testRenderer.type property. See the code for this app below −
DivTypeApp.js
import React from 'react';
import TestRenderer from 'react-test-renderer';

// Defining our DivTypeApp Component
const DivTypeApp = () => {

   // Function to demonstrate TestRenderer.type Property
   function testFunction() {
      const renderer = TestRenderer.create(
         <div>The testRenderer.type Property</div>
      );
      const mytype = renderer.root;
      console.log(mytype.type);
   }

   testFunction();

   // Returning our JSX code
   return <>
      <p>
         The testRenderer.type Property Example
      </p>
   </>;
}

export default DivTypeApp;
Output
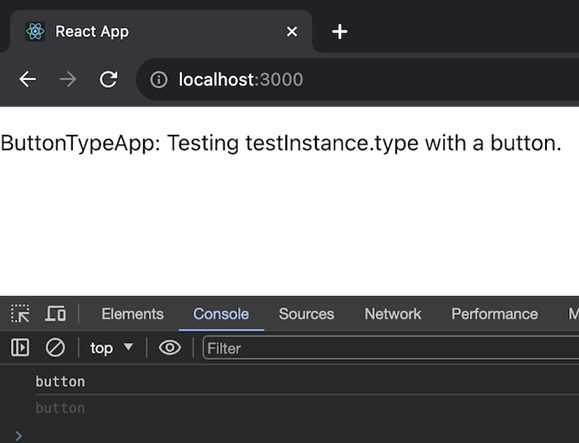
Example − Button Type App
In this app we will use TestRenderer to create a React component (a button element) and then log its type to the console. The JSX return is a simple paragraph element displaying an example of the testRenderer.type property. So the code for the same is given below −
ButtonTypeApp.js
import React from 'react';
import TestRenderer from 'react-test-renderer';

const ButtonTypeApp = () => {
   function testButtonType() {
      const renderer = TestRenderer.create(
         <button>Click me</button>
      );
      const buttonType = renderer.root;
      console.log(buttonType.type);
   }

   testButtonType();

   return (
      <>
         <p>ButtonTypeApp: Testing testInstance.type with a button.</p>
      </>
   );
};

export default ButtonTypeApp;
Output
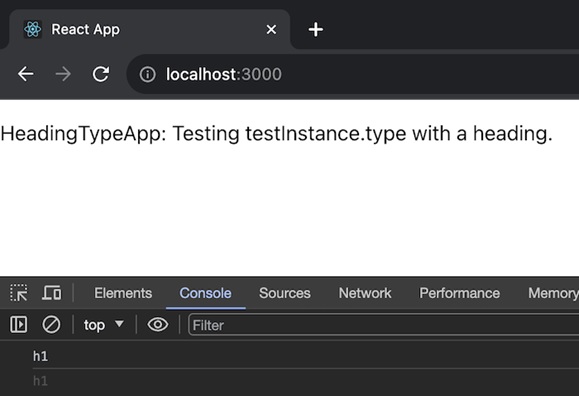
Example − Heading Type App
In this app we will use TestRenderer to create a React component (an <h1> heading), log its type to the console (which is "h1" in this case), and return a JSX structure with an explanatory paragraph. This is a basic example of testing the testInstance.type property with a heading element. Here is the code for this app −
HeadingTypeApp.js
import React from 'react';
import TestRenderer from 'react-test-renderer';

const HeadingTypeApp = () => {
   function testHeadingType() {
      const renderer = TestRenderer.create(
         <h1>Hello, TestInstance!</h1>
      );
      const headingType = renderer.root;
      console.log(headingType.type); // Output: "h1"
   }

   testHeadingType();

   return (
      <>
         <p>HeadingTypeApp: Testing testInstance.type with a heading.</p>
      </>
   );
};

export default HeadingTypeApp;
Output
Summary
The testInstance.type is similar to placing name tags on different puzzle pieces in a computer program. It helps developers in knowing and organizing their code, making it easier for the computer to understand what each component is supposed to perform. AS we have created three different examples using testInstance.type property. By practicing these examples we can understand its practical use.