- React - Home
- React - Introduction
- React - Roadmap
- React - Installation
- React - Features
- React - Advantages & Disadvantages
- React - Architecture
- React - Creating a React Application
- React - JSX
- React - Components
- React - Nested Components
- React - Using Newly Created Components
- React - Component Collection
- React - Styling
- React - Properties (props)
- React - Creating Components using Properties
- React - props Validation
- React - Constructor
- React - Component Life Cycle
- React - Event management
- React - Creating an Event−Aware Component
- React - Introduce Events in Expense Manager APP
- React - State Management
- React - State Management API
- React - Stateless Component
- React - State Management Using React Hooks
- React - Component Life Cycle Using React Hooks
- React - Layout Component
- React - Pagination
- React - Material UI
- React - Http Server
- React - Http client programming
- React - Form Programming
- React - Forms
- React - Controlled Component
- React - Uncontrolled Component
- React - Formik
- React - Conditional Rendering
- React - Lists
- React - Keys
- React - Routing
- React - Redux
- React - Animation
- React - Bootstrap
- React - Map
- React - Table
- React - Managing State Using Flux
- React - Testing
- React - CLI Commands
- React - Building and Deployment
- React - Example
- Hooks
- React - Introduction to Hooks
- React - Using useState
- React - Using useEffect
- React - Using useContext
- React - Using useRef
- React - Using useReducer
- React - Using useCallback
- React - Using useMemo
- React - Custom Hooks
- React Advanced
- React - Accessibility
- React - Code Splitting
- React - Context
- React - Error Boundaries
- React - Forwarding Refs
- React - Fragments
- React - Higher Order Components
- React - Integrating With Other Libraries
- React - Optimizing Performance
- React - Profiler API
- React - Portals
- React - React Without ES6 ECMAScript
- React - React Without JSX
- React - Reconciliation
- React - Refs and the DOM
- React - Render Props
- React - Static Type Checking
- React - Strict Mode
- React - Web Components
- Additional Concepts
- React - Date Picker
- React - Helmet
- React - Inline Style
- React - PropTypes
- React - BrowserRouter
- React - DOM
- React - Carousel
- React - Icons
- React - Form Components
- React - Reference API
- React Useful Resources
- React - Quick Guide
- React - Cheatsheet
- React - Axios CheatSheet
- React - Useful Resources
- React - Discussion
React - TestInstance.children Property
The React.js library is all about dividing the program into many components. Each component has a unique lifecycle. React includes some built-in methods that we can override at various points of the component's life-cycle.
So in this tutorial, we will learn how to use the testInstance.children property. The testInstance.children property is used to retrieve the test instance's children.
The "testInstance.children" property is a programming tool for retrieving the children or smaller components connected with a specific test instance. A test instance represents a main entity in the coding language, and by adding ".children" to it, developers can access and interact with the individual instances nested in it. It is like looking into a larger container to find and interact with one of the pieces located within.
This characteristic is useful for organizing and managing information because it allows programmers to focus on and manipulate small details within a larger context, resulting in more efficient and precise coding techniques.
Syntax
testInstance.children
Return Value
The "testInstance.children" property returns a collection or list of the child elements related with the specified test instance.
Below are some apps using import React from 'react'; and import TestRenderer from 'react-test-renderer'; with the usage of the TestRenderer.children property −
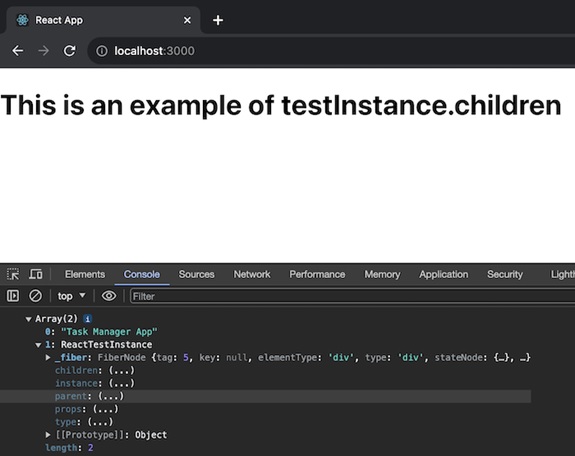
Example − Task Manager App
This app is like a digital to-do list. It uses a special tool called TestRenderer to create a virtual representation of the app. Then, it checks and shows the parts or "children" inside the app using the TestRenderer.children property.
TaskManagerApp.js
import React from 'react';
import TestRenderer from 'react-test-renderer';

const TaskManagerApp = () => {
   function showChildren() {
      const renderer = TestRenderer.create(
         <div>
            Task Manager App
            <div>Task Renderer</div>
         </div>
      );
      const myChildren = renderer.root;
      console.log(myChildren.children);
   }

   showChildren();

   return <>
      <h1>This is an example of testInstance.children</h1>
   </>;
};

export default TaskManagerApp;
Output
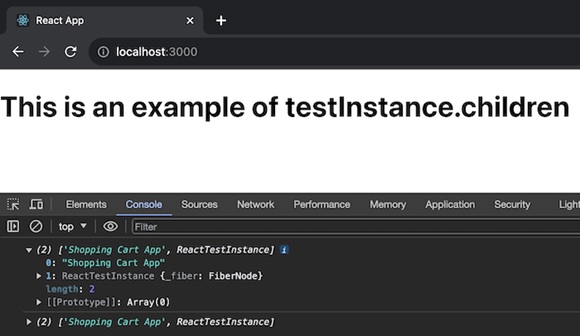
Example − Shopping Cart App
Imagine this app as a simple online shopping cart. It uses TestRenderer, a special tool, to create a virtual version of the app. Then, it checks and shows the parts or "children" inside the app using the TestRenderer.children property.
ShoppingCartApp.js
import React from 'react';
import TestRenderer from 'react-test-renderer';

const ShoppingCartApp = () => {
   function showChildren() {
      const renderer = TestRenderer.create(
      <div>
         Shopping Cart App
         <div>Cart Renderer</div>
      </div>
      );
      const myChildren = renderer.root;
      console.log(myChildren.children);
   }

   showChildren();

   return <><h1>This is an example of testInstance.children</h1></>;
};

export default ShoppingCartApp;
Output
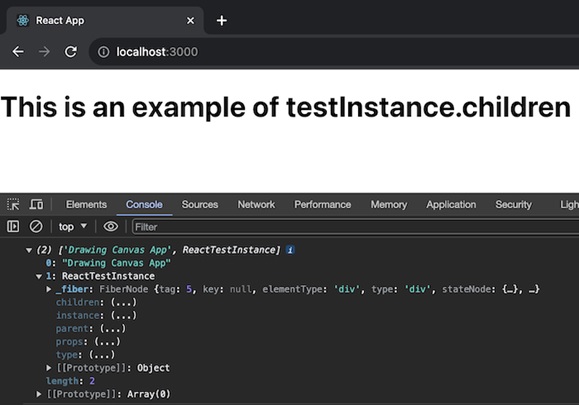
Example − Drawing Canvas App
This app is like a digital canvas where we can draw pictures. It uses a special tool, TestRenderer, to create a virtual version of the app. Then, it checks and shows the parts or "children" inside the app using the TestRenderer.children property.
DrawingCanvasApp.js
import React from 'react';
import TestRenderer from 'react-test-renderer';

const DrawingCanvasApp = () => {
   function showChildren() {
      const renderer = TestRenderer.create(
         <div>
            Drawing Canvas App
            <div>Canvas Renderer</div>
         </div>
      );
      const myChildren = renderer.root;
      console.log(myChildren.children);
   }

   showChildren();

   return <><h1>This is an example of testInstance.children</h1></>;
};

export default DrawingCanvasApp;
Output
Summary
Finally, testInstance.children is a coding command designed to handle multiple elements within a program. It functions like a magnifying glass, allowing developers to focus on specific areas of their code. Understanding these kinds of commands is important for anyone entering into the world of programming.