- React - Home
- React - Introduction
- React - Roadmap
- React - Installation
- React - Features
- React - Advantages & Disadvantages
- React - Architecture
- React - Creating a React Application
- React - JSX
- React - Components
- React - Nested Components
- React - Using Newly Created Components
- React - Component Collection
- React - Styling
- React - Properties (props)
- React - Creating Components using Properties
- React - props Validation
- React - Constructor
- React - Component Life Cycle
- React - Event management
- React - Creating an Event−Aware Component
- React - Introduce Events in Expense Manager APP
- React - State Management
- React - State Management API
- React - Stateless Component
- React - State Management Using React Hooks
- React - Component Life Cycle Using React Hooks
- React - Layout Component
- React - Pagination
- React - Material UI
- React - Http Server
- React - Http client programming
- React - Form Programming
- React - Forms
- React - Controlled Component
- React - Uncontrolled Component
- React - Formik
- React - Conditional Rendering
- React - Lists
- React - Keys
- React - Routing
- React - Redux
- React - Animation
- React - Bootstrap
- React - Map
- React - Table
- React - Managing State Using Flux
- React - Testing
- React - CLI Commands
- React - Building and Deployment
- React - Example
- Hooks
- React - Introduction to Hooks
- React - Using useState
- React - Using useEffect
- React - Using useContext
- React - Using useRef
- React - Using useReducer
- React - Using useCallback
- React - Using useMemo
- React - Custom Hooks
- React Advanced
- React - Accessibility
- React - Code Splitting
- React - Context
- React - Error Boundaries
- React - Forwarding Refs
- React - Fragments
- React - Higher Order Components
- React - Integrating With Other Libraries
- React - Optimizing Performance
- React - Profiler API
- React - Portals
- React - React Without ES6 ECMAScript
- React - React Without JSX
- React - Reconciliation
- React - Refs and the DOM
- React - Render Props
- React - Static Type Checking
- React - Strict Mode
- React - Web Components
- Additional Concepts
- React - Date Picker
- React - Helmet
- React - Inline Style
- React - PropTypes
- React - BrowserRouter
- React - DOM
- React - Carousel
- React - Icons
- React - Form Components
- React - Reference API
- React Useful Resources
- React - Quick Guide
- React - Cheatsheet
- React - Axios CheatSheet
- React - Useful Resources
- React - Discussion
React - static propTypes Property
We can use "propTypes" in React to define the types of properties (props) that our component should receive. This ensures that just the right information is provided to our component, making our code safer.
PropTypes can be considered as a way for expressing what kind of information our component expects to receive. It is a form of saying to our component, "Hey, I'm expecting a certain type of data, so make sure we get that!
In other words we can say that PropTypes is an approach in React for type-checking props given to a React component. It helps developers in detecting common problems by defining expected types for each parameter. The propTypes property is added to a React component class as a static property, which means it is linked to the class rather than with an instance of the class.
Import propTypes
import PropTypes from 'prop-types';
Example - Defining types of Props
So we are creating a small React app with static propTypes to define the types of props that our components are going to require. Let's create a basic app that accepts our name and greets.
App.js
import React from 'react';
import PropTypes from 'prop-types';

class Greeting extends React.Component {
   // Define propTypes
   static propTypes = {
      name: PropTypes.string.isRequired, // 'isRequired' means this prop is mandatory
   };
   render() {
      return (
         <div>
            <h1>Hello, {this.props.name}!</h1>
         </div>
      );
   }
}
class App extends React.Component {
   constructor(props) {
      super(props);
      this.state = {
         userName: '',
      };
   }
   handleNameChange = (event) => {
      this.setState({ userName: event.target.value });
   };
   render() {
      return (
         <div>
            <h1>Simple Greeting App</h1>
            <label>
               Enter your name:
            <input
               type="text"
               value={this.state.userName}
               onChange={this.handleNameChange}
            />
            </label>
            {/* Render the Greeting component and pass the name as a prop */}
            <Greeting name={this.state.userName} />
         </div>
      );
   }
}

export default App;
Output
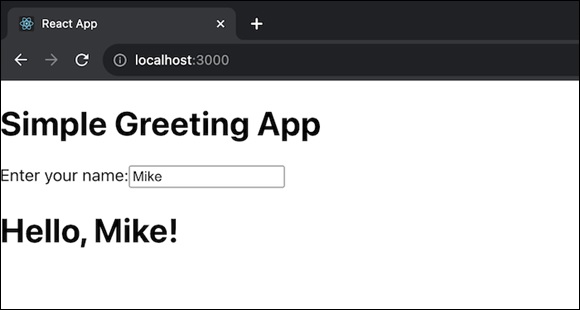
We have two components in this example: Greeting and App. The Greeting component needs a string-type prop called name, which is marked as isRequired, which indicates that it must be given.
The App component is a straightforward app in which we can type our name into an input box. The given name is then sent to the Greeting component, which displays a greeting message, as a prop.
Before starting this app, remember to set up our React environment and install the necessary packages, including prop-types.
Example - Counter App
Let's create another small React app which uses the use of static propTypes. Let's create a Counter app this time. The Counter component will display a number as a prop. If no number is specified, it will be set to 0.
CounterApp.js
import React from 'react';
import PropTypes from 'prop-types';

class Counter extends React.Component {
   // Define propTypes for the Counter component
   static propTypes = {
      number: PropTypes.number.isRequired,
   };
   render() {
      return (
         <div>
            <h2>Counter: {this.props.number}</h2>
         </div>
      );
   }
}
class CounterApp extends React.Component {
   constructor(props) {
      super(props);
      this.state = {
         count: 0,
      };
   }
   handleIncrement = () => {
      this.setState((prevState) => ({ count: prevState.count + 1 }));
   };

   handleDecrement = () => {
      this.setState((prevState) => ({ count: prevState.count - 1 }));
   };
   render() {
      return (
         <div>
            <h1>Simple Counter App</h1>
            {/* Render the Counter component and pass the count as a prop */}
            <Counter number={this.state.count} />

            <button onClick={this.handleIncrement}>Increment</button>
            <button onClick={this.handleDecrement}>Decrement</button>
         </div>
      );
   }
}

export default CounterApp;
Output
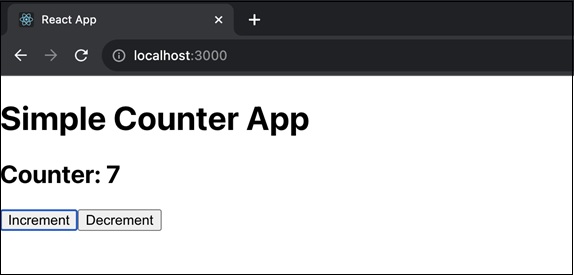
We have created a Counter component with a propTypes for the number prop in this app. The CounterApp component keeps a count and buttons to increment and decrement the count in its state. The Counter component displays the current count.
Example - Creating a ColorBox Component
Let's create one more small React app that makes use of static propTypes. This time, we will create a ColorBox component that takes a color as a prop and shows a colored box.
ColorBox.js
import React from 'react';
import PropTypes from 'prop-types';

class ColorBox extends React.Component {
   // Define propTypes for the ColorBox component
   static propTypes = {
      color: PropTypes.string.isRequired,
   };
   render() {
      const boxStyle = {
         width: '100px',
         height: '100px',
         backgroundColor: this.props.color,
      };

      return (
         <div>
            <h2>Color Box</h2>
            <div style={boxStyle}></div>
         </div>
      );
   }
}
class ColorBoxApp extends React.Component {
   constructor(props) {
      super(props);
      this.state = {
         selectedColor: 'blue',
      };
   }
   handleColorChange = (event) => {
      this.setState({ selectedColor: event.target.value });
   };
   render() {
      return (
         <div>
            <h1>Color Box App</h1>
            <label>
               Select a color:
               <select value={this.state.selectedColor} onChange={this.handleColorChange}>
                  <option value="red">Red</option>
                  <option value="green">Green</option>
                  <option value="blue">Blue</option>
               </select>
            </label>

            <ColorBox color={this.state.selectedColor} />
         </div>
      );
   }
}

export default ColorBoxApp;
Output
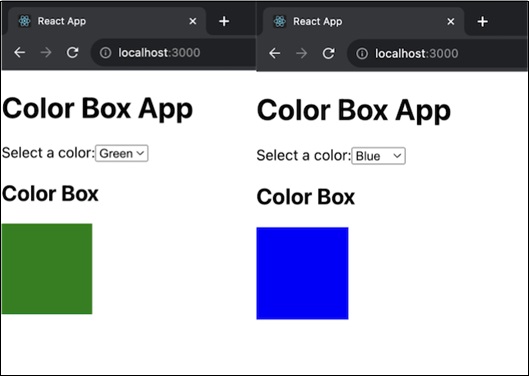
In this app, the ColorBox component has a propTypes requirement for the color prop. The ColorBoxApp component keeps a selected color in its state and gives a color selection dropdown. The ColorBox component is then used to display a colored box based on the color that has been selected.
Summary
PropTypes is a React feature that allows us to define the expected types of properties (props) that our components will receive. It helps in the detection of potential issues by allowing developers to specify the data types of props before development.