- React - Home
- React - Introduction
- React - Roadmap
- React - Installation
- React - Features
- React - Advantages & Disadvantages
- React - Architecture
- React - Creating a React Application
- React - JSX
- React - Components
- React - Nested Components
- React - Using Newly Created Components
- React - Component Collection
- React - Styling
- React - Properties (props)
- React - Creating Components using Properties
- React - props Validation
- React - Constructor
- React - Component Life Cycle
- React - Event management
- React - Creating an Event−Aware Component
- React - Introduce Events in Expense Manager APP
- React - State Management
- React - State Management API
- React - Stateless Component
- React - State Management Using React Hooks
- React - Component Life Cycle Using React Hooks
- React - Layout Component
- React - Pagination
- React - Material UI
- React - Http Server
- React - Http client programming
- React - Form Programming
- React - Forms
- React - Controlled Component
- React - Uncontrolled Component
- React - Formik
- React - Conditional Rendering
- React - Lists
- React - Keys
- React - Routing
- React - Redux
- React - Animation
- React - Bootstrap
- React - Map
- React - Table
- React - Managing State Using Flux
- React - Testing
- React - CLI Commands
- React - Building and Deployment
- React - Example
- Hooks
- React - Introduction to Hooks
- React - Using useState
- React - Using useEffect
- React - Using useContext
- React - Using useRef
- React - Using useReducer
- React - Using useCallback
- React - Using useMemo
- React - Custom Hooks
- React Advanced
- React - Accessibility
- React - Code Splitting
- React - Context
- React - Error Boundaries
- React - Forwarding Refs
- React - Fragments
- React - Higher Order Components
- React - Integrating With Other Libraries
- React - Optimizing Performance
- React - Profiler API
- React - Portals
- React - React Without ES6 ECMAScript
- React - React Without JSX
- React - Reconciliation
- React - Refs and the DOM
- React - Render Props
- React - Static Type Checking
- React - Strict Mode
- React - Web Components
- Additional Concepts
- React - Date Picker
- React - Helmet
- React - Inline Style
- React - PropTypes
- React - BrowserRouter
- React - DOM
- React - Carousel
- React - Icons
- React - Form Components
- React - Reference API
- React Useful Resources
- React - Quick Guide
- React - Cheatsheet
- React - Axios CheatSheet
- React - Useful Resources
- React - Discussion
React - DragEvent Handler
In React JS there is an event handler function called DragEvent. A DragEvent handler function is a web development function that controls and responds to events that occur when users drag and drop items on a web page. These HTML Drag and Drop API events enable users to make web items draggable and define dropping areas for it.
Syntax
<>
   <div
      draggable={true}
      onDragStart={e => console.log('onDragStart')}
      onDragEnd={e => console.log('onDragEnd')}
   >
      Source
   </div>
   <div
      onDragEnter={e => console.log('onDragEnter')}
      onDragLeave={e => console.log('onDragLeave')}
      onDragOver={e => { e.preventDefault(); console.log('onDragOver'); }}
      onDrop={e => console.log('onDrop')}
   >
      Destination
   </div>
</>
DragEvent handler functions are important for creating interactive and user-friendly web interfaces. They allow us to regulate what occurs when we start dragging something, enter a dropping area, leave it, move the dragged item across the dropping area, and simply drop it. These features allow us to adjust how our web page responds to drag-and-drop activities.
Parameters
A specific object named "e" is sent as a parameter to a DragEvent handler method. This "e" object keeps important information about the drag-and-drop event, like which item is being transferred, and also attributes that describe the event, for example if particular keys "Ctrl" or "Shift" are pressed.
The following are the important properties of the "e" object −
| Sr.No | Properties & Description |
|---|---|
| 1 |
dataTransfer This property helps us access the data of the dragged element, which is important for managing the drag-and-drop operation. |
| 2 |
altKey Indicates us if the "Alt" key on the keyboard is pressed during the event. |
| 3 |
ctrlKey Tell us if the "Ctrl" key on the keyboard is pressed during the event. |
| 4 |
shiftKey Indicates if the "Shift" key on the keyboard is pressed during the occurrence. |
| 5 |
onDragEnter This event happens when we drag an element into a drop zone. |
| 6 |
onDragLeave Occurs when we move the mouse pointer out of a drop zone. |
| 7 |
onDragOver This occurs when the mouse cursor moves over a drop zone. |
| 8 |
onDrop This is the event that occurs when we drop a dragged object into a drop zone. |
Example − Drag and Drop App
So we are creating a simple application which shows the usage of the handler function DragEvent. It creates a basic drag-and-drop interface with a dragged source item and a destination item where we can drop the dragged object. Let's go over the code −
App.js
import react, { usestate } from "react";

function app(){
   return (
      <div>
         <>
            <div
               draggable={true}
               ondragstart={(e) => console.log("ondragstart")}
               ondragend={(e) => console.log("ondragend")}
            >
               source  for dragging
            </div>
            <div
               ondragenter={(e) => console.log("ondragenter")}
               ondragleave={(e) => console.log("ondragleave")}
               ondragover={(e) => {
                  e.preventdefault();
                  console.log("ondragover");
               }}
               ondrop={(e) => console.log("ondrop")}
            >
               destination for dragging
            </div>
         </>
      </div>
   );
}

export default app;
Output
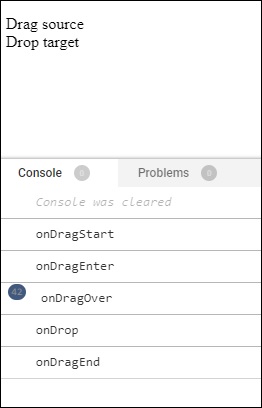
The code we have provided uses event handlers to log messages to the console at different stages of the drag-and-drop process.
Example − Image Upload App
Let us now create a simple React app for a Drag-and-Drop Image Upload. In this app users will be able to drag and drop images to upload them. And display the uploaded images in a gallery. So we will use React DragEvent handlers to handle image drag and drop events. And also we will use useState to manage the list of uploaded images. The code is given below −
ImageUploadApp.js
import React, { useState } from 'react';

const ImageUploadApp = () => {
   const [uploadedImages, setUploadedImages] = useState([]);
   const handleDragOver = (e) => {
      e.preventDefault();
   };
   const handleDrop = (e) => {
      e.preventDefault();
      const files = Array.from(e.dataTransfer.files);

      // Update state with the new images
      setUploadedImages((prevImages) => [...prevImages, ...files]);
   };
   return (
      <div>
         <div
            style={{ border: '2px dashed #ccc', padding: '20px' }}
            onDragOver={handleDragOver}
            onDrop={handleDrop}
         >
            <p>Drag and drop images here</p>
         </div>

         <div>
            <h2>Uploaded Images:</h2>
            <div style={{ display: 'flex', flexWrap: 'wrap' }}>
               {uploadedImages.map((image, index) => (
                  <img
                     key={index}
                     src={URL.createObjectURL(image)}
                     alt={`uploaded-${index}`}
                     style={{ width: '100px', height: '100px', margin: '5px' }}
                  />
               ))}
            </div>
         </div>
      </div>
   );
};

export default ImageUploadApp;
Output
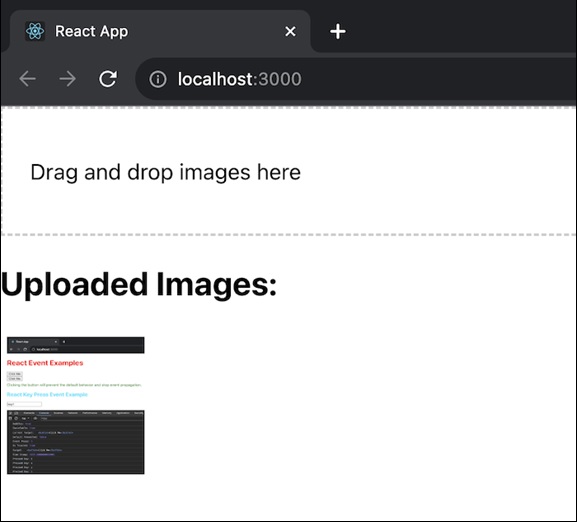
As we can see in the output image when the image is dragged and dropped so the image appears in the front end. We can customize and enhance this app based on the specific requirements.
Example − Quiz App
Let us create a basic React app for a Drag-and-Drop Quiz. So in this app we will display a list of questions with their corresponding answer choices. This app will allow users to drag and drop the answer choices to match them with the correct questions. So we will use React DragEvent handlers to handle the drag and drop functionality. Also we will provide feedback to the user on whether their answers are correct. The code for this app is as follows −
QuizApp.js
import React, { useState } from 'react';

const QuizApp = () => {
   const [questions, setQuestions] = useState([
      { id: 1, text: 'Who is known as the father of Artificial Intelligence?', correctAnswer: 'John McCarthy' },
      { id: 2, text: 'Chandrayaan3 landed on moon on which of the following date -', correctAnswer: '23rd August 2023' },
   ]);
   const [userAnswers, setUserAnswers] = useState([]);
   const handleDragStart = (e, answer) => {
      e.dataTransfer.setData('text/plain', answer);
   };
   const handleDragOver = (e) => {
      e.preventDefault();
   };
   const handleDrop = (e, questionId) => {
      e.preventDefault();

      // Get the dragged answer
      const droppedAnswer = e.dataTransfer.getData('text/plain');

      // Update userAnswers state
      setUserAnswers((prevAnswers) => [...prevAnswers, { questionId, answer: droppedAnswer }]);
   };

   const checkAnswers = () => {
      // Compare user answers with correct answers
      const feedback = userAnswers.map(({ questionId, answer }) => {
         const question = questions.find((q) => q.id === questionId);
         return {
            questionId,
            isCorrect: answer === question.correctAnswer,
         };
      });
      console.log(feedback);
   };

   return (
      <div>
         <h2>Drag-and-Drop Quiz</h2>
         <div>
            {questions.map((question) => (
               <div
                  key={question.id}
                  style={{ border: '1px solid #ccc', margin: '10px', padding: '10px' }}
                  onDragOver={handleDragOver}
                  onDrop={(e) => handleDrop(e, question.id)}
               >
                  <p>{question.text}</p>
                  <div
                     draggable
                     onDragStart={(e) => handleDragStart(e, question.correctAnswer)}
                     style={{ border: '1px solid #aaa', padding: '5px', cursor: 'move' }}
                  >
                  {question.correctAnswer}
                  </div>
               </div>
            ))}
         </div>
         <button onClick={checkAnswers}>Check Answers</button>
      </div>
   );
};

export default QuizApp;
Output
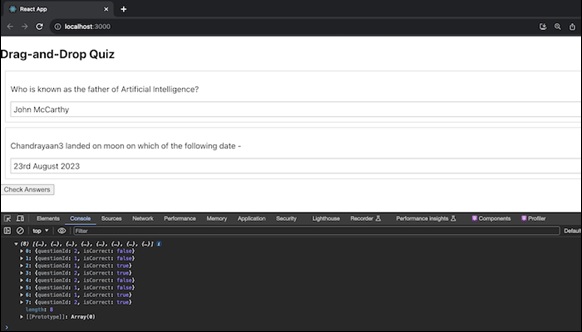
This example sets up a quiz where users can drag and drop the correct answer choices to match them with the corresponding questions. The app provides feedback on the correctness of the user's answers when the "Check Answers" button is clicked. We can customize this app further based on our specific quiz requirements.
Summary
DragEvent handler functions are used to manage how web items behave when dragged and dropped. They are required for the development of interactive and user-friendly web interfaces. As an argument, these methods accept an event object ("e"), which includes information on the drag-and-drop process as well as event attributes such as keys pressed. We can personalize how our web page responds to drag-and-drop activities by applying these functions and its attributes, making our website more engaging for users.