
 Data Structure
 Networking
 RDBMS
RDBMS Operating System
 Java
Java MS Excel
 iOS
iOS HTML
HTML CSS
CSS Android
 Python
 C Programming
 C++
C++ C#
C# MongoDB
 MySQL
MySQL Javascript
 PHP
PHP
- Selected Reading
- UPSC IAS Exams Notes
- Developer's Best Practices
- Questions and Answers
- Effective Resume Writing
- HR Interview Questions
- Computer Glossary
- Who is Who
NavigationView in ActionBar in Android
Before getting into the Navigation view example, we should know about navigation view. Navigation view is just like a sliding menu in HTML. Navigation view is extended by navigatoin drawer. Most of use cases of Navigation view is used to redirect different activities or show profile information.
This example demonstrate about how to integrate NavigationView in ActionBar
Step 1 − Create a new project in Android Studio,go to File ⇒ New Project and fill all required details to create a new project.
Step2 − While creating project we should select Navigation drawer activity as shown below
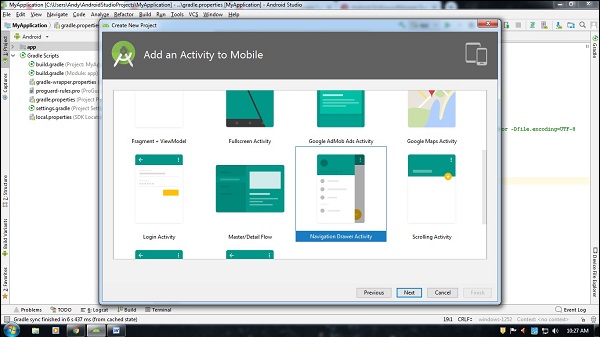
After selecting navigation drawer activity click on next button to finish project creation.
Step3 − Open your project structure for layout folder. Android studio generates different layout as shown below
activity_main.xml − It is a MainActivity layout. It going to create drawer layout as a parent layout and child layout contains navigationview as shown below
<?xml version = "1.0" encoding = "utf-8"?>
<android.support.v4.widget.DrawerLayout xmlns:android = "http://schemas.android.com/apk/res/android"
   xmlns:app = "http://schemas.android.com/apk/res-auto"
   xmlns:tools = "http://schemas.android.com/tools"
   android:id = "@+id/drawer_layout"
   android:layout_width = "match_parent"
   android:layout_height = "match_parent"
   android:fitsSystemWindows = "true"
   tools:openDrawer = "start">
   <include
      layout = "@layout/app_bar_main"
      android:layout_width = "match_parent"
      android:layout_height = "match_parent" />
   <android.support.design.widget.NavigationView
      android:id = "@+id/nav_view"
      android:layout_width = "wrap_content"
      android:layout_height = "match_parent"
      android:layout_gravity = "start"
      android:fitsSystemWindows = "true"
      app:headerLayout = "@layout/nav_header_main"
      app:menu = "@menu/activity_main_drawer" />
</android.support.v4.widget.DrawerLayout>
In the navigationview it contains two layouts as Header Layout and menu layout. Header layout contains information about header of navigationview and menu layout is contains information about menu list.
app_bar_main.xml − It is layout file as we see normal layout. But it contains information about app bar layout( action bar) , center layout.
<?xml version = "1.0" encoding = "utf-8"?>
<android.support.design.widget.CoordinatorLayout xmlns:android = "http://schemas.android.com/apk/res/android"
   xmlns:app = "http://schemas.android.com/apk/res-auto"
   xmlns:tools = "http://schemas.android.com/tools"
   android:layout_width = "match_parent"
   android:layout_height = "match_parent"
   tools:context = ".MainActivity">
   <android.support.design.widget.AppBarLayout
      android:layout_width = "match_parent"
      android:layout_height = "wrap_content"
      android:theme = "@style/AppTheme.AppBarOverlay">
   <android.support.v7.widget.Toolbar
      android:id = "@+id/toolbar"
      android:layout_width = "match_parent"
      android:layout_height = "?attr/actionBarSize"
      android:background = "?attr/colorPrimary"
      app:popupTheme = "@style/AppTheme.PopupOverlay" />
   </android.support.design.widget.AppBarLayout>
   <include layout = "@layout/content_main" />
</android.support.design.widget.CoordinatorLayout>
In the above layout we have included content_main layout. it is mainlayout where user can customize own views as shown below
<?xml version = "1.0" encoding = "utf-8"?>
<android.support.constraint.ConstraintLayout xmlns:android = "http://schemas.android.com/apk/res/android"
   xmlns:app = "http://schemas.android.com/apk/res-auto"
   xmlns:tools = "http://schemas.android.com/tools"
   android:layout_width = "match_parent"
   android:layout_height = "match_parent"
   app:layout_behavior = "@string/appbar_scrolling_view_behavior"
   tools:context = ".MainActivity"
   tools:showIn = "@layout/app_bar_main">
   <TextView
      android:layout_width = "wrap_content"
      android:layout_height = "wrap_content"
      android:text = "Hello World!"
      app:layout_constraintBottom_toBottomOf = "parent"
      app:layout_constraintLeft_toLeftOf = "parent"
      app:layout_constraintRight_toRightOf = "parent"
      app:layout_constraintTop_toTopOf = "parent" />
</android.support.constraint.ConstraintLayout>
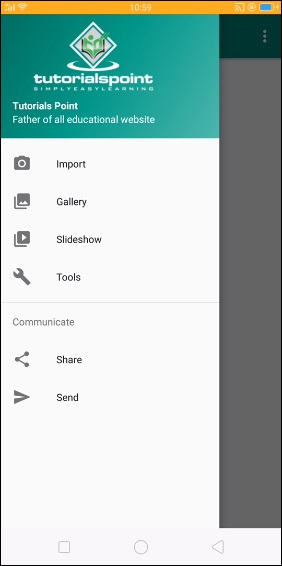
nav_header_main − It is a navigation header view, it contains information about navigation header. we have customized navigation header as shown below
<?xml version = "1.0" encoding = "utf-8"?>
<LinearLayout xmlns:android = "http://schemas.android.com/apk/res/android"
   xmlns:app = "http://schemas.android.com/apk/res-auto"
   android:layout_width = "match_parent"
   android:layout_height = "@dimen/nav_header_height"
   android:background = "@drawable/side_nav_bar"
   android:gravity = "bottom"
   android:orientation = "vertical"
   android:paddingLeft = "@dimen/activity_horizontal_margin"
   android:paddingTop = "@dimen/activity_vertical_margin"
   android:paddingRight = "@dimen/activity_horizontal_margin"
   android:paddingBottom = "@dimen/activity_vertical_margin"
   android:theme = "@style/ThemeOverlay.AppCompat.Dark">
   <ImageView
      android:id = "@+id/imageView"
      android:layout_width = "wrap_content"
      android:layout_height = "100dp"
      android:contentDescription = "@string/nav_header_desc"
      android:paddingTop = "@dimen/nav_header_vertical_spacing"
      app:srcCompat = "@drawable/logo" />
   <TextView
      android:layout_width = "match_parent"
      android:layout_height = "wrap_content"
      android:paddingTop = "@dimen/nav_header_vertical_spacing"
      android:textColor = "#FFF"
      android:textStyle = "bold"
      android:text = "Tutorials Point"
      android:textAppearance = "@style/TextAppearance.AppCompat.Body1" />
   <TextView
      android:id = "@+id/textView"
      android:textColor = "#FFF"
      android:layout_width = "wrap_content"
      android:layout_height = "wrap_content"
      android:text = "Father of all educational website" />
</LinearLayout>
Note − we have added drawable/logo, while your are developing application please add your own logo.
activity_main_drawer − It is a menu layout which is available at menu/activity_main_drawer.xml as shown below
<?xml version = "1.0" encoding = "utf-8"?>
<menu xmlns:android = "http://schemas.android.com/apk/res/android"
   xmlns:tools = "http://schemas.android.com/tools"
   tools:showIn = "navigation_view">
   <group android:checkableBehavior = "single">
      <item
         android:id = "@+id/nav_camera"
         android:icon = "@drawable/ic_menu_camera"
         android:title = "Import" />
      <item
         android:id = "@+id/nav_gallery"
         android:icon = "@drawable/ic_menu_gallery"
         android:title = "Gallery" />
      <item
         android:id = "@+id/nav_slideshow"
         android:icon = "@drawable/ic_menu_slideshow"
         android:title = "Slideshow" />
      <item
         android:id = "@+id/nav_manage"
         android:icon = "@drawable/ic_menu_manage"
         android:title = "Tools" />
   </group>
   <item android:title = "Communicate">
      <menu>
         <item
            android:id = "@+id/nav_share"
            android:icon = "@drawable/ic_menu_share"
            android:title = "Share" />
         <item
            android:id = "@+id/nav_send"
            android:icon = "@drawable/ic_menu_send"
            android:title = "Send" />
      </menu>
   </item>
</menu>
Step 4 − Add the following code to src/MainActivity.java
import android.os.Bundle;
import android.support.design.widget.FloatingActionButton;
import android.support.design.widget.Snackbar;
import android.view.View;
import android.support.design.widget.NavigationView;
import android.support.v4.view.GravityCompat;
import android.support.v4.widget.DrawerLayout;
import android.support.v7.app.ActionBarDrawerToggle;
import android.support.v7.app.AppCompatActivity;
import android.support.v7.widget.Toolbar;
import android.view.Menu;
import android.view.MenuItem;
public class MainActivity extends AppCompatActivity implements NavigationView.OnNavigationItemSelectedListener {
   @Override
   protected void onCreate(Bundle savedInstanceState) {
      super.onCreate(savedInstanceState);
      setContentView(R.layout.activity_main);
      Toolbar toolbar = (Toolbar) findViewById(R.id.toolbar);
      setSupportActionBar(toolbar);
      DrawerLayout drawer = (DrawerLayout) findViewById(R.id.drawer_layout);
      ActionBarDrawerToggle toggle = new ActionBarDrawerToggle(
      this, drawer, toolbar, R.string.navigation_drawer_open, R.string.navigation_drawer_close);
      drawer.addDrawerListener(toggle);
      toggle.syncState();
      NavigationView navigationView = (NavigationView) findViewById(R.id.nav_view);
      navigationView.setNavigationItemSelectedListener(this);
   }
   @Override
   public void onBackPressed() {
      DrawerLayout drawer = (DrawerLayout) findViewById(R.id.drawer_layout);
      if (drawer.isDrawerOpen(GravityCompat.START)) {
         drawer.closeDrawer(GravityCompat.START);
      } else {
         super.onBackPressed();
      }
   }
   @Override
   public boolean onCreateOptionsMenu(Menu menu) {
      // Inflate the menu; this adds items to the action bar if it is present.
      getMenuInflater().inflate(R.menu.main, menu);
      return true;
   }
   @Override
   public boolean onOptionsItemSelected(MenuItem item) {
      // Handle action bar item clicks here. The action bar will
      // automatically handle clicks on the Home/Up button, so long
      // as you specify a parent activity in AndroidManifest.xml.
      int id = item.getItemId();
      //noinspection SimplifiableIfStatement
      if (id == R.id.action_settings) {
         return true;
      }
      return super.onOptionsItemSelected(item);
   }
   @SuppressWarnings("StatementWithEmptyBody")
   @Override
   public boolean onNavigationItemSelected(MenuItem item) {
      // Handle navigation view item clicks here.
      int id = item.getItemId();
      if (id == R.id.nav_camera) {
         // Handle the camera action
      } else if (id == R.id.nav_gallery) {
      } else if (id == R.id.nav_slideshow) {
      } else if (id == R.id.nav_manage) {
      } else if (id == R.id.nav_share) {
      } else if (id == R.id.nav_send) {
      }
      DrawerLayout drawer = (DrawerLayout) findViewById(R.id.drawer_layout);
      drawer.closeDrawer(GravityCompat.START);
      return true;
   }
}
To close navigation view, we have to close drawer as shown below
if (drawer.isDrawerOpen(GravityCompat.START)) {
   drawer.closeDrawer(GravityCompat.START);
}
To change navigationview position, user the following code
DrawerLayout drawer = (DrawerLayout) findViewById(R.id.drawer_layout);
drawer.closeDrawer(GravityCompat.END);
Let's try to run your application. I assume you have connected your actual Android Mobile device with your computer. To run the app from android studio, open one of your project's activity files and click Run ![]() icon from the toolbar. Select your mobile device as an option and then check your mobile device which will display your default screen
icon from the toolbar. Select your mobile device as an option and then check your mobile device which will display your default screen
Click here to download the project code

1K+ Views
