
Article Categories
- All Categories
-
 Data Structure
-
 Networking
-
 RDBMS
RDBMS
-
 Operating System
-
 Java
Java
-
 MS Excel
-
 iOS
iOS
-
 HTML
HTML
-
 CSS
CSS
-
 Android
-
 Python
-
 C Programming
-
 C++
C++
-
 C#
C#
-
 MongoDB
-
 MySQL
MySQL
-
 Javascript
-
 PHP
PHP
-
 Economics & Finance
List files stored in SD Card connected to Arduino
As the title suggests, in this tutorial, we will be listing the files stored in an SD Card connected to Arduino.
Circuit Diagram
The circuit diagram is shown below −
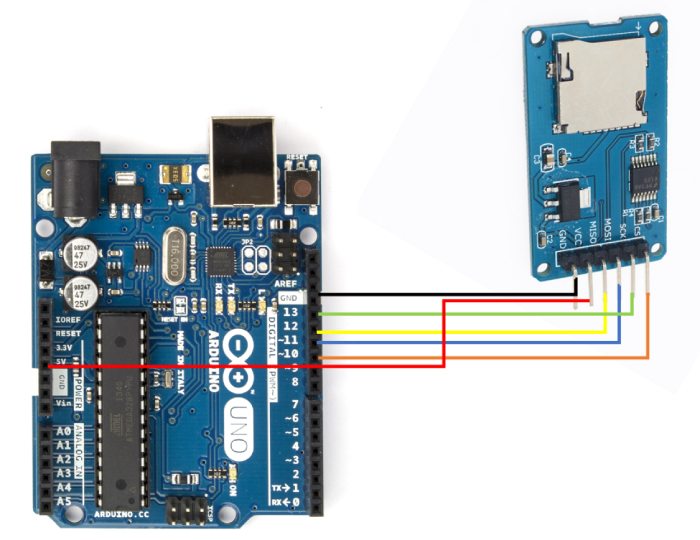
As you can see, you need to make the following connections −
| SD Card Holder | Arduino Uno |
|---|---|
| Vcc | 5V |
| GND | GND |
| MISO | 12 |
| MOSI | 11 |
| SCK | 13 |
| CS | 10 |
Only for the Vcc, make sure that your SD Card Holder takes 5V as input. If it takes in 3.3V, connect it to the 3.3V pin on Arduino Uno.
Code Walkthrough
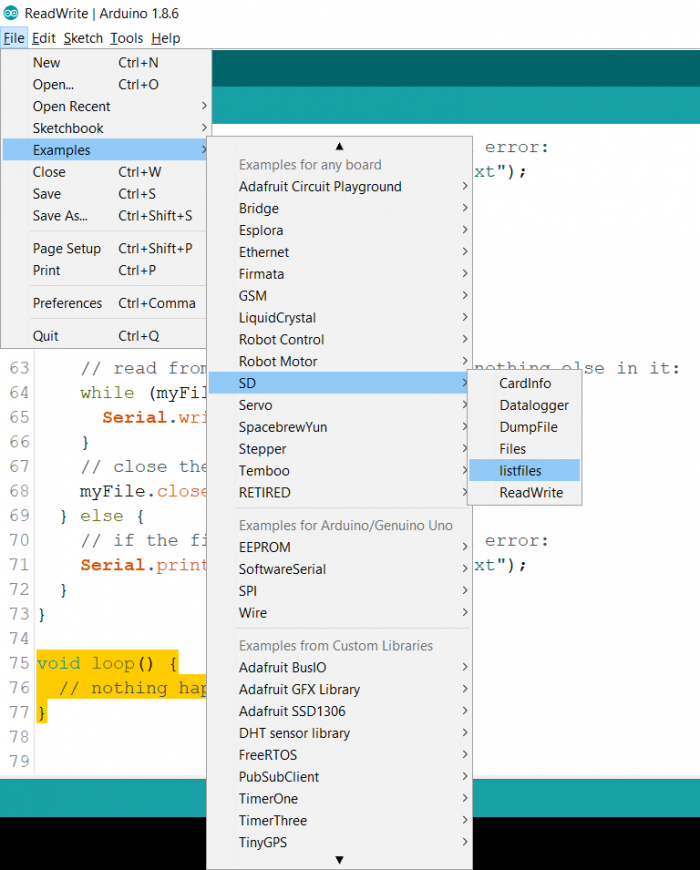
We will be walking through the example code that comes in with the inbuilt SD library. You can access it from File → Examples → SD → listfiles
Alternatively, the code can be found on GitHub −https://github.com/adafruit/SD/blob/master/examples/listfiles/listfiles.ino As you can see, we begin with the inclusion of the libraries and declaration of a root file object.
#include <SPI.h>
#include <SD.h>

File root;
Within setup, we initialize Serial, then initialize SD. Since we have connected the chip select pin of the SD Card to pin 10 of Arduino Uno, we will enter 10 as the argument in SD.begin().
void setup() {
   // Open serial communications and wait for port to open:
   Serial.begin(9600);
   while (!Serial) {
      ; // wait for serial port to connect. Needed for native USB port only
   }

   Serial.print("Initializing SD card...");

   if (!SD.begin(10)) {
      Serial.println("initialization failed!");
      while (1);
   }
Serial.println("initialization done.");
Next, we open the root directory of the SD Card, using SD.open("/"); and then use the printDirectory() function to list all the files. We will come to that function shortly.
root = SD.open("/");

printDirectory(root, 0);

Serial.println("done!");
}
Nothing is done in the loop.
void loop() {
   // nothing happens after setup finishes.
}
Now, let’s look at the printDirectory() function. This, as you can see, is a recursive function. It takes in two arguments: the path of the directory which it has to scan for files, and the number of Tabs it has to add on the Serial Monitor when printing the file path. Its pseudocode will be similar to the one given below −
Keep scanning objects one after the other in the root directory
If the current object is a file, print its name and size
If the current object is a directory, then call the printDirectory() function again on this directory, with one higher Tab. This way, the nesting effect will be seen on the Serial Monitor.
When no more objects are left in the current directory, exit.
void printDirectory(File dir, int numTabs) {
   while (true) {

      File entry = dir.openNextFile();
      if (! entry) {
         // no more files
         break;
      }
      for (uint8_t i = 0; i < numTabs; i++) {
         Serial.print('\t');
      }
      Serial.print(entry.name());
      if (entry.isDirectory()) {
         Serial.println("/");
         printDirectory(entry, numTabs + 1);
      } else {
         // files have sizes, directories do not
         Serial.print("\t\t");
         Serial.println(entry.size(), DEC);
      }
      entry.close();
   }
} 
5K+ Views
