
 Data Structure
 Networking
 RDBMS
RDBMS Operating System
 Java
Java MS Excel
 iOS
iOS HTML
HTML CSS
CSS Android
 Python
 C Programming
 C++
C++ C#
C# MongoDB
 MySQL
MySQL Javascript
 PHP
PHP
- Selected Reading
- UPSC IAS Exams Notes
- Developer's Best Practices
- Questions and Answers
- Effective Resume Writing
- HR Interview Questions
- Computer Glossary
- Who is Who
Interface Arduino with Gas Sensor
In this article, we will see how to interface Arduino with the MQ-2 gas sensor. MQ2 gas sensor is used for detecting smoke and some flammable gases like LPG, Methane, etc. It changes its resistance depending on the type of the gas. This principle can be used to raise an alarm based on the concentration of the gas.
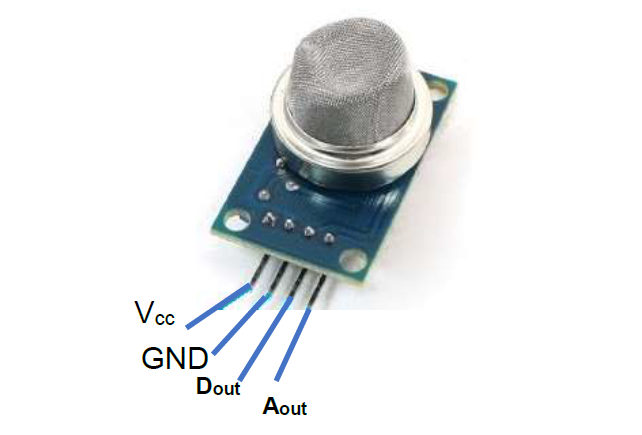
An image of the MQ2 gas sensor is given above. As you can see, it has 4 pins. Out of these the Aout pin gives the Analog voltage in proportion to the gas concentration. Higher the gas concentration, higher the voltage on the Aout pin. Depending on your application, you can perform some trial and errors, and determine the threshold of Aout voltage above which you want to raise an alarm.
Alternatively, you can adjust the potentiometer on the other side of the sensor to set the threshold, and then use the Dout pin to get digital value (whether concentration of gas is above or below threshold).
Circuit Diagram
The circuit diagram is shown below −
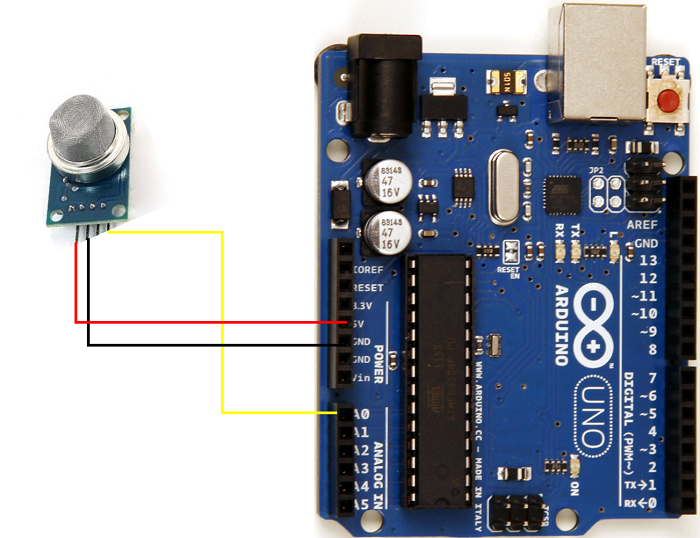
As you can see, Vcc of MQ2 is connected to 5V, GND to GND and Aout to A0.
The code is pretty straightforward, as you can see below −
int sensorPin = A0;
int sensorThreshold = 300;

void setup() {
   // put your setup code here, to run once:
   Serial.begin(9600);
   pinMode(sensorPin, INPUT);
}

void loop() {
   // put your main code here, to run repeatedly:
   if (analogRead(sensorPin) > sensorThreshold) {
      Serial.println("Gas concentration too high!");
   } else {
      Serial.println("Gas concentration in control");
   }
}
As discussed earlier as well, you can determine the threshold using trial and error. Also, don’t touch the sensor after it has been active for some time, because it tends to heat up. Also, you can add other actions, like ringing a buzzer, once the sensor readings cross the threshold.

7K+ Views
