
 Data Structure
 Networking
 RDBMS
RDBMS Operating System
 Java
Java MS Excel
 iOS
iOS HTML
HTML CSS
CSS Android
 Python
 C Programming
 C++
C++ C#
C# MongoDB
 MySQL
MySQL Javascript
 PHP
PHP
- Selected Reading
- UPSC IAS Exams Notes
- Developer's Best Practices
- Questions and Answers
- Effective Resume Writing
- HR Interview Questions
- Computer Glossary
- Who is Who
How to use the handleChange() function in react component?
The handleChange() is not a built-in function in the React, but as its name suggests, we can define it to handle changes that users made in the input. In the react, we need to handle the input whenever a user enters some value in the input field to make it editable.
Here, we will learn to use the handleChange() function with single and multiple inputs.
Use the handleChange() function with functional components
In react, we can define the components using the function keyword and call them functional components. We can use hooks to manage the input value while using the functional components.
Syntax
Users can follow the syntax below to use the handleChange() function with functional components.
function handleChange(event) {
   let value = event.target.value;
}
<input type = "text" onChange = {handleChange} value = {value} />
In the above syntax, we have used the onChange event attribute, which invokes the handleChange() function whenever changes occur in the input value. In the handleChange() function, we can get a new input value using the ?event.target.value'.
Example
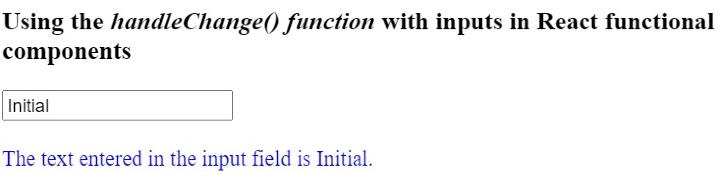
In the example below, We have created the functional component which contains the text input field. Also, we have added the handleChange() function inside the functional component.
In the handleChange() function, we take the updated input value and use hooks to set it to the value variable. Also, we are showing the value of the ?value' variable in the output.
import React from "react";
import { useState } from "react";

function App() {
   const [value, setValue] = useState("Initial");
   function handleChange(event) {
      // gives the value of the targetted element
      let value = event.target.value;
      setValue(value);
   }
   return (
      <div>
         <h3>
            Using the <i> handleChange() function </i> with inputs in React
            functional components.
         </h3>
         <input type = "text" onChange = {handleChange} value = {value} />
         <br/>   <br/>
         <div style = {{ color: "blue" }}>
            {" "}
            The text entered in the input field is {value}.{" "}
         </div>
      </div>
   );
}
export default App;
Output
Example
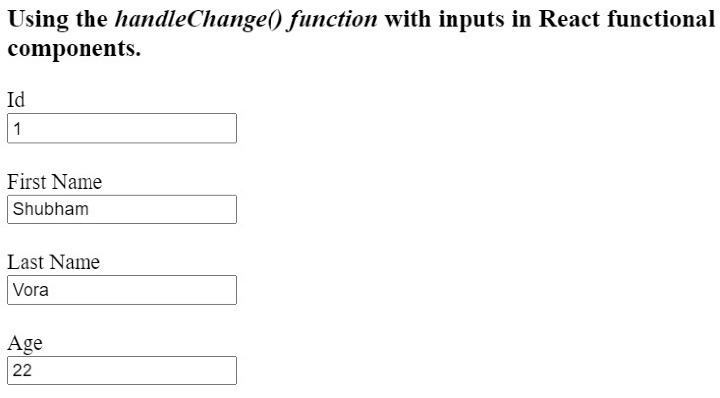
In the example below, we have created multiple inputs in a single functional component. We are using the single handleChange() function to handle all inputs. In the handleChange() function, we can get the name of the input using the ?event.target.name', and based on the name, we use the function to set the input value.
Users can enter the value in the input field and observe how the single handleChange() function handles all inputs.
import React from "react";
import { useState } from "react";

function App() {
   const [id, setId] = useState("1");
   const [firstName, setFirstName] = useState("Shubham");
   const [lastName, setLastName] = useState("Vora");
   const [age, setAge] = useState(22);
   function handleChange(event) {
      // gives the value of the targetted element
      let value = event.target.value;
      let inputName = event.target.name;
      if (inputName == "id") {
         setId(value);
      } else if (inputName == "fname") {
         setFirstName(value);
      } else if (inputName == "lname") {
         setLastName(value);
      } else {
         setAge(age);
      }
   }
   return (
      <div>
         <h3>
            Using the <i> handleChange() function </i> with inputs in React
            functional components.
         </h3>
         <label for = "Id"> Id </label>
         <br />
         <input type = "text" id = "Id" name = "id" onChange = {handleChange} value = {id} />
         <br /> <br />
         <label for = "fname"> First Name </label>
         <br />
         <input
            type = "text"
            id = "fname"
            name = "fname"
            onChange = {handleChange}
            value = {firstName}
         />
         <br /> <br />
         <label for = "lname"> Last Name </label>
         <br />
         <input
            type = "text"
            id = "lname"
            name = "lname"
            onChange = {handleChange}
            value = {lastName}
         />
         <br /> <br />
         <label for = "age"> Age </label>
         <br />
         <input
            type = "text"
            id = "age"
            name = "age"
            onChange = {handleChange}
            value = {age}
         />
         <br /> <br />
      </div>
   );
}

export default App;
Output
Use the handleChange() function with class components
We can create class components using the class keyword in ReactJS. We can't use hooks to manage variables with class components. So, we need to use state with class components.
Also, whenever we use the handleChange() method with the class components, we need to bind the method in the constructor.
Syntax
Users can follow the syntax below to use the handleChange() function with class components.
handleChange(event) {
   this.state.text = event.target.value;
}
<input onChange = {this.handleChange} name = "text" />
In the above syntax, we update the state value whenever changes occur in the input value.
Example
In the example below, we have created the class component containing the input field. We have also added the handleChage() method on the input field.
Whenever the user changes the input value, we invoke the handleChange() method, which updates the component's state.
import React from "react";

class App extends React.Component {
   constructor(props) {
      super(props);
      this.state = {
         text: "Sample",
      };
      this.handleChange = this.handleChange.bind(this);
   }
   handleChange(event) {
      this.state.text = event.target.value;
   }
   render() {
      return (
         <div>
            <h2>
               {" "}
               Using the <i> handleChange() function </i> in ReactJs with class
               components.{" "}
            </h2>
            <input onChange = {this.handleChange} name = "text" />
         </div>
      );
   }
}
export default App;
Output

Users learned to use the handleChange() function with the input field in react class and functional components. Also, we learned to handle multiple inputs with single handleChange() function.

7K+ Views
