
 Data Structure
 Networking
 RDBMS
RDBMS Operating System
 Java
Java MS Excel
 iOS
iOS HTML
HTML CSS
CSS Android
 Python
 C Programming
 C++
C++ C#
C# MongoDB
 MySQL
MySQL Javascript
 PHP
PHP
- Selected Reading
- UPSC IAS Exams Notes
- Developer's Best Practices
- Questions and Answers
- Effective Resume Writing
- HR Interview Questions
- Computer Glossary
- Who is Who
How to perform image translation using OpenCV in Python?
Shifting the image location in a particular direction is referred to as Image Translation. To perform image translation, we should first understand what is a translation matrix and how to define it using OpenCV and NumPy.
If we want to make a translation in (x, y) direction, let it be (tx, ty). tx is the shift in horizontal direction and ty is the shift in vertical direction. Using (tx, ty), we can define the translation matrix M as below ?
M = np.float32([[1,0,tx],[0,1,ty]])
The translation matrix M is a numpy array of type np.float32. We pass M to the cv2.warpAffine() function as an argument. See the syntax below ?
Syntax
cv2.warpAffine(img, M, (w, h))
Here,
img ? The image to be shifted.
M ? Translation matrix defined above.
(w, h) ? Width and height of the image after translation.
Note ? The positive value of tx will shift the image right, while the negative value of tx will shift the image left. In the same way, the positive value of ty will shift the image down, while the negative value of tx will shift the image up.
Steps
To perform an image translation, you can follow the steps given below ?
Import the required libraries. In all the following Python examples, the required Python libraries are OpenCV and NumPy. Make sure you have already installed it.
import cv2
import numpy as np
Read the input image using cv2.imread() function. Pass teh full path of the input image.
img = cv2.imread('interior.jpg')
Define translation matrix M. Here we take (tx, ty) = (100, 50) i.e. translation in the right direction is 100 pixels and translation in down direction is 50 pixels.
M = np.float32([[1,0,100],[0,1,50]])
Perform the translation on the input image using the above defined translation matrix.
img = cv2.warpAffine(img,M,(w,h))
Display the translated image.
cv2.imshow('Image Translation', img)
cv2.waitKey(0)
cv2.destroyAllWindows()
Example 1
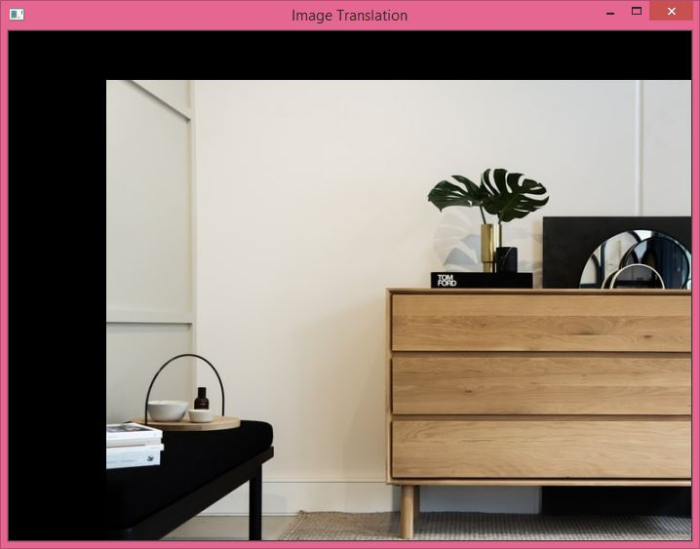
In this program, we will translate the input image 100px in right horizontally and 50px bottom vertically.
# import required libraries
import cv2
import numpy as np

# read the input image
img = cv2.imread('interior.jpg')

# access the height and width of image
height,width, _ = img.shape

# define the translation matrix
M = np.float32([[1,0,100],[0,1,50]])

# perform the translation
img = cv2.warpAffine(img,M,(width,height))

# display the translated image
cv2.imshow('Image Translation', img)
cv2.waitKey(0)
cv2.destroyAllWindows()
Output
When you run the above program, it will produce the following output window.
Example 2
In this program, we perform four different translations.
import cv2
import numpy as np
import matplotlib.pyplot as plt

img = cv2.imread('interior.jpg')
rows,cols,_ = img.shape

M_left = np.float32([[1,0,-50],[0,1,0]])
M_right = np.float32([[1,0,50],[0,1,0]])
M_top = np.float32([[1,0,0],[0,1,50]])
M_bottom = np.float32([[1,0,0],[0,1,-50]])

img_left = cv2.warpAffine(img,M_left,(cols,rows))
img_right = cv2.warpAffine(img,M_right,(cols,rows))
img_top = cv2.warpAffine(img,M_top,(cols,rows))
img_bottom = cv2.warpAffine(img,M_bottom,(cols,rows))

plt.subplot(221), plt.imshow(img_left), plt.title('Left')
plt.subplot(222), plt.imshow(img_right), plt.title('Right')
plt.subplot(223), plt.imshow(img_top), plt.title('Top')
plt.subplot(224), plt.imshow(img_bottom), plt.title('Bottom')
plt.show()
Output
When you run the above program, it will produce the following output window.
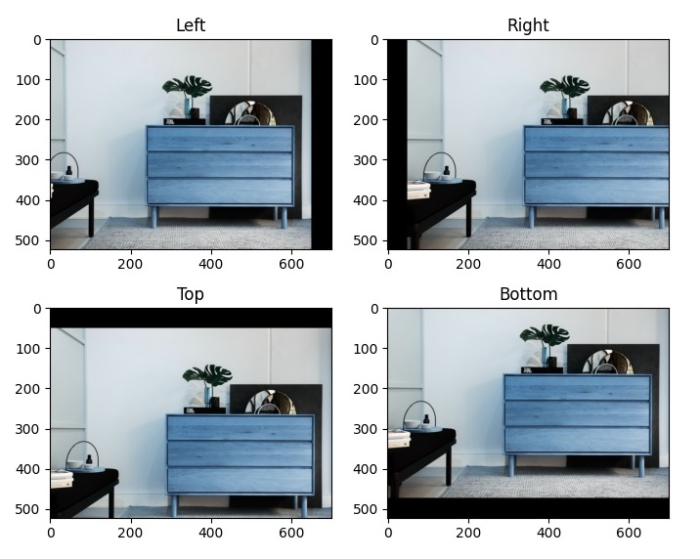
Notice that the first image shows that the image is shifted to the left by 50px, second image shows that the image is shifted to the right by 50px Third image shows that the image is shifted to the top by 50px and the last image shows that the image is shifted to the bottom by 50px

3K+ Views
