
Article Categories
- All Categories
-
 Data Structure
-
 Networking
-
 RDBMS
RDBMS
-
 Operating System
-
 Java
Java
-
 MS Excel
-
 iOS
iOS
-
 HTML
HTML
-
 CSS
CSS
-
 Android
-
 Python
-
 C Programming
-
 C++
C++
-
 C#
C#
-
 MongoDB
-
 MySQL
MySQL
-
 Javascript
-
 PHP
PHP
How to install NumPy for Python 3.3.5 on Mac OSX 10.9?
This article will show you how to install Numpy in Python on MacOS using 3 different methods as below.
- Using Homebrew
- Using Anaconda
- Using pip
What is Numpy
NumPy is gaining popularity and being used in various commercial systems. As a result, it's critical to understand what this library has to offer. NumPy is a powerful Python library due to its syntax, which is compact, powerful, and expressive all at the same time. It allows users to manage data in vectors, matrices, and higher-dimensional arrays, and it is also used in array computing in the industry.
Method 1: Using Homebrew
Homebrew
Homebrew (brew) is a free and open-source package manager that allows users to install apps and software in macOS based on their preferences. It has been recommended because of its ease of use and effectiveness in saving time and effort. Its catchphrase is "the missing package manager for macOS"
Installation
This option is a little more complicated and may require more time invested upfront, but it can save you time and headaches in the long run because you have more control and freedom with how you want to set up Python and other command-line tools.
The first step is to install Homebrew. Currently, this is done with a single terminal command that will walk you through the installation process.
ruby -e "$(curl -fsSL https://raw.githubusercontent.com/Homebrew/install/master/install)"

You will also need to install XCode (free from the App Store) and its associated command line tools. This is why this option takes so long.
After installing Homebrew, you'll have access to a new command in the terminal called brew. This command will install Python 3, NumPy.
# Install Python 3, which Homebrew will manage.
brew install python3
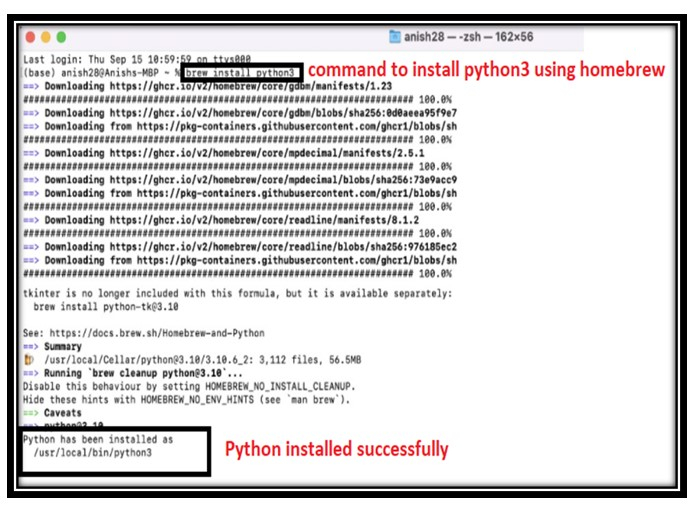
# Installing Numpy using the brew install command
brew install numpy --with-python3

Checking whether the numpy is installed or not.
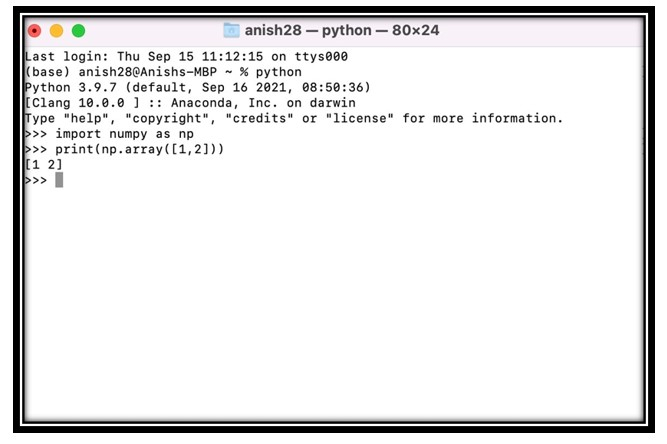
Then you're all set! This option grants you access to powerful tools such as pip and brew. It means that in the future if you want to install a new Python package, you should be able to do so with pip install
See the Homebrew and Python wiki page for more information.
Method 2: Using Anaconda
Anaconda
languages that aims to simplify package management and deployment. Anaconda's package management system, conda, manages package versions by analyzing the current environment before executing an installation to avoid disrupting other frameworks and packages.
You can download and install it by clicking here.
Once installed, you should be able to run Numpy and Matplotlib-based Python code. You should be able to open a terminal and type pip install if you need a new Python package. Some command-line tools and libraries are configured to install with conda install, but conda does not have nearly as many packages as the brew. But that may not be a big deal depending on what you end up using in the future!
macOS graphic Installation
Download the graphical macOS installer for the Python version you want.
To begin the installation, double-click the downloaded file and then click Continue.
On the Introduction, Read Me, and License screens, follow the prompts.
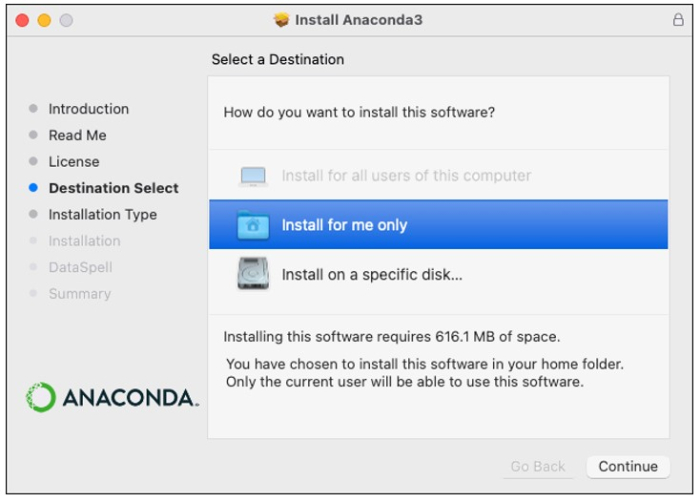
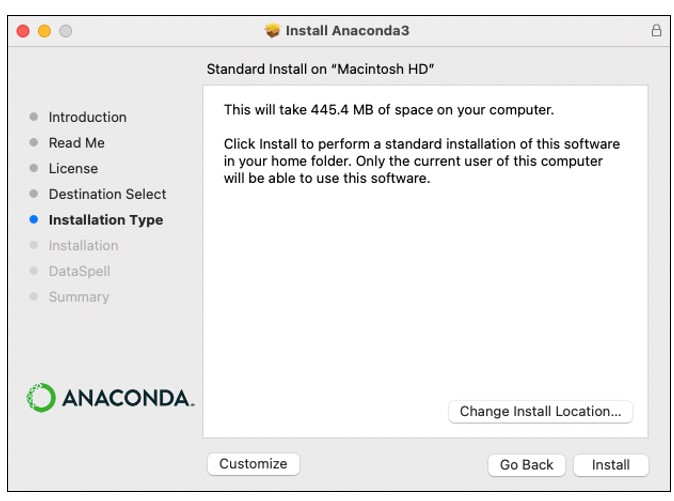
To install Anaconda Distribution for all users or on a specific disc, click Change Install Location. This is not advised. Install is the default (and recommended) option for me. Return to Installation Type by clicking Continue.
Note
If the message "You cannot install Anaconda in this location," appears, reselect Install for me only.
Click Install to install Anaconda in your user directory's opt folder (recommended).
When the installation is finished, click Continue.
Optional: Click https://www.anaconda.com/dataspell to install DataSpell for Anaconda.
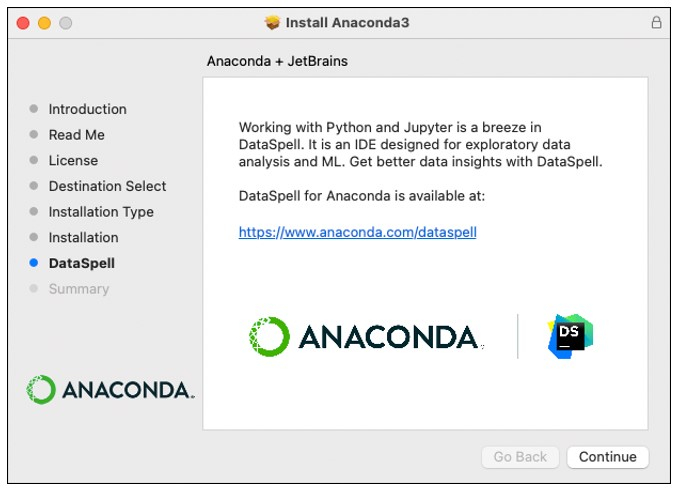
Click Continue to proceed without Dataspell.
After a successful installation, the following screen appears ?

Check your installation by clicking here
Command line installation
If you prefer to use a terminal window, use this method.
Download the command-line version of the macOS installer for your system in your browser.
(Recommended) Using SHA-256, check the installer's data integrity. See Cryptographic hash validation for more information on hash verification.
Start a terminal and type the following ?
vikram -a 256 /PATH/FILENAME
# Replace /PATH/FILENAME with your installation's path and filename.
Python 3.7 or 2.7 installation ?
Enter the following for Python 3.7 ?
# Include the bash command regardless of whether or not you are using the Bash shell
bash ~/Downloads/Anaconda3-2020.05-MacOSX-x86_64.sh
# Replace ~/Downloads with your actual path
# Replace the .sh file name with the name of the file you downloaded
For Python 2.7, launch the Terminal.app or iTerm2 terminal application and type
# Include the bash command regardless of whether or not you are using the Bash shell
bash ~/Downloads/Anaconda2-2019.10-MacOSX-x86_64.sh
# Replace ~/Downloads with your actual path
# Replace the .sh file name with the name of the file you downloaded
Enter to read the license agreement. Then, to scroll, press and hold Enter.
To accept the license agreement, enter "yes".
Enter to accept the default installation directory, CTRL+C to cancel the installation, or another file path to specify an alternative installation directory. When you accept the default installation location, the installer displays PREFIX=/home/anaconda<2/3> and proceeds with the installation. It may take a few minutes to finish.
Note
Anaconda recommends that you use the default installation location. For the Anaconda/Miniconda installation, do not use the /usr path.
The installer prompts you to choose whether to run conda init to initialize Anaconda Distribution. I recommend typing "yes."If you enter "no," conda will make no changes to your shell scripts. After the installation is complete, run source PATH-TO-CONDA/bin/activate followed by conda init to initialize conda.
Note
The new default shell for macOS Catalina is zsh. After completing the installation with a zsh shell, run source <path to conda>/bin/activate, followed by conda init zsh
The installer finishes and displays, "Thank you for installing Anaconda<2/3>!"
Optional: The installer describes the Anaconda-JetBrains partnership and provides a link to install Dataspell for Anaconda at https://www.anaconda.com/dataspell.
Close and re-open your terminal window to make the installation take effect, or type source /.bashrc to refresh the terminal.
You can also choose whether your shell opens with the base environment activated or not.
# The base environment is activated by default
conda config --set auto_activate_base True

# The base environment is not activated by default
conda config --set auto_activate_base False

# The above commands only work if conda init has been run first
# conda init is available in conda versions 4.6.12 and later
Verify your installation by clicking here
Note
If you install multiple versions of Anaconda, the system defaults to the most recent version as long as the default install path is not changed.
Method 3: Using Pip
The simplest method is to use pip (http://en.wikipedia.org/wiki/Pip (package manager)), which is a package manager for Python packages similar to apt on Ubuntu or Homebrew on Mac (which I would also recommend you get but is not exactly relevant in this situation). Pip will provide you with a list of Python packages from which you can search and install, and pip will handle the configuration and updating of these packages.
Pip comes with Python by default but is not installed; however, installing pip is very simple; see How do I install pip on macOS or OS X? Simply run sudo easy install pip to install pip (this assumes you already have Python installed on your system; if you don't, install it before running this command). Then, using sudo pip install numpy, you can install numpy, which will install the package numpy. You can also use pip to search for packages by using pip search, which searches through a list of Python packages.
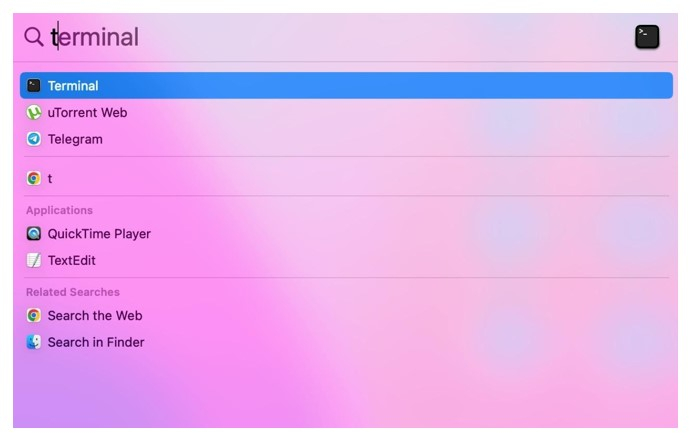
Step 1 ? To open Spotlight search, press command(?) + Space Bar. Enter Terminal and hit enter.
Step 2 ? Use the pip command below in the terminal to install the NumPy package.
pip install numpy
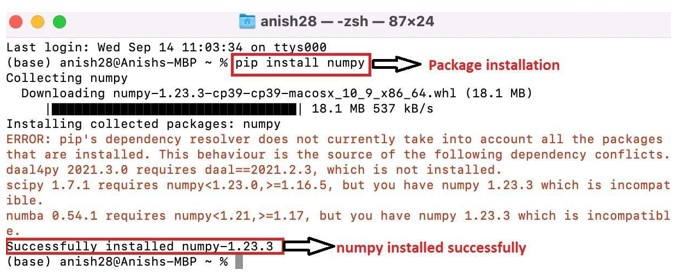
Numpy was Installed successfully.
Conclusion
We learned how to install NumPy for Python 3.3.5 on Mac OSX 10.9 in this article. using the three distinct methods We also learned how these softwares can be used for a variety of other tasks.

1K+ Views
