
Article Categories
- All Categories
-
 Data Structure
-
 Networking
-
 RDBMS
RDBMS
-
 Operating System
-
 Java
Java
-
 MS Excel
-
 iOS
iOS
-
 HTML
HTML
-
 CSS
CSS
-
 Android
-
 Python
-
 C Programming
-
 C++
C++
-
 C#
C#
-
 MongoDB
-
 MySQL
MySQL
-
 Javascript
-
 PHP
PHP
-
 Economics & Finance
How to Create and Fill New Custom Lists Quickly in Excel
With the help of the robust spreadsheet programme Excel, you can easily organise and work with data. Making custom lists is one of its useful features, which may help you enter data more quickly and with less effort. This tutorial will walk you through the steps involved in making custom lists in Excel and using them to quickly fill fields. Custom lists can be a game-changer whether you routinely work with a particular piece of data or need to enter repetitious information.
You will have a firm grasp on how to create, manage, and utilise custom lists in Excel in order to expedite your data input duties at the end of this session. So let's get started and discover the potential of Excel's custom lists!
Create and Fill New Custom Lists Quickly
Here we can create a new list by editing the Excel options. So let us see a simple process to know how you can create and fill new custom lists quickly in Excel.
Step 1
Consider any Excel sheet. First, click on File and select Options.
File > Options.
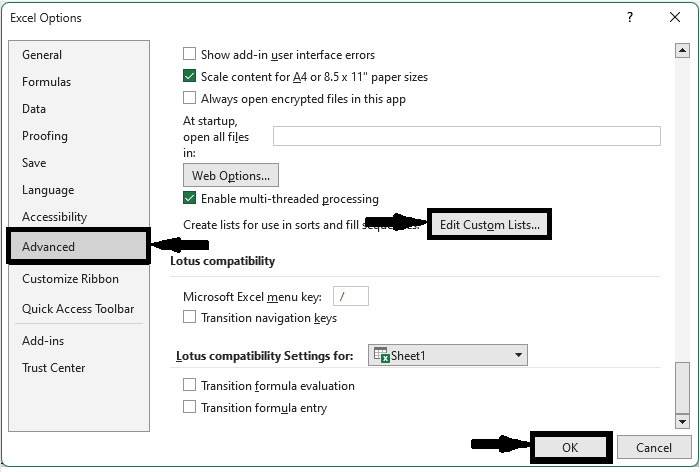
Step 2
Then click on Advanced and click on Edit Customs Lists under General.
Advanced > Edit Customs Lists.
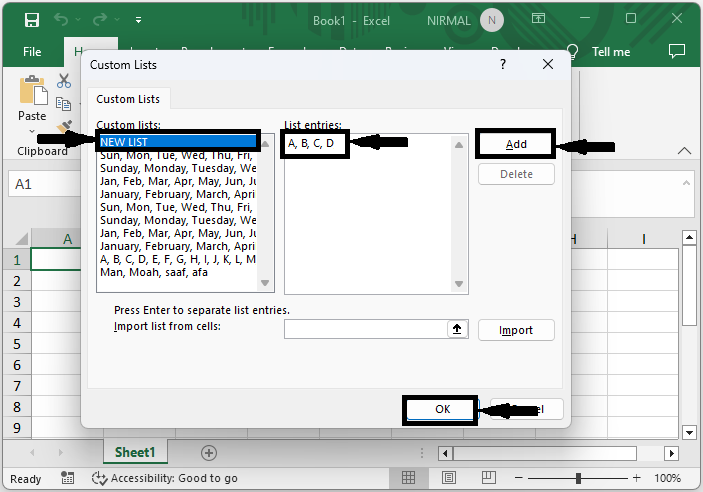
Step 3
Then click on New List, enter the List values, and click Add. Then click Ok and Ok to complete the task.
New List > List Values > Add > Ok > Ok.
Then, to use this list, enter the first value in the cell and use the auto-fill handle. This is how you can quickly create and fill out new custom lists in Excel.
Conclusion
In this tutorial, we have used a simple example to demonstrate how you can quickly create and fill out new custom lists in Excel to highlight a particular set of data.

332 Views
