
Article Categories
- All Categories
-
 Data Structure
-
 Networking
-
 RDBMS
RDBMS
-
 Operating System
-
 Java
Java
-
 MS Excel
-
 iOS
iOS
-
 HTML
HTML
-
 CSS
CSS
-
 Android
-
 Python
-
 C Programming
-
 C++
C++
-
 C#
C#
-
 MongoDB
-
 MySQL
MySQL
-
 Javascript
-
 PHP
PHP
How to change notification background colour in Android?
This example demonstrate about How can I marquee the text content in Android Notification.
Step 1 − Create a new project in Android Studio, go to File ⇒ New Project and fill all required details to create a new project.
Step 2 − Add the following code to res/layout/activity_main.xml.
<? xml version = "1.0" encoding = "utf-8" ?>
<RelativeLayout xmlns: android = "http://schemas.android.com/apk/res/android"
   xmlns: tools = "http://schemas.android.com/tools"
   android :layout_width = "match_parent"
   android :layout_height = "match_parent"
   tools :context = ".MainActivity" >
   <Button
      android :layout_width = "match_parent"
      android :layout_height = "wrap_content"
      android :layout_centerInParent = "true"
      android :layout_margin = "16dp"
      android :onClick = "createNotification"
      android :text = "create notification" />
</RelativeLayout>
Step 3 − Add the following code to res/layout/custom_notification_layout.xml.
<? xml version = "1.0" encoding = "utf-8" ?>
<RelativeLayout xmlns: android = "http://schemas.android.com/apk/res/android"
   android :id = "@+id/layout"
   android :layout_width = "fill_parent"
   android :layout_height = "64dp"
   android :background = "@color/colorAccent"
   android :padding = "10dp" >
   <ImageView
      android :id = "@+id/image"
      android :layout_width = "wrap_content"
      android :layout_height = "fill_parent"
      android :layout_alignParentStart = "true"
      android :layout_marginEnd = "10dp"
      android :contentDescription = "@string/app_name"
      android :src = "@mipmap/ic_launcher" />
   <TextView
      android :id = "@+id/title"
      android :layout_width = "wrap_content"
      android :layout_height = "wrap_content"
      android :layout_toEndOf = "@id/image"
      android :text = "Testing"
      android :textColor = "#000"
      android :textSize = "13sp" />
   <TextView
      android :id = "@+id/text"
      android :layout_width = "wrap_content"
      android :layout_height = "wrap_content"
      android :layout_below = "@id/title"
      android :layout_toEndOf = "@id/image"
      android :ellipsize = "marquee"
      android :singleLine = "true"
      android :text = "Lorem Ipsum is simply dummy text of the printing and typesetting
         industry. Lorem Ipsum has been the industry's standard dummy text ever since the
         1500s, when an unknown printer took a galley of type and scrambled it to make a type
         specimen book. It has survived not only five centuries, but also the leap into
         electronic typesetting, remaining essentially unchanged. It was popularised in the
         1960s with the release of Letraset sheets containing Lorem Ipsum passages, and more
         recently with desktop publishing software like Aldus PageMaker including versions of
         Lorem Ipsum. "
   android :textColor = "#000"
   android :textSize = "13sp" />
</RelativeLayout>
Step 4 − Add the following code to src/MainActivity.
package app.tutorialspoint.com.notifyme ;
import android.app.NotificationChannel ;
import android.app.NotificationManager ;
import android.os.Bundle ;
import android.support.v4.app.NotificationCompat ;
import android.support.v7.app.AppCompatActivity ;
import android.view.View ;
import android.widget.RemoteViews ;
public class MainActivity extends AppCompatActivity {
   public static final String NOTIFICATION_CHANNEL_ID = "10001" ;
   private final static String default_notification_channel_id = "default" ;
   @Override
   protected void onCreate (Bundle savedInstanceState) {
      super .onCreate(savedInstanceState) ;
      setContentView(R.layout. activity_main ) ;
   }
   public void createNotification (View view) {
      RemoteViews contentView = new RemoteViews(getPackageName() , R.layout. custom_notification_layout ) ;
      NotificationManager mNotificationManager = (NotificationManager) getSystemService( NOTIFICATION_SERVICE ) ;
      NotificationCompat.Builder mBuilder = new NotificationCompat.Builder(MainActivity. this, default_notification_channel_id ) ;
      mBuilder.setContent(contentView) ;
      mBuilder.setSmallIcon(R.drawable. ic_launcher_foreground ) ;
      mBuilder.setAutoCancel( true ) ;
      if (android.os.Build.VERSION. SDK_INT > = android.os.Build.VERSION_CODES. O ) {
         int importance = NotificationManager. IMPORTANCE_HIGH ;
         NotificationChannel notificationChannel = new NotificationChannel( NOTIFICATION_CHANNEL_ID , "NOTIFICATION_CHANNEL_NAME" , importance) ;
         mBuilder.setChannelId( NOTIFICATION_CHANNEL_ID ) ;
         assert mNotificationManager != null;
         mNotificationManager.createNotificationChannel(notificationChannel) ;
      }
      assert mNotificationManager != null;
      mNotificationManager.notify(( int ) System. currentTimeMillis () ,
      mBuilder.build()) ;
   }
}
Step 5 − Add the following code to AndroidManifest.xml
<? xml version = "1.0" encoding = "utf-8" ?>
<manifest xmlns: android = "http://schemas.android.com/apk/res/android"
   package = "app.tutorialspoint.com.notifyme" >
   <uses-permission android :name = "android.permission.VIBRATE" />
   <application
      android :allowBackup = "true"
      android :icon = "@mipmap/ic_launcher"
      android :label = "@string/app_name"
      android :roundIcon = "@mipmap/ic_launcher_round"
      android :supportsRtl = "true"
      android :theme = "@style/AppTheme" >
      <activity android :name = ".MainActivity" >
         <intent-filter>
            <action android :name = "android.intent.action.MAIN" />
            <category android :name = "android.intent.category.LAUNCHER" />
         </intent-filter>
      </activity>
   </application>
</manifest>
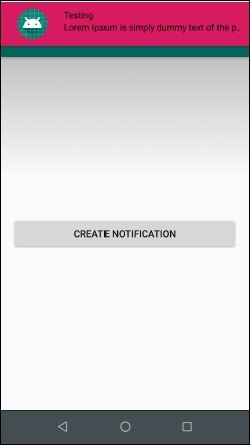
Let's try to run your application. I assume you have connected your actual Android Mobile device with your computer. To run the app from android studio, open one of your project's activity files and click Run ![]() icon from the toolbar. Select your mobile device as an option and then check your mobile device which will display your default screen −
icon from the toolbar. Select your mobile device as an option and then check your mobile device which will display your default screen −
Click here to download the project code

2K+ Views
