
 Data Structure
 Networking
 RDBMS
RDBMS Operating System
 Java
Java MS Excel
 iOS
iOS HTML
HTML CSS
CSS Android
 Python
 C Programming
 C++
C++ C#
C# MongoDB
 MySQL
MySQL Javascript
 PHP
PHP
- Selected Reading
- UPSC IAS Exams Notes
- Developer's Best Practices
- Questions and Answers
- Effective Resume Writing
- HR Interview Questions
- Computer Glossary
- Who is Who
How to add constraints programmatically using Swift
The goal of this article is to explain how you can add constraints programmatically in the Swift language.
To programmatically add constraints in Swift, you can use the NSLayoutConstraint class to define the constraints you want to add.
Concepts That Will Be Used To Add Constraints Are The Following
The translatesAutoresizingMaskIntoConstraints is a property of UIView in the UIKit framework. It is a boolean value that determines whether the view's autoresizingMask properties are translated into Auto Layout constraints. When translatesAutoresizingMaskIntoConstraints is set to NO, the autoresizingMask is ignored and the view is resized accrding to any constraints that have been set up using the Auto Layout system.
A widthAnchor is a property of UIView in the UIKit framework that refers to a layout anchor representing the width of the view.
A heightAnchor is a property of UIView in the UIKit framework that refers to a layout anchor representing the height of the view.
A leadingAnchor is a property of UIView in the UIKit framework that refers to a layout anchor representing the leading edge of the view. The leading edge is the left edge of the view for a left-to-right language, or the right edge of the view for a rightto- left language.
A trailingAnchor is a property of UIView in the UIKit framework that refers to a layout anchor representing the trailing edge of the view. The trailing edge is the right edge of the view for a left-to-right language, or the left edge of the view for a right-toleft language.
The constraint(equalTo:) is a method of the NSLayoutAnchor class in the UIKit framework that creates a constraint between two layout anchors. The constraint specifies that the layout attribute of one view should be equal to the layout attribute of another view.
Here's an example of how you can add a constraint to a view in Swift
In this example, you will learn how to add subviews programmatically step by step. Let's start.
Basic setup
In this step, you will create a basic login screen with the initial setup like the below
import UIKit
class RegisterViewController: UIViewController {
   override func viewDidLoad() {
      super.viewDidLoad()
      setupUIComponents()
   }
   private func setupUIComponents() {
      view.backgroundColor = .white
      // add all views here
   }
}
Explanation
In the above code, we created a RegisterViewController class to design a basic register screen. Also, in this example, we will learn how to add constraints to UI components to draw a screen.
Profile Image Setup
In this section, we will set up a profile image view.
// profile image view customization
private let profileImageView: UIImageView = {
   let imageView = UIImageView()
   imageView.contentMode = .scaleAspectFill
   imageView.layer.cornerRadius = 16
   imageView.layer.masksToBounds = true
   imageView.backgroundColor = UIColor(white: 0, alpha: 0.1)
   return imageView
}()
private func setupUIComponents() {
   view.backgroundColor = .white

   // adding constraints to profileImageView
   view.addSubview(profileImageView)
   profileImageView.translatesAutoresizingMaskIntoConstraints = false
   profileImageView.widthAnchor.constraint(equalToConstant: 150).isActive = true
   profileImageView.heightAnchor.constraint(equalToConstant: 150).isActive = true
   profileImageView.centerXAnchor.constraint(equalTo: view.centerXAnchor).isActive = true
   profileImageView.topAnchor.constraint(equalTo: view.topAnchor, constant: 100).isActive = true
}
In the above example, you have initialized and customized the profile image view. After that add the constraint to display it on the screen.
Email TextField Setup
In this section, we will set up an email text field.
private let emailTextField: UITextField = {
   let textField = UITextField()
   textField.keyboardType = .emailAddress
   textField.layer.cornerRadius = 8
   textField.layer.masksToBounds = true
   textField.layer.borderWidth = 1.0
   textField.layer.borderColor = UIColor(white: 0, alpha:0.3).cgColor
   textField.placeholder = "Email Address"
   textField.textAlignment = .center
   return textField
}()
private func setupUIComponents() {
   view.backgroundColor = .white

   // adding constraints to email text field
   view.addSubview(emailTextField)
   emailTextField.translatesAutoresizingMaskIntoConstraints = false
   emailTextField.leadingAnchor.constraint(equalTo:view.leadingAnchor, constant: 30).isActive = true
   emailTextField.trailingAnchor.constraint(equalTo:view.trailingAnchor, constant: -30).isActive = true
   emailTextField.heightAnchor.constraint(equalToConstant:50).isActive = true
   emailTextField.topAnchor.constraint(equalTo:profileImageView.bottomAnchor, constant: 60).isActive = true
}
In the above example, you have initialized and customized a text field to enter the email address. After that add the constraint to display it on the screen.
Password TextField Setup
In this section, we will set up a password text field.
private let passwordTextField: UITextField = {
   let textField = UITextField()
   textField.layer.cornerRadius = 8
   textField.layer.masksToBounds = true
   textField.isSecureTextEntry = true
   textField.layer.borderWidth = 1.0
   textField.layer.borderColor = UIColor(white: 0, alpha:
   0.3).cgColor
   textField.placeholder = "Password"
   textField.textAlignment = .center
   return textField
}()
private func setupUIComponents() {
   view.backgroundColor = .white

   // adding constraints to passwordTextField
   view.addSubview(passwordTextField)
   passwordTextField.translatesAutoresizingMaskIntoConstraints =   false
   passwordTextField.leadingAnchor.constraint(equalTo: view.leadingAnchor, constant: 30).isActive = true
   passwordTextField.trailingAnchor.constraint(equalTo:view.trailingAnchor, constant: -30).isActive = true
   passwordTextField.heightAnchor.constraint(equalToConstant: 50).isActive = true
   passwordTextField.topAnchor.constraint(equalTo: emailTextField.bottomAnchor, constant: 30).isActive = true
}
In the above example, you have initialized and customized a text field to enter the password. After that add the constraint to display it on the screen.
Register Button Setup
In this section, we will set up a register button.
private let registerButton: UIButton = {
   let button = UIButton(type: .system)
   button.backgroundColor = .darkGray
   button.setTitle("Register", for: .normal)
   button.setTitleColor(.white, for: .normal)
   button.layer.cornerRadius = 8
   button.layer.masksToBounds = true
   return button
}()
private func setupUIComponents() {
   view.backgroundColor = .white

   // adding constraints to register button
   view.addSubview(registerButton)
   registerButton.translatesAutoresizingMaskIntoConstraints = false
   registerButton.leadingAnchor.constraint(equalTo: view.leadingAnchor, constant: 30).isActive = true
   registerButton.trailingAnchor.constraint(equalTo: view.trailingAnchor, constant: -30).isActive = true
   registerButton.heightAnchor.constraint(equalToConstant: 50).isActive = true
   registerButton.topAnchor.constraint(equalTo: passwordTextField.bottomAnchor, constant: 50).isActive = true
}
In the above example, you customized a button for the register feature.
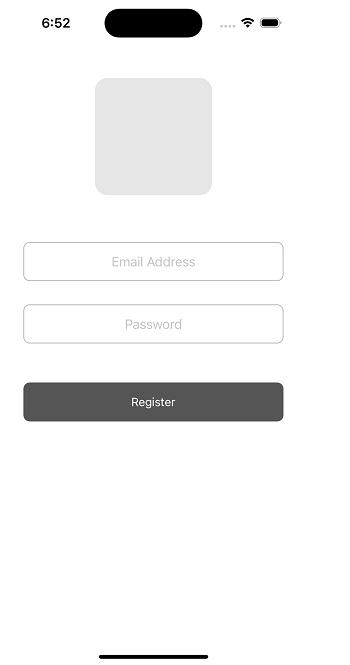
Final Output
Some Points to Note Here
A view should be added to the superview before adding constraints.
The translatesAutoresizingMaskIntoConstraints should be false in case of adding constraints programmatically.
Add dependent constraints carefully otherwise the view might not be visible properly on the screen.
Conclusion
Programmatically adding constraints is really fun and easy, but be careful while adding constraints. Dependency constraints should be applied carefully. You can apply different types of constraints like width, height, leading, trailing, top, and bottom.

13K+ Views
