
Article Categories
- All Categories
-
 Data Structure
-
 Networking
-
 RDBMS
RDBMS
-
 Operating System
-
 Java
Java
-
 MS Excel
-
 iOS
iOS
-
 HTML
HTML
-
 CSS
CSS
-
 Android
-
 Python
-
 C Programming
-
 C++
C++
-
 C#
C#
-
 MongoDB
-
 MySQL
MySQL
-
 Javascript
-
 PHP
PHP
-
 Economics & Finance
How to add a column to a Tkinter TreeView widget?
Tkinter TreeView widget is used to present data in a hierarchical manner in the form of rows and columns. To create a Treeview widget, you have to first create a constructor of Treeview(master, column, show='headings') widget. Here, you can specify the list of columns and pass the value to the column parameter that you want to include in the table.
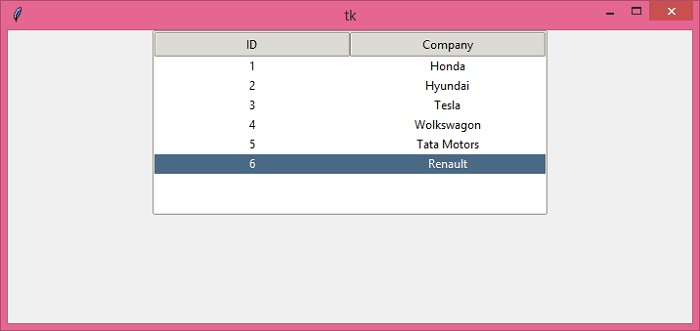
The indexing of data in the Treeview widget starts from 0. Therefore, to avoid counting the first column, we need to use the show=heading parameter. Let us create an application to show a table with two columns "ID" and "Company" of car manufacturers. For each column, there will be some data that can be inserted by using the insert() method.
Example
# Import the required libraries
from tkinter import *
from tkinter import ttk

# Create an instance of tkinter frame
win = Tk()

# Set the size of the tkinter window
win.geometry("700x300")

# Create an instance of Style widget
style = ttk.Style()
style.theme_use('clam')

# Add a Treeview widget
tree = ttk.Treeview(win, column=("c1", "c2"), show='headings', height=8)
tree.column("# 1", anchor=CENTER)
tree.heading("# 1", text="ID")
tree.column("# 2", anchor=CENTER)
tree.heading("# 2", text="Company")

# Insert the data in Treeview widget
tree.insert('', 'end', text="1", values=('1', 'Honda'))
tree.insert('', 'end', text="2", values=('2', 'Hyundai'))
tree.insert('', 'end', text="3", values=('3', 'Tesla'))
tree.insert('', 'end', text="4", values=('4', 'Wolkswagon'))
tree.insert('', 'end', text="5", values=('5', 'Tata Motors'))
tree.insert('', 'end', text="6", values=('6', 'Renault'))

tree.pack()

win.mainloop()
Output
Running the above code will display a Treeview widget with a list of vehicle manufacturers.
You can also modify/replace the row and column values by using the insert() method.

4K+ Views
