- Arduino - Home
- Arduino - Overview
- Arduino - Board Description
- Arduino - Installation
- Arduino - Program Structure
- Arduino - Data Types
- Arduino - Variables & Constants
- Arduino - Operators
- Arduino - Control Statements
- Arduino - Loops
- Arduino - Functions
- Arduino - Strings
- Arduino - String Object
- Arduino - Time
- Arduino - Arrays
- Arduino Function Libraries
- Arduino - I/O Functions
- Arduino - Advanced I/O Function
- Arduino - Character Functions
- Arduino - Math Library
- Arduino - Trigonometric Functions
- Arduino Advanced
- Arduino - Due & Zero
- Arduino - Pulse Width Modulation
- Arduino - Random Numbers
- Arduino - Interrupts
- Arduino - Communication
- Arduino - Inter Integrated Circuit
- Arduino - Serial Peripheral Interface
- Arduino Projects
- Arduino - Blinking LED
- Arduino - Fading LED
- Arduino - Reading Analog Voltage
- Arduino - LED Bar Graph
- Arduino - Keyboard Logout
- Arduino - Keyboard Message
- Arduino - Mouse Button Control
- Arduino - Keyboard Serial
- Arduino Sensors
- Arduino - Humidity Sensor
- Arduino - Temperature Sensor
- Arduino - Water Detector / Sensor
- Arduino - PIR Sensor
- Arduino - Ultrasonic Sensor
- Arduino - Connecting Switch
- Motor Control
- Arduino - DC Motor
- Arduino - Servo Motor
- Arduino - Stepper Motor
- Arduino And Sound
- Arduino - Tone Library
- Arduino - Wireless Communication
- Arduino - Network Communication
Arduino - Multi-Dimensional Arrays
Arrays with two dimensions (i.e., subscripts) often represent tables of values consisting of information arranged in rows and columns.
Following are the key features of multidimensional arrays −
To identify a particular table element, we must specify two subscripts.
By convention, the first identifies the elements row and the second identifies the elements column.
Arrays that require two subscripts to identify a particular element are called two-dimensional arrays or 2-D arrays.
Arrays with two or more dimensions are known as multidimensional arrays and can have more than two dimensions.
The following figure illustrates a two-dimensional array, a. The array contains three rows and four columns, so it is a 3-by-4 array. In general, an array with m rows and n columns is called an m-by-n array.
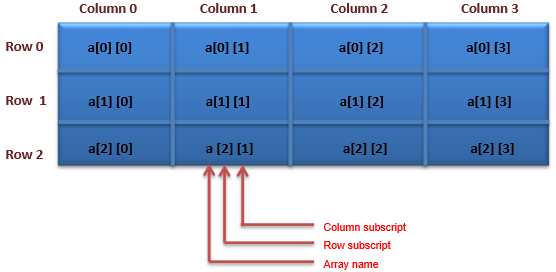
Every element in array a is identified by an element name of the form a[i][j]. Here, a is the name of the array, and i and j are the subscripts that uniquely identify each element in a. Notice that the names of the elements in row 0 all have a first subscript of 0; the names of the elements in column 3 all have a second subscript of 3.
A multidimensional array can be initialized in its declaration much like a one-dimensional array. For example, a two-dimensional array b with values 1 and 2 in its row 0 elements and values 3 and 4 in its row 1 elements could be declared and initialized as follows −
int b[ 2 ][ 2 ] = { { 1, 2 }, { 3, 4 } };
The values are grouped by row in braces. Therefore, 1 and 2 initialize b[0][0] and b[0][1], respectively, and 3 and 4 initialize b[1][0] and b[1][1], respectively. If there are not enough initializers for a given row, the remaining elements of that row are initialized to 0. Thus, the following declaration initializes b[0][0] to 1, b[0][1] to 0, b[1][0] to 3 and b[1][1] to 4.
int b[ 2 ][ 2 ] = { { 1 }, { 3, 4 } };
Example
Here is an example that demonstrates initializing two-dimensional arrays in declarations.
Lines ac declare three arrays, each with two rows and three columns.
The declaration of array1 (line a) provides six initializers in the two sub lists. The first sub list initializes row 0 of the array to the values 1, 2 and 3; the second sub list initializes row 1 of the array to the values 4, 5 and 6.
If the braces around each sub-list are removed from the array1 initializer list, the compiler initializes the elements of row 0 followed by the elements of row 1, yielding the same result.
The declaration of array2 (line b) provides only five initializers.
The initializers are assigned to row 0, then row 1. Any elements that do not have an explicit initializer are initialized to zero, so array2[1][2] is initialized to zero.
The declaration of array3 (line c) provides three initializers in two sub lists.
The sub list for row 0 explicitly initializes the first two elements of row 0 to 1 and 2; the third element is implicitly initialized to zero.
The sub list for row 1 explicitly initializes the first element to 4 and implicitly initializes the last two elements to zero.
The program calls function printArray to output each arrays elements. Notice that the function prototype (line k) specify the parameter const int a[][columns].
When a function receives a one-dimensional array as an argument, the array brackets are empty in the functions parameter list.
The size of a two-dimensional arrays first dimension (i.e., the number of rows) is not required either, but all the subsequent dimension sizes are required. The compiler uses these sizes to determine the locations in memory of elements in multidimensional arrays.
All array elements are stored consecutively in memory, regardless of the number of dimensions. In a two-dimensional array, row 0 is stored in memory followed by row 1.
Example
void printArray ( const int [][ 3 ] ); // prototype
const int rows = 2;
const int columns = 3;
int array1[ rows ][ columns ] = { { 1, 2, 3 }, { 4, 5, 6 } };
int array2[ rows ][ columns ] = { 1, 2, 3, 4, 5 };
int array3[ rows ][ columns ] = { { 1, 2 }, { 4 } };

void setup () {

}
void loop () {
   Serial.print ("Values in array1 by row are: ") ;
   Serial.print (\r ) ;
   printArray(array1) ;
   Serial.print ("Values in array2 by row are: ") ;
   Serial.print (\r ) ;
   printArray(array2) ;
   Serial.print ("Values in array3 by row are: ") ;
   Serial.print (\r ) ;
   printArray(array3) ;
}

// output array with two rows and three columns

void printArray( const int a[][ columns ] ) {
   // loop through array's rows
   for ( int i = 0; i < rows; ++i ) {
      // loop through columns of current row
      for ( int j = 0; j < columns; ++j )
      Serial.print (a[ i ][ j ] );
      Serial.print (\r ) ; // start new line of output
   }
// end outer for
}

// end function printArray
Result
Values in array1 by row are:
1 2 3
4 5 6
Values in array2 by row are:
1 2 3
4 5 0
Values in array3 by row are:
1 2 0
4 0 0
Note − Each row is a one-dimensional array. To locate an element in a particular row, the function must know exactly how many elements are in each row so it can skip the proper number of memory locations when accessing the array. Thus, when accessing a[1][2], the function knows to skip row 0s three elements in memory to get to row 1. Then, the function accesses element 2 of that row. Many common array manipulations use FOR statements.
For example, the following FOR statement sets all the elements in row 2 of array a.
for ( int column = 0; column < 4; ++column )
   a[ 2 ][ column ] = 0;
The FOR statement varies only the second subscript (i.e., the column subscript). The preceding FOR statement is equivalent to the following assignment statements −
a[ 2 ][ 0 ] = 0;
a[ 2 ][ 1 ] = 0;
a[ 2 ][ 2 ] = 0;
a[ 2 ][ 3 ] = 0;
The following Nested FOR statement determines the total of all the elements in array a −
total = 0;
for ( int row = 0; row < 3; ++row )
for ( int column = 0; column < 4; ++column )
total += a[ row ][ column ];
The FOR statement totals the elements of the array one row at a time. The outer FOR statement begins by setting the row (i.e., the row subscript) to 0. Therefore, the elements of row 0 may be totaled by the inner FOR statement.
The outer FOR statement then increments row to 1, so that, the elements of row 1 can be totaled. Then, the outer FOR statement increments row to 2, so that, the elements of row 2 can be totaled. When the nested FOR statement terminates, the total contains the sum of all the array elements.